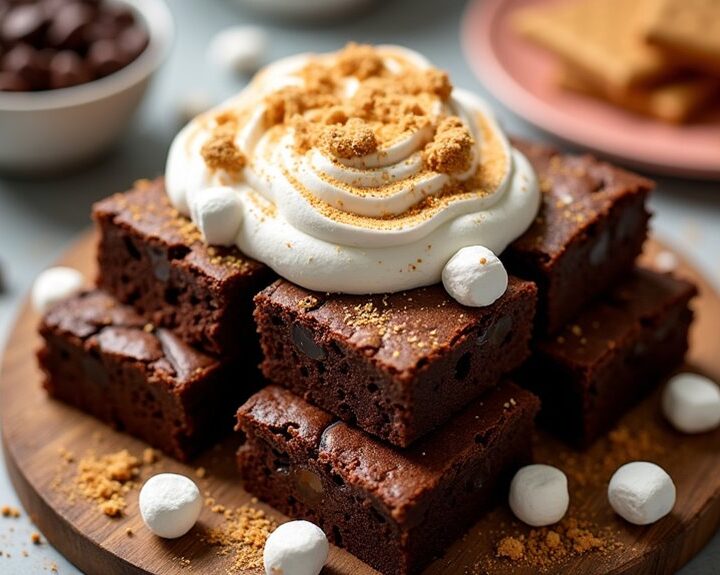
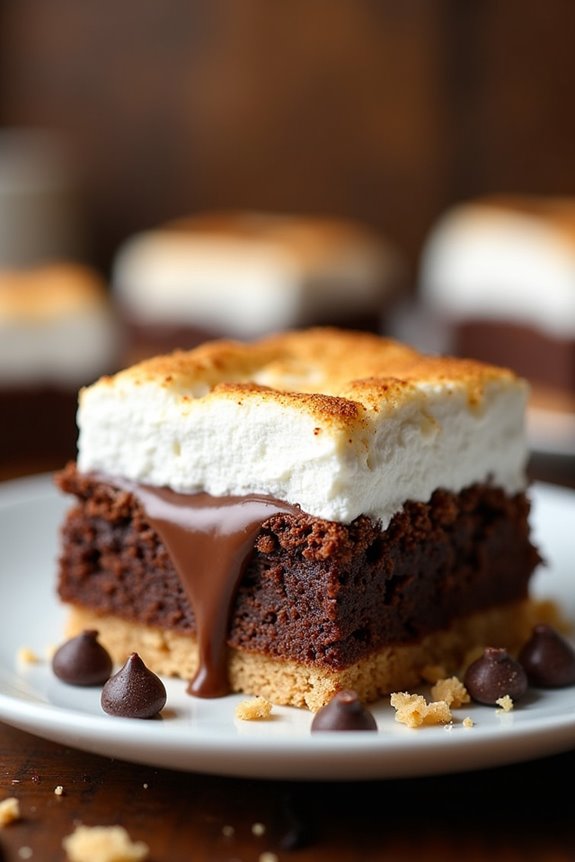
I’ve got to tell you about these Decadent S’mores Brownies with Vanilla Bean Marshmallow. Imagine biting into layers of a crunchy graham cracker crust, fudgy brownie, and that dreamy marshmallow topping. Sounds heavenly, right? Trust me, the kitchen will smell divine, and your friends will think you’re a dessert wizard. And if you’re like me, you’ll probably end up with brownie on your face while trying to taste it all. Curious about how to whip this up?
Why You’ll Love This Recipe
When you take a bite of these S’mores Brownies, you might just find yourself questioning all your previous dessert choices.
Seriously, the rich, fudgy brownie base melds seamlessly with the crunchy graham cracker crust, creating a perfect textural delight.
And that vanilla bean marshmallow? It’s like a fluffy cloud of sweetness that takes everything up a notch.
Honestly, who needs a campfire? The gooey marshmallow makes these s’mores brownies with vanilla bean marshmallow a showstopper at any gathering.
Plus, the subtle speckles of vanilla bean create a beautiful contrast on top, making them as pretty as they’re delicious.
I promise, one slice won’t be enough.
Equipment List
Getting ready to whip up these S’mores Brownies means you’ll want to gather your gear first. Trust me, it makes the whole process smoother—like chocolate melting in your mouth.
You’ll need an 8×8-inch baking pan, preferably lined with parchment for easy brownie removal. A medium saucepan is essential for melting that delightful chocolate and butter. Don’t forget a mixing bowl—preferably one that’s not too wobbly.
A whisk is your best friend for stirring things up, and an electric mixer is key for that marshmallow fluff. I always keep a spatula handy, too; it’s perfect for scraping every last bit of goodness.
Oh, and if you have a kitchen torch, you might want to grab that for toasting your marshmallow topping. Isn’t cooking all about the right tools? Investing in gourmet kitchen gear can elevate your baking experience, making these brownies a treat to remember.
Our Ingredients
When it comes to whipping up a batch of S’mores Brownies, the right ingredients are your best pals. They’re the building blocks of that gooey, chocolatey goodness topped with fluffy marshmallow that screams comfort food.
Plus, who doesn’t love the nostalgic taste of s’mores? It’s like camping in dessert form, minus the bugs. So, let’s get our shopping list ready. Trust me, once you start gathering these items, the sweet aroma of happiness will practically follow you home.
Here’s what you’ll need:
- 4-5 honey graham cracker sheets (crushed)
- 10 tbsp unsalted butter
- 2/3 + 1/4 cup dark chocolate chips
- 1/2 cup dark brown sugar
- 1/2 cup granulated sugar (plus extra for marshmallow)
- 2 large eggs + 1 large egg yolk
- 2 tsp vanilla extract
- 2/3 cup + 1 tbsp all-purpose flour
- 1/4 cup unsweetened cocoa powder
- 1/4 tsp fine sea salt
- 1 tsp gelatin powder
- 1 1/8 cups granulated sugar (for marshmallow)
- 1/4 cup + 1 tbsp agave or honey
- 1/3 cup water
- 1 tsp vanilla bean paste
Now, let’s chat ingredients for a moment. You might be wondering about the dark chocolate chips—go for a good quality brand. It seriously makes a world of difference in the richness of the brownies.
And while you could use mini marshmallows for that fluffy topping, treating yourself to homemade marshmallow with vanilla bean paste is an upgrade you won’t regret. Those tiny specks of vanilla just elevate the experience like no other.
Don’t skip the gelatin, either; it’s the secret to that marshmallow fluffiness. Trust me, when you take that first bite, you’ll understand why every ingredient matters. So, ready to plunge into the fun part? Let’s get cooking!
Step-by-Step Instructions
Mixing the batter is quick and simple—just follow these easy steps to create a decadent batch of S’mores Brownies topped with fluffy marshmallow goodness. You’ll be savoring these delicious treats in no time, so let’s get started!
1. Prepare the crust**: Preheat your oven to 350°F. Grab 4-5 honey graham cracker sheets and crush them into fine crumbs. In a bowl, mix these crumbs with 10 tablespoons of melted unsalted butter until well combined. Press this mixture firmly into the bottom of a greased pan to create a nice, sturdy crust. Bake it for about** 10 minutes, or until it’s set and slightly golden. (Trust me, this crust is essential for that s’mores experience).
2. Make the brownie batter**: In a medium microwave-safe bowl, melt together 2/3 + 1/4 cup of dark chocolate chips with the remaining 3 tablespoons of unsalted butter until smooth. Stir it well, and then add 1/2 cup of dark brown sugar and 1/2 cup of granulated sugar** to the mix.
Whisk in 2 large eggs and 1 egg yolk, along with 2 teaspoons of vanilla extract until everything is blended beautifully.
3. Add dry ingredients**: Now, in a separate bowl, whisk together 2/3 cup + 1 tablespoon of all-purpose flour, 1/4 cup of unsweetened cocoa powder**, and 1/4 teaspoon of fine sea salt. Gradually fold this dry mixture into the chocolate mixture.
(Don’t overmix the batter—just until combined is perfect, and those lumpy bits are actually your friends).
4. Bake the brownies: Pour the brownie batter over the graham cracker crust evenly. Slide the pan into the oven and bake for 30-35 minutes, or until a toothpick inserted into the center comes out with a few moist crumbs.
Let the brownies cool completely in the pan on a wire rack. (The temptation to dig in right away is real, but patience is key here).
5. Prepare the marshmallow fluff**: While the brownies cool, in a small bowl, dissolve 1 teaspoon of gelatin powder** in 1/3 cup of water. In a saucepan, combine 1 1/8 cups of granulated sugar, 1/4 cup + 1 tablespoon of agave (or honey), and the gelatin mixture.
Bring this over medium heat and stir until the sugar dissolves and the mixture boils lightly. Allow it to boil without stirring for about 1 minute, then remove from heat.
6. Whip the marshmallow: Transfer the syrup into a mixing bowl and whip it up until it’s thick and fluffy. Add 1 teaspoon of vanilla bean paste toward the end—a delightful addition that adds speckles and flavor.
(This is where the magic happens. Watching it transform is almost as satisfying as eating it).
7. Top it off: Spread the fluffy marshmallow mixture evenly over your cooled brownies, making sure to cover every nook and cranny. If you’re feeling adventurous, use a kitchen torch to toast the top until golden brown.
(If you don’t have a torch, a broiler works too, but closely monitor it—nobody wants a scorched marshmallow).
And there you have it—a beautifully layered creation of S’mores Brownies. Once cooled and set, slice them into squares and prepare for a crowd of excited dessert seekers. Using high end cookware set ensures that your baking experience is not only enjoyable but yields perfect results.
Trust me—you’ll be the star of the potluck! Enjoy every gooey, chocolatey bite.
Tips & Variations
There’s something undeniably magical about S’mores Brownies, don’t you think? For the best results, make sure you cool those brownies completely before slathering on the marshmallow — trust me, soggy brownies aren’t the goal.
If you want an extra touch of pizzazz, try using flavored chocolates or even adding some nuts for crunch. Feeling adventurous? You could swap the graham crackers for a cookie crust, or throw in some peanut butter for a twist that’s just crazy enough to work.
And hey, if you’re a marshmallow lover like I am, don’t be shy about using more than the recipe calls for. Life’s too short for skimpy toppings, right?
How to Serve?
Serving S’mores brownies is one of the most satisfying parts of the whole process. Once they’re cool and that marshmallow’s all toasty, I like to slice them up into generous squares.
Honestly, you don’t want to skimp here—these little treats deserve to be showcased. Lay them on a plate that you love, you know, the one with the cute pattern. For that extra wow factor, I sometimes drizzle a little chocolate or caramel sauce on top.
If I’m feeling fancy, a sprinkle of graham cracker crumbs adds a nice touch too. And don’t forget—these brownies are best shared with friends. Because really, who wouldn’t want to plunge into this gooey, decadent delight?
Storage & Reheating Guide
Storing S’mores brownies properly is key if you want to enjoy that gooey goodness longer than a day or two.
First, let them cool completely—trust me, nobody likes a marshmallow volcano. Then, cut them into squares and place them in an airtight container. If you want to take it a step further, I like to layer parchment paper between the squares to prevent sticking.
They’ll last about three days at room temperature. Want to keep them longer? Stash them in the fridge for up to a week or freeze for up to three months. Additionally, consider using a storage method that helps maintain their freshness and texture.
When you’re ready to indulge again, thaw at room temperature. For a warm treat, microwave for just 10-15 seconds. You’ll be back in brownie bliss in no time.
Final Thoughts
When you finally take that first bite of S’mores brownies, it feels like a cozy campfire night wrapped in gooey chocolatey goodness. I mean, really, how can something so simple bring this much joy?
You’ve got the rich brownie, crunchy graham cracker crust, and that dreamy vanilla bean marshmallow on top—pure magic. I’ve been known to make these just to impress my friends, and honestly, it works every time.
They’re a bit of a labor of love, but trust me, it’s worth it. If you’re craving that nostalgic flavor, go ahead and whip these up. You’ll feel like a kitchen superstar, even if you still can’t roast a marshmallow without it catching fire. Enjoy every bite!