When it comes to cooking, nothing beats the satisfaction of a well-prepared savory pan-fried fish. I mean, that crispy skin and tender, flaky flesh can make any dinner feel special, right? And honestly, I’ve burned enough dinners to appreciate how easy this can be—trust me, you don’t want to see my burnt attempts. But don’t worry; I’ve got solid tips and tricks to share. Curious about how to pair it with a mouthwatering garlic bread?
Why You’ll Love This Recipe
When it comes to homemade bread, I think we can all agree—there’s nothing quite like the aroma of freshly baked garlic bread wafting through the house, right?
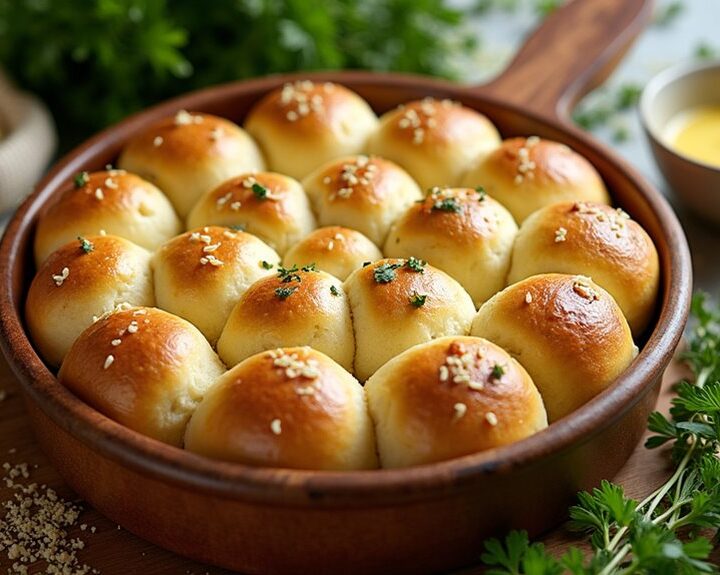
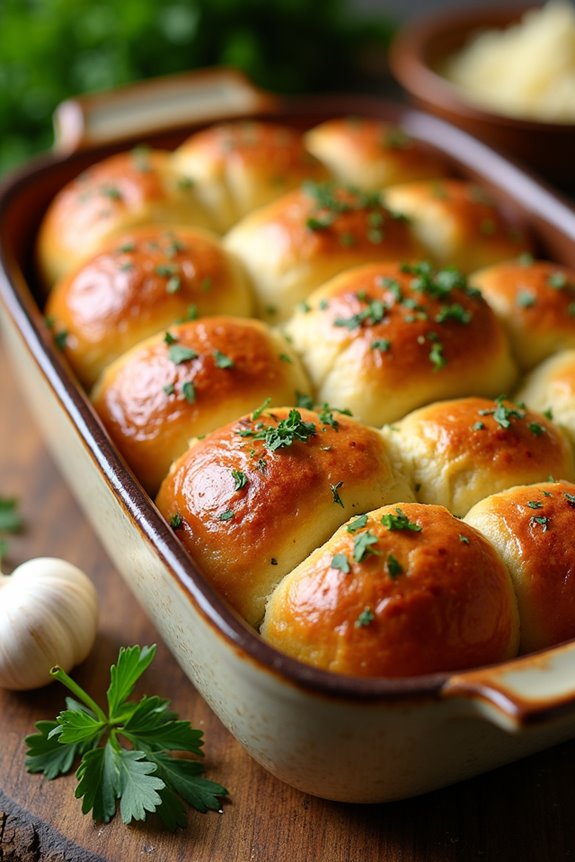
Let’s be real, pull apart garlic bread is basically the ultimate comfort food. I mean, who can resist that warm, buttery, garlicky goodness? It’s perfect for cozy family dinners or game nights. Plus, it’s super easy to make. Honestly, if I can whip it up without burning the kitchen down (mostly), anyone can.
Imagine this: you tear apart a fluffy piece, and it’s packed with flavor. You can even dunk it into marinara sauce, which takes it to another level. Just don’t blame me if you eat half of it before dinner.
Equipment List
Next, you’ll want a clean kitchen towel or plastic wrap for covering the dough while it rises.
And of course, a baking dish or pan for that glorious, buttery bread to bake in.
Finally, a cooling rack is a lifesaver for letting your masterpiece breathe.
Trust me, it’s worth it! And if you’re considering frying fish, a commercial deep fryer can make the process much easier and more efficient.
Our Ingredients
When it comes to making any dish, especially when it involves bread, having the right ingredients is absolutely key. Now, while we’re diving into the savory world of pan-fried fish, there’s also something to be said about the delicious sidekick that’s easy pull-apart garlic bread.
Imagine that fresh, doughy bread, slathered in garlicky goodness, just waiting to join your fish on the plate. I don’t know about you, but my mouth is watering just thinking about it. So, let’s grab our aprons and see what we’ll need for this culinary adventure!
Ingredients:
- 1/2 cup warm water
- 1 tbsp sugar
- 1 tsp active dry yeast
- 1 tbsp softened butter
- 1/2 cup milk
- 1 tsp salt
- 2 1/2 cups bread flour
- For the topping:
- 4 tbsp melted butter
- 3 minced garlic cloves
- Chopped parsley (as much as you love!)
- Pinch of salt
- 1 tsp Parmesan cheese (optional, but oh-so-good)
Now, let’s take a moment to chat about our ingredients before we jump into mixing and kneading. Using warm water is essential because it helps the yeast bloom.
If it’s too hot, you’ll end up with a bunch of sad, inactive yeast—just like those days when the coffee is too cold to drink. The butter and milk add a rich flavor to the bread and bring that lovely, soft texture which is what we’re all after.
And don’t shy away from those garlic cloves in the topping; they’re what take this bread from good to absolutely irresistible. Just imagine the aroma wafting through your kitchen, making everyone wonder what deliciousness is happening.
Step-by-Step Instructions
Making easy pull-apart garlic bread is a fun and rewarding activity that brings incredible aroma and flavor to any meal, especially when paired with savory pan-fried fish. Let’s roll up those sleeves and get started—mixing the dough is quick and simple, just follow these easy steps!
Step-by-Step Instructions
- Bloom the yeast: In a mixing bowl, combine 1/2 cup warm water with 1 tablespoon sugar and 1 teaspoon active dry yeast. Give it a gentle stir and let it rest for about 5-10 minutes, or until it becomes frothy. This is the yeast coming alive and getting super excited to help your bread rise.
- Mix the ingredients: Once your yeast is bubbly, add 1 tablespoon softened butter, 1/2 cup milk, and 1 teaspoon salt to the bowl. Then, add 2 1/2 cups bread flour a little at a time, mixing it with your hands or a spoon until everything comes together. You want to form a soft dough that’s not too sticky—adjust with a little more flour or water as needed.
- Knead the dough: Turn the dough out onto a lightly floured surface and knead it for about 8-10 minutes. Use the heel of your hand to push the dough away and fold it back over itself. Think of it as giving the dough a mini workout—similar to how we all feel after a vigorous yoga session. The dough should be smooth and elastic.
- Let it rise: Place your kneaded dough in a greased bowl, cover it with a clean kitchen towel, and let it rise in a warm place for about 1 hour, or until it has doubled in size. You could take this time to chop your parsley or sip on a delightful beverage while daydreaming of your wonderful garlic bread.
- Prepare the topping: While your dough is rising, mix together 4 tablespoons melted butter, 3 minced garlic cloves, a generous handful of chopped parsley, a pinch of salt, and 1 teaspoon Parmesan cheese (if you’re feeling cheesy). This mixture is where the magic happens, making your bread burst with flavor.
- Shape the dough: Once the dough has risen, punch it down (yes, release that pent-up energy) and turn it out onto a lightly floured surface. Cut the dough into small pieces, about the size of a golf ball. It’s a little like crafting mini dough sculptures.
- Dip and arrange: Take each dough ball, give it a bath in your garlicky butter topping, and arrange them tightly in a greased baking pan. Don’t worry about them spreading out—this will create those delightful pull-apart sections we’re after. Once arranged, cover the pan and let them rise again for another hour.
- Bake the bread: Preheat your oven to 350°F (175°C) while you’re waiting. When the dough has puffed up nicely, pop it in the oven and bake for about 30 minutes, or until the tops are golden brown and your kitchen smells heavenly.
- Final touch: Once baked, pull the bread from the oven and brush any remaining garlic butter topping over the warm rolls. This is optional, but trust me, your future self will thank you for every buttery, garlicky bite.
And there you have it! A beautiful, easy pull-apart garlic bread made from scratch, ready to complement your pan-fried fish.
It’s warm, comforting, and oh-so-satisfying. Serve it fresh, and watch as it disappears before your eyes—maybe even before you can grab a piece. Don’t forget, this garlic bread pairs perfectly with an artisan cheese making kit, adding a unique twist to your meals. Enjoy!
Tips & Variations
After you’ve shaped those delightful dough balls and let them rise, it’s time to think beyond the basics.
Have you ever considered seasoning your fish with a pinch of smoked paprika or perhaps a sprinkle of lemon zest? It adds this incredible depth that makes your taste buds dance. Sometimes, I like to swap out the standard breadcrumbs for crushed crackers—just for a little crunch!
Oh, and don’t forget about the oil temperature; if it’s too low, your fish can get soggy—nobody wants that.
Or, you could try marinating your fish overnight. Let it soak up those flavors. Trust me; it’s worth it. Cooking should be fun, a little experimentation goes a long way, don’t you think?
How to Serve?
Serving up your pan-fried fish can be just as exciting as cooking it. I love the moment when I place the beautifully golden fillets on a vibrant platter.
To make it pop, I often sprinkle some fresh herbs like parsley or cilantro on top. That bright green really makes a difference, doesn’t it? You could serve it alongside a zesty lemon wedge, too, letting guests squeeze some over their piece—such a simple touch that elevates the dish.
I like to pair mine with a side of garlic mashed potatoes or a fresh salad; it just balances the flavors perfectly. And don’t forget—present it hot! There’s nothing better than enjoying that crispy skin right out of the pan.
Storage & Reheating Guide
While you might think that a delicious pan-fried fish only belongs on the dinner table fresh out of the skillet, it’s actually quite versatile when it comes to storage and reheating.
First things first, let it cool down to room temperature. I usually pop mine in an airtight container; it can hang out in the fridge for about three days.
Now, when it’s time to reheat, I don’t recommend the microwave—trust me, it just makes everything soggy. Instead, heat a non-stick skillet on medium. Just a splash of oil and a minute or two on each side should do the trick. Using appropriate soup freezer containers will ensure that your leftovers are stored properly and maintain their quality.
Easy, right? You’ll feel like a kitchen magician, bringing that crispy goodness back to life.
Final Thoughts
Cooking is all about having fun in the kitchen, and if you’ve made a savory pan-fried fish, you’re in for a treat. Honestly, it’s one of those simple joys that, once you’ve nailed the technique, you’ll find yourself whipping it up again and again.
Nothing beats the crispy outside and tender inside, right? Plus, you can switch up the seasonings based on your mood or what you’ve got on hand. Don’t be shy to experiment!
I’ve flubbed this recipe more times than I care to admit—burnt fish once plagued my dinner party. But when I finally got it right, oh boy, was it worth it.