I’ve been experimenting with meringue kisses, and let me tell you, these Patriotic ones are a game-changer for any get-together! With just a handful of ingredients, you can whip up these festive treats that are as light as a cloud. It’s honestly a bit ridiculous how easy they are, but they look so fancy. So, why not impress your friends and family without putting in hours of work? When you see how effortless they are, you might just become the go-to dessert maker in your circle. Curious about how to get started?
Why You’ll Love This Recipe
When I first made these Patriotic Meringue Kisses, I couldn’t believe how simple yet delightful they turned out to be. You know, it’s like magic—just a few ingredients and some whisking transforms into these airy, sweet treats.
They’re not just pretty; they practically scream celebration. The vibrant red and blue stripes? Perfect for any occasion, whether it’s the Fourth of July or a barbecue.
And let’s be honest, who wouldn’t want to impress their friends with such a dazzling dessert? Plus, whipping up patriotic meringue kisses is a great way to practice your piping skills, even if you occasionally end up with a squiggly line.
Trust me, each kiss is worth it. You’ll love serving them up.
Equipment List
Before you plunge into creating these delightful Patriotic Meringue Kisses, let’s talk about the equipment you’ll need.
First up, grab a stand mixer or a handheld one. Trust me, you’ll want that muscle to whip those egg whites into shape.
You also need mixing bowls—two is ideal. Piping bags are essential for those pretty swirls, and don’t forget a piping tip; a round one works best.
An offset spatula can be handy for smoothing things out, too.
Finally, you’ll need a couple of baking sheets lined with parchment paper, because nobody wants sticky meringues.
Additionally, using a sushi making kit deluxe can elevate your culinary experience to new heights.
With this lineup, you’re set for some meringue magic. It’s like having a chef’s toolbox, ready for action—and I always feel like a pro!
Our Ingredients
When you’re ready to whip up some festive Patriotic Meringue Kisses, having the right ingredients is key. It’s almost magical how simple ingredients can turn into such delightful treats, isn’t it? You might feel like a baking wizard as you combine them to create those perfectly sweet, airy bites.
Let’s explore what you’ll need before we start mixing and piping.
Here’s what you’ll be gathering for these meringue wonders:
- 4 large egg whites (make sure they’re room temperature for ideal fluffiness)
- 1 cup (200g) granulated sugar (this is what gives them that sweet crunch)
- ½ tsp cream of tartar (helps stabilize those egg whites like a pro)
- 1 tsp vanilla extract (because who doesn’t love a hint of vanilla?)
- Red gel food coloring (to show off that patriotic spirit)
- Blue gel food coloring (don’t forget this for the star-spangled effect!)
Now, let’s chat about these ingredients for a moment. The egg whites, oh my goodness, they’re not just going to sit there; they’re the real stars of this show, whipping up into those lovely peaks we dream about.
If you can manage to let your eggs sit out and come to room temperature, they’ll be even easier to whip, and you’ll feel like you can tackle anything.
And that sugar? It’s basically magic dust, turning everything into sweet perfection. Just remember, using gel food coloring is a game changer here. Liquid colors just won’t cut it for those vibrant, eye-catching stripes we want.
Step-by-Step Instructions

Making Patriotic Meringue Kisses is a delightful experience that will fill your kitchen with sweet aromas and vibrant colors. You’ll be amazed at how simple ingredients transform into light and airy treats that are perfect for celebrating any festive occasion. Mix, whip, and pipe your way to these delightful bites by following these easy steps!
- Preheat your oven to 200°F (95°C) and prepare your baking sheets by lining them with parchment paper (trust me, this makes cleanup a breeze). You’ll want everything ready to go before you start whipping those egg whites.
- In a large mixing bowl, grab your 4 large egg whites (make sure they’re at room temperature for the best results) and use a hand mixer or stand mixer to beat them until they’re foamy. Don’t rush this part; you want to see the foam developing before you add anything else—it’s like watching magic in action.
- Now, add ½ teaspoon of cream of tartar to the mix—this little ingredient is your secret weapon for stabilizing those egg whites. Continue to whip the mixture until soft peaks form, meaning that the peaks hold their shape when you pull the beater out. It’s a bit like soft clouds, but can you believe we’re going to turn these into something so colorful?
- Gradually add 1 cup (200g) of granulated sugar, about a tablespoon at a time, while still beating the mixture. Be patient; this step is essential because the sugar needs time to dissolve completely. You’ll know you’re on the right track when the mixture becomes glossy and forms stiff peaks. That’s when you know you’ve hit the jackpot.
- Mix in the 1 teaspoon of vanilla extract gently. Feel free to close your eyes and inhale; the scent is heavenly.
- Now for the fun part—time to add some color! Grab your piping bag and use red gel food coloring to paint stripes along the inside. Repeat with blue gel food coloring. This is where your inner artist comes out, and it’s such a satisfying part of the process. Think of it as getting ready to show off your patriotic flair!
- Fill the piping bag with your meringue mixture. You can use a spatula if it gets a bit stuck; this meringue can be quite clingy when it wants to be.
- Pipe kisses onto the prepared baking sheets, spacing them about an inch apart. They’ll puff a bit, but no worries; they won’t get too crazy. Each kiss should look like a little dollop of sweetness waiting for its time to shine.
- Bake in your preheated oven for 1 hour. After that, turn off the oven, but don’t open the door just yet. Let the meringues dry in the warm oven for an additional hour. This step is essential for ensuring they don’t crack and have that perfect, melt-in-your-mouth texture. You could use this time to clean up a bit or just stand by the oven and dream about how delicious they’ll be.
- Once the hour is up and they’ve dried, take the meringues out and let them cool completely on the parchment paper before attempting to lift them off. They’re delicate little things, and we want them to stay that way.
And there you have it—your beautiful Patriotic Meringue Kisses ready to be enjoyed! These treats are perfect for your next celebration, adding that sweet touch of color and flavor. Investing in quality seafood cooking tools will elevate your kitchen experience, making it even easier to whip up delightful treats like these. Just remember, if your friends say they can’t believe you made them, you can always pretend you were slaving away in the kitchen for hours. But we both know you’ve mastered the art of meringue magic! Enjoy!
Tips & Variations
Even if you think you’ve nailed the basic meringue kisses, there’s always room for a little extra flair or some tasty tweaks.
For vibrant colors, I swear by gel food coloring—liquid just doesn’t cut it.
Want some fun flavors? Try adding a bit of almond extract or lemon zest to the vanilla for a fresh twist.
If you’re feeling adventurous, why not sprinkle some mini chocolate chips into the meringue before piping? There’s that delightful surprise when you bite in. And let’s be honest, who doesn’t love a little chocolate magic?
No need for perfection here; even if they aren’t all the same size, they’ll disappear fast.
Just remember—practice makes delicious!
How to Serve?
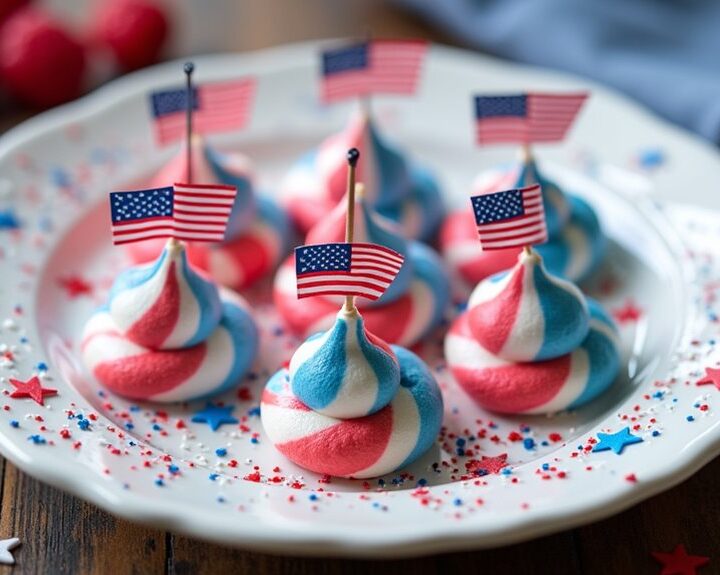
Serving up those beautiful Patriotic Meringue Kisses? You’ve got a showstopper, my friend.
I like to arrange them on a festive platter, mixing the red, white, and blue hues for that eye-catching look. You could even sprinkle some edible glitter on top—because why not make them even more dazzling?
I often serve them with fresh berries or whipped cream to make things a little fancy. It gives that nice contrast to their sweetness.
And here’s a fun tip: place them in mason jars for a delightful treat to gift. If you’re feeling ambitious, add a flag toothpick, and you’ve got a festive tabletop presentation.
Trust me; everyone will be reaching for seconds!
Storage & Reheating Guide
Once you’ve whipped up these fun, festive Patriotic Meringue Kisses, you’ll want to make sure they stay fresh and delicious for as long as possible. Trust me, nothing’s worse than stale meringues.
I usually store mine in an airtight container at room temperature. A simple jar or a cute tin works wonders. Just make sure they’re totally cooled before you tuck them away; otherwise, they could get a bit sticky.
To ensure the ultimate freshness, consider airtight food storage solutions to keep your meringue kisses as delightful as the day they were made.
As for reheating? Spoiler alert: you don’t actually need to! Meringue kisses are best enjoyed straight out of the container, crunchy and light.
But if they get a little soft, a quick trip to a low oven (like 200°F) for a few minutes can help bring them back to life.
Final Thoughts
As you wrap up your adventure in the kitchen, you might find yourself wondering just how magical these Patriotic Meringue Kisses truly are. Honestly, it’s like crafting little clouds of joy!
When you take that first bite, the crunch giving way to softness—it’s a joyous explosion of sweetness. Plus, they’re so festive; I mean who doesn’t love red, white, and blue treats?
I remember nibbling on these during a family barbecue, and they vanished faster than I could say “Meringue.”
Don’t fret if they crack a bit—cooking is all about trial and error, right? Just embrace the imperfections.