I can’t tell you how many times I’ve made Lunch Lady’s Peanut Butter Bars; they’re just that good. Seriously, you mix some graham cracker crumbs with peanut butter, and voilà, magic happens. I promise, even if you’re not a kitchen whiz, this recipe is foolproof. Remember that time I almost burned water while trying to boil it? Yeah, let’s not revisit those days. Just trust me, stick around, and I’ll guide you through it step by step.
Why You’ll Love This Recipe
If you’ve ever had one of those days when you just need a little something sweet to lift your spirits, these peanut butter bars are where it’s at!
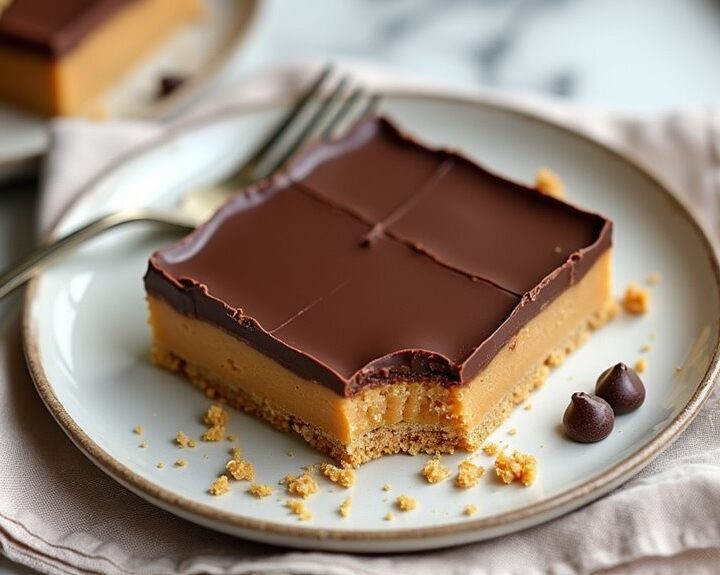
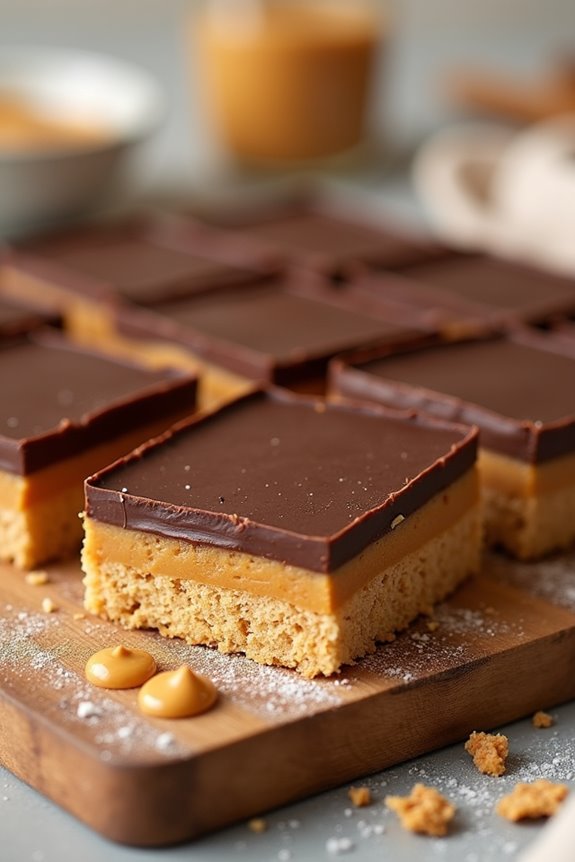
Seriously, who wouldn’t love lunch lady peanut butter bars? Their creamy peanut butter base paired with that rich chocolate topping is pure bliss.
It’s the ultimate treat when you need a pick-me-up. Plus, they’re super easy to whip up—no fancy skills required.
I remember my first attempt; I was so proud when I cut those bars, they looked just like the ones I’d in school!
Trust me, your friends and family will think you’re a pro. And hey, they keep well, so having them around for a sweet snack is a no-brainer.
Equipment List
Making these peanut butter bars is a delightful experience, and having the right equipment can make it even smoother!
First off, you’ll need a 9×13-inch pan—trust me, the size matters. I always line it with foil or parchment for easy cleanup; why make life harder, right?
You’ll also want mixing bowls, ideally two, so you can combine that gooey peanut butter with the other ingredients. A sturdy spatula—or even a wooden spoon—does wonders for blending everything together.
Don’t forget a microwave-safe bowl for melting those chocolate chips without a disaster. And if you’re like me, a whisk might come in handy for some good old-fashioned whisking magic.
Prep just feels right with the right tools. Additionally, having essential kitchen appliances can enhance your breakfast cooking experience.
Our Ingredients
When it comes to making delicious Peanut Butter Bars, the ingredients are the stars of the show. They meld together to create that perfect sweet-and-salty treat we can’t resist. Don’t you just love the way peanut butter makes everything better?
Whether you’re getting ready to impress guests or just indulging your sweet tooth, you’ll want to guarantee you have all the right stuff on hand before diving into the mixing bowl. So let’s gather our pantry staples and see what we need!
Here’s what you’ll need for those irresistible Peanut Butter Bars:
- 1/2 cup butter, melted
- 1 cup creamy peanut butter (or crunchy if you’re feeling adventurous!)
- 2 cups powdered sugar
- 1 1/2 to 2 cups graham cracker crumbs
- 12 ounces semi-sweet chocolate chips
Now, let’s talk about some considerations. While it may seem straightforward, the type of peanut butter you choose can dramatically affect your bars’ texture.
If you’re a fan of chunky peanut butter, throw in some nuts for extra crunch; it’s a delicious twist. Don’t skimp on the graham cracker crumbs, either. They give the bars that delightful crumbly texture that balances the creamy filling and rich chocolate.
Step-by-Step Instructions
Making these Peanut Butter Bars isn’t only a breeze, but also incredibly satisfying. With just a few simple steps, you’ll have delicious treats ready to enjoy. Whether you’re craving a sweet snack or looking to impress your friends, these bars won’t disappoint. Let’s roll up our sleeves and plunge into the fun part—creating these delightful snacks!
- Prep the Pan: Start by lining a 9×13-inch pan with foil or parchment paper. This guarantees your bars won’t stick to the pan and makes for easy removal later—trust me, nobody wants a sticky mess.
- Mix the Base: In a large mixing bowl, combine 1/2 cup melted butter and 1 cup creamy peanut butter. Stir until the mixture is smooth and well combined. The buttery goodness combined with peanut butter is pure bliss—just don’t get too carried away munching this first layer.
- Add Sweetness: Gradually mix in 2 cups of powdered sugar and 1 1/2 to 2 cups of graham cracker crumbs. Use a spoon or spatula to blend everything together until it forms a dough-like consistency. This part can get a bit thick, but that’s what you want—press on!
- Press into the Pan: Once your mixture is well combined, pour it into the prepared pan. Press it down evenly with your fingers or the bottom of a measuring cup. It should be compact, so the bars hold together nicely when cut—you want these beauties to be sturdy!
- Melt the Chocolate: In a microwave-safe bowl, melt 12 ounces of semi-sweet chocolate chips. Heat in 30-second intervals, stirring in between, until smooth and melted. Be careful not to overheat; burnt chocolate is a famously sad predicament.
- Spread the Love: Pour the melted chocolate over the peanut butter layer. Use a spatula to spread it evenly—like icing a cake—making sure to cover all the corners. This chocolate topping is what dreams are made of, so get it nice and smooth.
- Chill and Set: Place your pan in the refrigerator for about 1 hour, letting the layers set up perfectly. It’s the hardest part, waiting. Maybe sneak in a tiny taste of the warm chocolate as a pre-reward. Totally justified, right?
- Slice & Serve: Once the bars are set, remove them from the pan using the edges of the foil or parchment paper. Cut them into squares or rectangles—whatever floats your boat. Try not to devour them all at once; sharing is caring, after all.
And there you have it! Your Peanut Butter Bars are ready to impress. As you serve them, just remember: it’s completely okay to claim you slaved away in the kitchen for hours. We won’t tell, but don’t be surprised if you suddenly find yourself with a bunch of new fans. Don’t forget, having the right kitchen grill outdoor equipment can elevate your snack time too!
Tips & Variations
While you savor the deliciousness of these Peanut Butter Bars, don’t forget that a few twists can elevate them even further.
If you’re feeling adventurous, try using crunchy peanut butter for a nice texture, or even throw in some chopped nuts if you want a bit of a crunch.
I once added a sprinkle of sea salt on top—wow, game changer! You could also swap out the semi-sweet chocolate chips for milk chocolate, or even white chocolate if you’re feeling fancy.
Wanna add a hidden surprise? Layer in some mini marshmallows or a drizzle of caramel!
Oh, and if you’re like me and don’t always have graham crackers, crushed cookies do wonders too.
Don’t be afraid to get creative!
How to Serve?
Serving up these Peanut Butter Bars is a piece of cake—well, a piece of bar, to be exact.
First off, I like to slice them into bite-sized pieces. It just makes grabbing one (or two, or three) so much easier, don’t you think?
Lay them out on a colorful platter; trust me, it brightens up any gathering. If you’re feeling fancy, dust a little extra powdered sugar on top for the wow factor—who doesn’t love that?
These bars pair wonderfully with a glass of cold milk or even a hot cup of coffee, depending on your mood.
I usually let my friends dig in while I attend to my second helping. Don’t worry, I won’t judge if you do the same.
Storage & Reheating Guide
After you’ve sliced up those delightful Peanut Butter Bars and enjoyed a few (or maybe more), the next question is how to store the leftovers—or if you’re like me, how to keep them safe from your midnight snack cravings.
Personally, I recommend keeping them in the fridge. Just pop the bars in an airtight container to keep them fresh for up to a week. Trust me, they taste even better chilled.
If you want to nibble on them later, just pull out as many as you fancy. Forget reheating; they’re best enjoyed cold, like a little treat from the ice cream shop. Furthermore, using a reusable glass water bottle can help you stay hydrated while indulging in these delicious bars.
Just try not to eat the entire batch in one night—I’ll admit, I’ve been there before.
Final Thoughts
As you finish whipping up these delicious peanut butter bars, you might find yourself grinning from ear to ear—after all, who wouldn’t be excited about a sweet treat that takes barely any time to make?
Imagine this: you’re in the kitchen, and the scent of melted chocolate fills the air. It’s pure bliss. Honestly, I could eat the whole batch myself—just try to stop me.
These bars strike that perfect balance between creamy and crunchy, with just the right amount of sweetness. They’re great for parties or a quick snack.
And let’s be real, don’t we all deserve a little indulgence? Trust me, once they’re set, you’ll wonder how you ever lived without them.