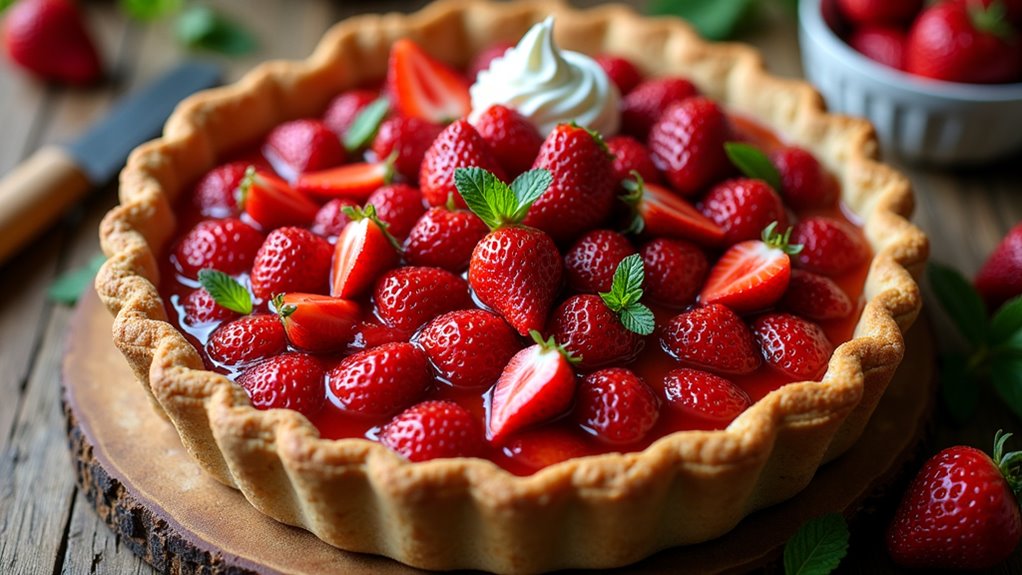
I’ve got to say, I absolutely love this no bake lemon blueberry dessert. It’s like sunshine on a plate. The way the tartness of lemon dances with the sweetness of fresh blueberries? Pure magic. And the best part? You don’t even have to turn on the oven. Ever tried making a dessert while avoiding a meltdown in the kitchen? Yeah, me too. Stick around, I’ll share how to whip this up effortlessly, and trust me, you’ll want to hear about the secret ingredient.
Why You’ll Love This Recipe
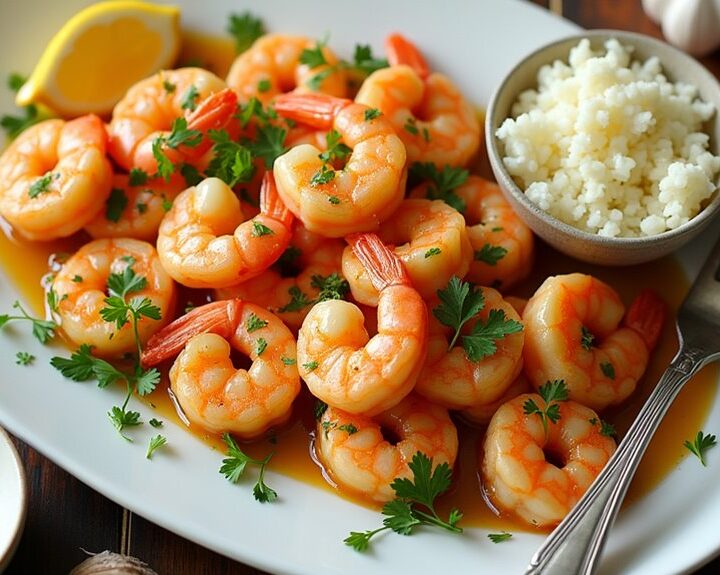
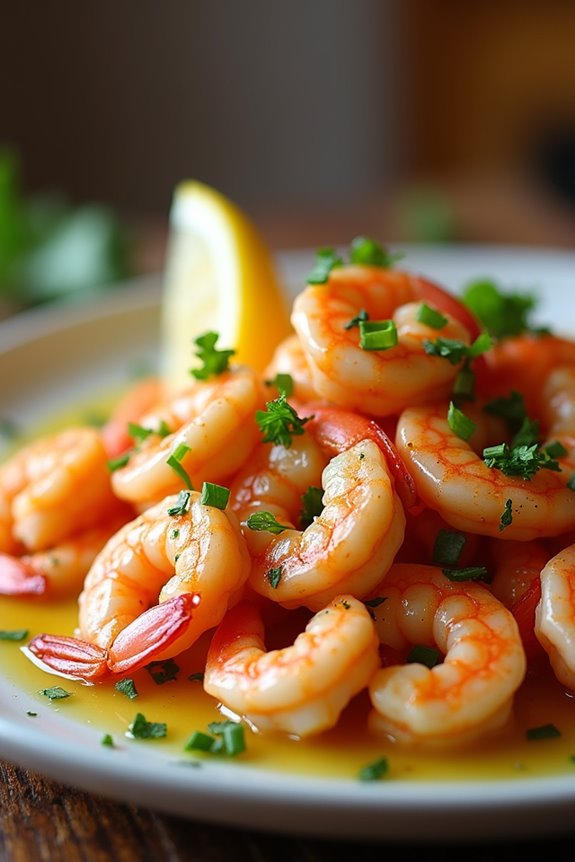
If you’re anything like me, who always seems to forget about dinner until it’s almost too late, you’ll love how quick and delicious this Hawaiian Garlic Shrimp recipe is.
Seriously, it’s a lifesaver on those busy nights when I just can’t think straight. You can whip it up in about 15 minutes, which leaves me enough time to catch my breath. The succulent shrimp, combined with that buttery garlic goodness, is simply irresistible.
Plus, it’s surprisingly simple. Just think: sauté some garlic, fry the shrimp, toss it all together, and voilà – dinner’s served. You’ll impress your family or friends without breaking a sweat.
And the best part? You can serve it over rice, making it the perfect all-in-one meal.
Equipment List
When it comes to whipping up this tasty Hawaiian Garlic Shrimp, having the right equipment makes everything smoother. First off, you’ll need a large skillet—trust me, a smaller one just won’t cut it with all those shrimp. A spatula’s essential for flipping those little guys without causing a calamity. Don’t forget a sharp knife for mincing garlic; we want it finely chopped, not a garlic paste that requires a cleanup crew. A sturdy cutting board is a must for that, too. Oh, and measuring spoons? You bet, precision matters! I learned that the hard way. Finally, some paper towels for drying shrimp—you know, to prevent a slippery disaster. Additionally, having some grill barbecue smoker accessories on hand can enhance your cooking experience and help achieve perfect flavors. Let’s keep it easy-peasy in the kitchen, right?
Our Ingredients
Alright, let’s plunge into what you’ll need to whip up this Hawaiian Garlic Shrimp. Trust me, once you gather these ingredients, you’ll be well on your way to a dish that’ll leave your taste buds dancing and your friends asking for seconds.
The beauty of this recipe is in its simplicity and the amazing flavor that comes from just a few ingredients.
Here’s what’s on our shopping list:
- 1 lb jumbo shrimp, shell-on, deveined
- 2 tbsp flour (or mochiko, if you’re feeling adventurous)
- 2 tsp paprika
- 1 tsp salt
- 1 tsp pepper or cayenne (for that kick, if you dare)
- 1 head garlic, minced (don’t skimp on this; it’s the star of the show)
- 4 tbsp butter
- 2 tbsp olive oil
- Lemon and parsley (optional, but they make a lovely garnish)
Now, a couple of things to keep in mind when gathering these ingredients. First, shrimp is definitely the main event here, so you might want to splurge a little on some good-quality jumbo shrimp. They can be a bit pricey, but trust me, the juicy freshness makes all the difference.
The spices? Simple, but each one plays a role—paprika adds warmth and a bit of color, while the garlic? Well, it’s just magical.
And don’t be afraid to experiment; if you love a bit more heat, go ahead and toss in extra cayenne. Ultimately, it’s about making the dish your own—cooking should always be a bit of an adventure, right?
Just remember, fresh ingredients generally yield better results, and we want your Hawaiian Garlic Shrimp to shine bright!
Step-by-Step Instructions
Making Hawaiian Garlic Shrimp is a delightful culinary adventure that’ll transport you straight to the sunny shores of Hawaii, all without leaving your kitchen. The dish is bursting with flavor and comes together in just a few simple steps. So, roll up your sleeves and get ready to impress your taste buds!
1. Prep the Shrimp: Start by taking 1 lb of jumbo shrimp and patting them dry with a paper towel. This step is essential because dry shrimp will crisp up beautifully.
Next, in a bowl, combine 2 tbsp of flour (or mochiko if you’re feeling adventurous) with 2 tsp paprika, 1 tsp salt, and 1 tsp pepper or cayenne. Toss your shrimp in this flour-spice mix until they’re evenly coated. This is where the flavor starts to build—yum!
2. Sauté the Garlic: In a large skillet, melt 4 tbsp of butter with 2 tbsp of olive oil over medium heat.
Once the butter is bubbly (but not burnt, we’re not looking for charred garlic here), add 1 head of minced garlic. Sauté for about 1 minute until the garlic turns golden and fragrant. Ah, that aroma! Just imagine how your kitchen will smell.
3. Fry the Shrimp: Time to add the shrimp! Place your coated shrimp in the skillet and fry them for about 2 minutes on each side.
You want them to turn a lovely pinkish-orange—this is a good sign they’re cooking through. Just don’t rush this step; the shrimp are delicate and need that time to soak up all that delicious garlic flavor.
4. Combine with Garlic Butter****: Once the shrimp are cooked on both sides, pour the sautéed garlic and the butter from the skillet over the shrimp.
Stir it all together and let it cook for another minute. This is where magic happens; the shrimp soak up every garlicky morsel, and your dish transforms into something utterly irresistible.
5. Serve and Enjoy: Finally, transfer your Hawaiian Garlic Shrimp to a serving plate.
If you’d like, garnish with a squeeze of fresh lemon juice and a sprinkle of parsley to make it pop. Serve it alongside some fluffy rice to soak up all that buttery goodness.
And there you have it—a dish that captures the taste of Hawaii in under 15 minutes! You might want to warn your friends that they’re in for a treat; otherwise, they might just jump in before you even set the table. Enjoy your feast! Additionally, this dish pairs wonderfully with homemade pasta made using a Ravioli Maker to elevate your meal even further.
Tips & Variations
Tips and variations can really take your Hawaiian Garlic Shrimp to the next level. Ever thought about adding a dash of soy sauce? It adds a savory kick that’ll make you swoon.
I sometimes toss in a pinch of red pepper flakes for a subtle heat—maybe I’m a spice junkie. And if you’ve got fresh herbs lying around, like cilantro or basil, throw them in for a pop of freshness.
You can even swap out the shrimp for scallops if you’re feeling adventurous.
Oh, and when it comes to the garlic, keep an eye on it; burnt garlic can ruin everything. Believe me, I’ve learned that the hard way.
How to Serve?
When it comes to serving Hawaiian Garlic Shrimp, you want to create a plate that’s as inviting as the aroma wafting from your kitchen. I like to pile the shrimp high on a big platter, drizzled with that delicious garlic butter. Toss in a sprinkle of fresh parsley for a pop of color, and don’t forget a wedge of lemon on the side—trust me, it adds a zing that brightens the dish.
You can serve this over a fluffy bed of rice, which helps soak up all that glorious sauce. Looking for a little crunch? Add some crusty bread to the table.
As my grandma always said, great food deserves a great presentation, so make it look as tasty as it smells.
Storage & Reheating Guide
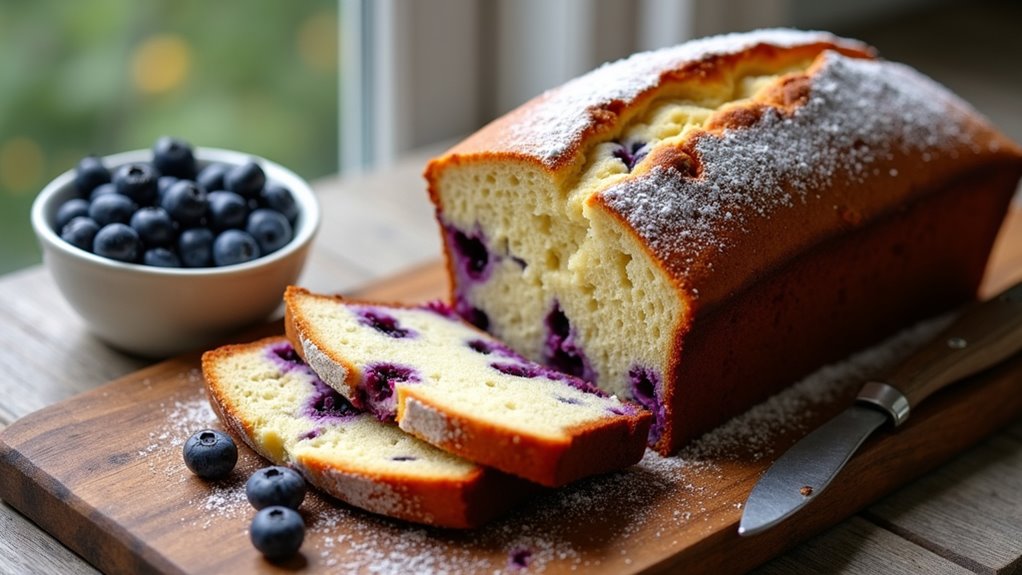
After you’ve plated up that beautiful dessert, you might be wondering about what to do with any leftovers.
First off, I totally get it—this treat is just too good. If you’ve got some remaining, cover it tightly with plastic wrap or pop it in an airtight container. It’ll keep well in the fridge for about 3 to 4 days. Just make sure it’s chilled and not sitting out too long.
Now, when it comes to enjoying those leftovers, no need to overthink it. Just grab a slice straight from the fridge or let it sit out for a few minutes to soften. In addition, if you want to store it for a longer period, consider using Freezer Storage Bags to keep it fresh and delicious.
Trust me, it’ll still taste delightful, as if you made it fresh just for yourself again.
Final Thoughts
As I think back on whipping up this no-bake lemon blueberry dessert, I can’t help but feel a wave of satisfaction.
The zingy lemon and sweet blueberries create such a delightful balance. Honestly, making this dessert felt more like a fun kitchen party than a chore.
It’s one of those recipes where you can confidently say, “I nailed it!” even if you accidentally spilled some blueberries on the floor—but hey, that’s part of the fun, right?
Plus, it’s perfect for warm days when you don’t want to turn on the oven.