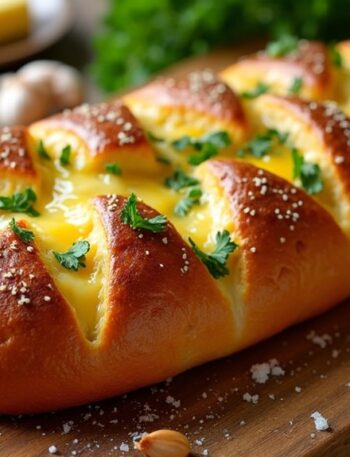
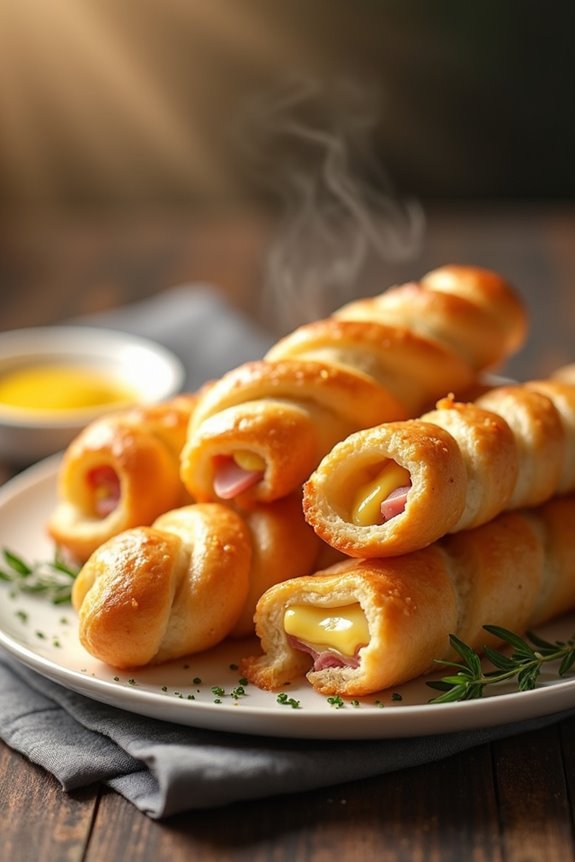
I’ve gotta tell you about this Cheesy Ham Puff Pastry recipe of mine. It’s one of those quick treats that’s both easy and impressive. When I whip this up, the smell alone makes my family gather in the kitchen, hoping for a taste. Seriously, who can resist gooey cheese and crispy pastry? If you’re like me and you enjoy snacks that can double as fancy appetizers, stick around. You won’t want to miss what comes next.
Why You’ll Love This Recipe
There’s something magical about whipping up a batch of cheesy ham puff pastry sticks, especially when your kitchen starts to smell like a bakery.
Trust me, as I fumble around trying to not burn my fingers, the aroma makes it all worth it.
These ham and cheese puff pastry sticks aren’t just tasty; they’re a crowd-pleaser.
Imagine this: golden, flaky pastry surrounding gooey cheese and savory ham—absolutely delicious!
They’re perfect for parties, movie nights, or just a spontaneous snack.
Plus, you can customize them with mustard or herbs.
Honestly, they’re so fun to make that I sometimes find myself making a double batch, which leads to a slight issue with self-control.
But hey, who can resist?
Equipment List
When you’re ready to tackle the cheesy ham puff pastry sticks, having the right equipment is key to a smooth cooking experience. You’ll need a baking sheet lined with parchment paper—trust me, this makes clean-up way easier.
A rolling pin is essential for the puff pastry unless you enjoy it shaped like a crumpled ball. Grab a sharp knife for cutting those strips, and don’t forget a pastry brush for that shiny egg wash finish; it adds a nice touch.
Oh, and a mixing bowl for beating the egg? Crucial. Honestly, I once tried using a mug and ended up wearing the egg wash.
With the right baking sheet set, you’ll be on your way to golden, cheesy perfection in no time.
Our Ingredients
When it comes to whipping up some cheesy ham puff pastry sticks, you’re going to want to gather your delicious ingredients before diving into the fun of cooking. Trust me, it makes the entire process a breeze. Have you ever started cooking only to realize you’re missing that key ingredient? Yeah, that’s one way to kill the excitement. So, let’s make sure you’re prepared, shall we? Here’s what you’re going to need to create these flaky, cheesy delights.
- 1 sheet of puff pastry (make sure it’s thawed)
- 6 oz of sliced ham (go for that deli-style goodness)
- 6 oz of cheese, either Gruyère or Mozzarella, cut into sticks or shredded
- 1 egg (for that glorious egg wash)
- Optional: mustard, fresh herbs, or your favorite seasoning to kick up the flavor a notch
Now that you have your ingredient list, let’s talk about the goodies you can add for that extra pop of flavor. Mustard is a classic pairing with ham, but if you’re feeling adventurous, why not try a sprinkle of fresh herbs like thyme or rosemary?
They’ll elevate your sticks and make your kitchen smell amazing. And here’s a little secret: if you have some seasoning that you love—Italian seasoning, perhaps—don’t hold back! Cooking should be fun, and adjusting recipes to fit your taste is part of that experience.
Step-by-Step Instructions
Making Cheesy Ham Puff Pastry Sticks isn’t only a breeze, but it’s also an adventure in the kitchen. With just a few ingredients, you’ll create a delectable snack that’s flaky, cheesy, and oh-so-satisfying. Plus, using premium baking equipment can elevate your baking experience to the next level.
Ready to impress yourself and your friends? Let’s plunge into the process of whipping up these tasty treats!
Step-by-Step Instructions
1. Preheat the Oven
Start by preheating your oven to 350–375°F (175–190°C). This will guarantee that your pastry sticks cook perfectly once they’re assembled.
2. Prepare the Puff Pastry
Take your 1 sheet of thawed puff pastry and roll it out on a lightly floured surface. Aim for a thickness of about 1/8 inch; this will give you the right balance between flaky and sturdy.
3. Cut the Pastry
Using a sharp knife or pizza cutter, slice the pastry into strips about 1 inch wide. These strips are going to wrap around the delicious filling, so don’t worry too much about them being perfectly straight; after all, a little charm never hurts.
4. Add the Filling
For each strip, lay down a few slices of your 6 oz of sliced ham and a generous amount of your chosen cheese (6 oz of Gruyère or Mozzarella). Keep it towards one side of the strip, making sure there’s enough room to fold the pastry over the top.
5. Roll or Fold the Pastry
Now, here’s where the fun begins. Gently fold or roll the pastry over the ham and cheese. You can twist it if you like for a little extra flair!
Make sure to pinch the edges to seal them, because we don’t want any of that cheesy goodness escaping during baking.
6. Brush with Egg Wash****
Grab your lone egg and beat it in a small bowl. With a pastry brush, brush the beaten egg over the top of each pastry stick. This will give them that beautiful golden color when they bake.
It’s like giving them a little spa treatment before their big moment in the oven.
7. Bake the Pastry Sticks
Place your sticks on a baking sheet lined with parchment paper (helps avoid sticking, trust me). Bake for about 15–25 minutes, or until they’re puffed and golden brown.
Keep an eye on them toward the end—nobody wants burnt pastries, right?
8. Serve and Enjoy
Once they’re out of the oven, let them cool for a few minutes. You can serve them warm with some mustard or your favorite dip.
Trust me, these are best enjoyed fresh out of the oven when they’re crispy and the cheese is melty.
And there you have it—your Cheesy Ham Puff Pastry Sticks are ready! Enjoy them yourself or share them (if you’re feeling generous).
Just remember, when they disappear quickly, that’s just a sign you did things right. Happy cooking!
Tips & Variations
There’s nothing quite like putting your own spin on a classic recipe, right? I love experimenting with different cheeses or adding a little mustard or herbs for that extra kick.
Maybe you’ll throw in some jalapeños for heat; who knows? I once tried using leftover turkey with Swiss, and let me tell you, that worked like a charm.
Don’t forget to season the ham; it can really elevate the flavor!
And hey, if you’ve got kids, let them help twist the pastry. They love getting hands-on, and it keeps them occupied. You can even shape them into fun designs.
Just remember, it’s all about enjoying the process—don’t worry if they don’t look perfect. Trust me, they’ll still taste amazing.
How to Serve?
Serving these ham and cheese puff pastries is where the fun really begins. You’ll want to plate them while they’re still warm. Trust me, the smell alone will have everyone clawing at the table.
I like to arrange them in a circle, like a cheesy little family, and sprinkle some herbs or serve with mustard on the side. It adds a nice touch and lets your guests get creative. You might even catch them arguing about the best dipping sauce, which is always fun, right?
Plus, don’t forget that crispy texture—it’s totally the charm. Watching people enjoy them? That’s the best part of cooking. Just be prepared: you might need to make double next time.
Storage & Reheating Guide
While it might be tempting to gobble up all your ham and cheese puff pastries right away (trust me, I get it), knowing how to store and reheat them can be a real game changer.
First, I usually let them cool completely, then pop them in an airtight container. In the fridge, they’re good for about three days.
When it comes to reheating, I recommend using the oven. Just preheat it to 350°F and place the pastries on a baking sheet for about 10 minutes. This way, they’ll be crispy again, not soggy like my last-minute dinner plans!
If you’ve got a bit of extra time, you might even use a little butter to really amp up that flavor. Did you know that Mason Jars with Lids are also excellent for storing baked goods? Enjoy!
Final Thoughts
As I think about making these ham and cheese puff pastries, it’s hard not to get excited about how easy and delicious they are.
Seriously, if I can whip these up without burning my kitchen down, anyone can! They’re perfect for a last-minute snack or a fun dinner.
I love how the gooey cheese and savory ham just melt together in that crisp pastry. Plus, you can get creative by adding herbs or a dab of mustard.
Honestly, what’s not to love? Just remember, they’re best served warm, fresh out of the oven.
I always promise myself leftovers, but they vanish like magic.