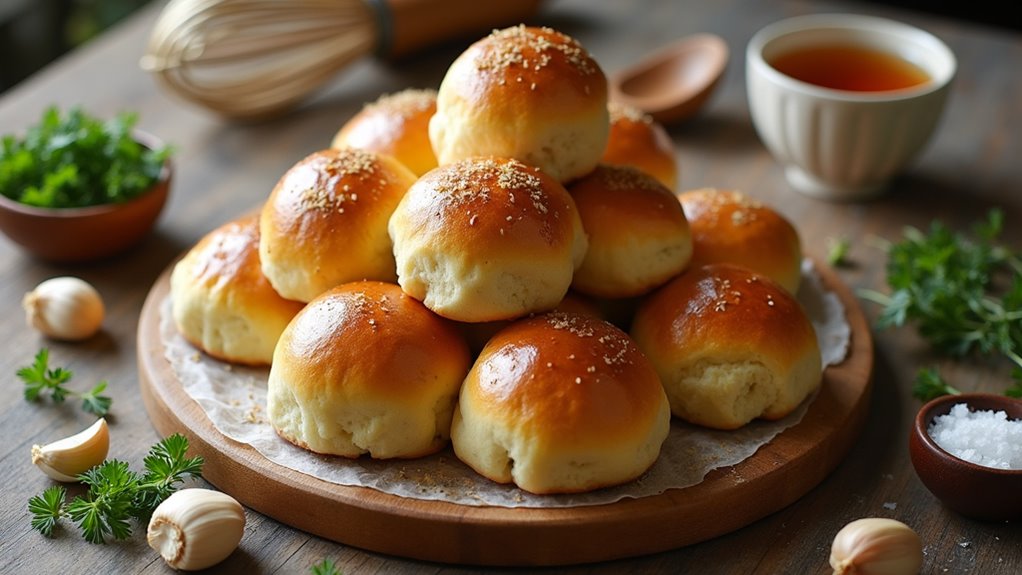
Let me tell you about my favorite recipe for Garlic Butter Dinner Rolls. These rolls aren’t just bread; they’re fluffy clouds of comfort that draw everyone to the table. Seriously, who can resist the smell of garlic butter wafting through the kitchen? I still remember the first time I made them; my family turned into bread fanatics, clamoring for more. It’s the little things that matter, right? Stick with me, and I’ll share all the details you need to whip these up.
Why You’ll Love This Recipe
You’ll absolutely love this recipe for Garlic Butter Dinner Rolls, especially when you realize how easy it’s to whip up a batch that makes your kitchen smell like a cozy Italian bakery.
Seriously, I’m not kidding. When the warm bread hits the oven, you’ll get that homey, buttery aroma wafting through the air, and you might catch yourself daydreaming about dipping these rolls in marinara.
What’s great is that even if you’ve never baked bread before, you’ll find this recipe simple enough. The dough rises beautifully, thanks to that warm milk and yeast magic.
Plus, brushing on the garlic butter? It’s like giving your rolls a warm hug. Trust me, your family will be begging for seconds.
Equipment List
When you plunge into making these Garlic Butter Dinner Rolls, gathering the right equipment can make the process smoother than butter on warm bread.
You’ll need a mixing bowl for bringing everything together—trust me, a big one helps. A whisk is handy for mixing the yeast and sugar into the warm milk (you don’t want lumps).
Don’t forget a measuring cup because accuracy matters. A rolling pin plays a vital role if you’re shaping the dough—just roll with it, okay?
For baking, a lovely baking dish or sheet is essential. And grab a pastry brush to slather that garlic butter all over your rolls.
Additionally, having an essential measuring spoon set can ensure that your ingredient ratios are just right, making your rolls even more delectable.
You see, it’s all pretty simple, but it makes a world of difference.
Our Ingredients
When it comes to whipping up a batch of Garlic Butter Dinner Rolls, the first step is gathering those all-important ingredients. You might think, “It can’t be that complicated, right?” Well, my friend, you’d be surprised at how a few simple ingredients can come together to create magic.
Imagine this: fluffy, warm rolls right out of the oven, with that heavenly garlic butter drizzle. Sounds good? It’s time to make it happen!
Here’s what you’ll need:
- 1 cup warm milk (about 110ºF)
- 2 teaspoons active dry yeast
- 1 tablespoon sugar
- 3 ¼ cups all-purpose or bread flour
- 1 teaspoon salt
- ¼ cup unsalted butter (melted for the dough)
- 1 large egg (for the dough)
- ¼ cup unsalted butter (melted for the garlic butter)
- 4 cloves garlic (minced)
- 2 tablespoons fresh parsley (chopped)
- Sea salt to taste
- 1 large egg (beaten for the egg wash)
Now, let’s talk about these ingredients for a second. The yeast is your secret weapon here; it’s what makes the rolls rise and turn fluffy—so don’t skimp on that.
And if you’re wondering, yes, warm milk helps the yeast thrive and do its thing. As for the flour, you have a choice: all-purpose or bread flour, but both will give you tasty results.
If you’re feeling fancy, fresh parsley adds that pop of color and flavor, while garlic? Well, that’s a no-brainer. If you’re like me and can’t resist garlic, feel free to be a little generous.
Step-by-Step Instructions
Making garlic butter dinner rolls isn’t just cooking; it’s an experience filled with the warmth of your kitchen and the promise of deliciousness. Mixing the batter is quick and simple—just follow these easy steps, and before you know it, you’ll have fluffy rolls waiting to soak up that heavenly garlic butter. Let’s plunge into it!
- Activate your yeast: Start by mixing 1 cup of warm milk (about 110ºF) with 2 teaspoons of active dry yeast and 1 tablespoon of sugar. Stir it gently, then let it sit for about 5–10 minutes. This magic moment is when the yeast awakens and gets bubbly—trust me, you want to see those little bubbles form.
- Combine the dry ingredients: In a separate large bowl, mix together 3 ¼ cups of all-purpose or bread flour and 1 teaspoon of salt. This step guarantees your rolls will have that perfect flavor balance. Make a little well in the center of the flour mixture and get ready to add your wet ingredients.
- Bring it all together: Pour the yeast mixture into the flour along with ¼ cup of melted unsalted butter and 1 large egg. Here’s where the fun begins—get in there and mix with a wooden spoon or your hands until a shaggy dough forms. It may look a bit messy, but that’s a good thing!
- Knead like a pro: Flour your countertop lightly, then turn the dough out and knead it for about 8–10 minutes, or until it feels smooth and elastic. It’s a bit of a workout, but it’s worth every minute. You want the dough to be soft and slightly tacky, so remember not to add too much extra flour.
- Let it rise: Place your dough in a greased bowl and cover it with a damp cloth or plastic wrap. Let it rise in a warm place until it doubles in size, which should take about 1–1.5 hours. If you’re like me, this is the perfect time to sip a cup of tea and admire your handiwork—or, you know, try to resist the urge to poke it.
- Shape the rolls: Once the dough has risen, punch it down gently to release the air. Turn it out onto a floured surface, then divide it into 12 even pieces (or more if you want mini rolls). Shape each piece into a ball by tucking the edges underneath and rolling it on the countertop. It’s like giving each roll a little spa treatment.
- Second rise: Place your shaped rolls into a greased baking dish, leaving a bit of space between them. Cover again and let them rise for another 30-45 minutes, until they puff up beautifully. Seriously, try to resist the temptation to peek too often—it’s just too exciting!
- Prep for baking: While your rolls are rising, preheat your oven to 350°F (about 175°C). Once the rolls have risen, brush the tops with 1 beaten egg. This will give them that lovely golden color and shiny finish as they bake.
- Bake away: Pop your rolls into the preheated oven and bake for about 20 minutes, or until they’re golden brown. Oh man, the smell will be incredible! Keep an eye on them toward the end and enjoy the aroma wafting through your home.
- The finishing touch: While your rolls are baking, whip up some garlic butter by melting ¼ cup of unsalted butter in a small pan and adding 4 minced cloves of garlic along with 2 tablespoons of chopped fresh parsley. Stir it all together and let it simmer for just a minute—just enough to infuse that classic garlicky goodness.
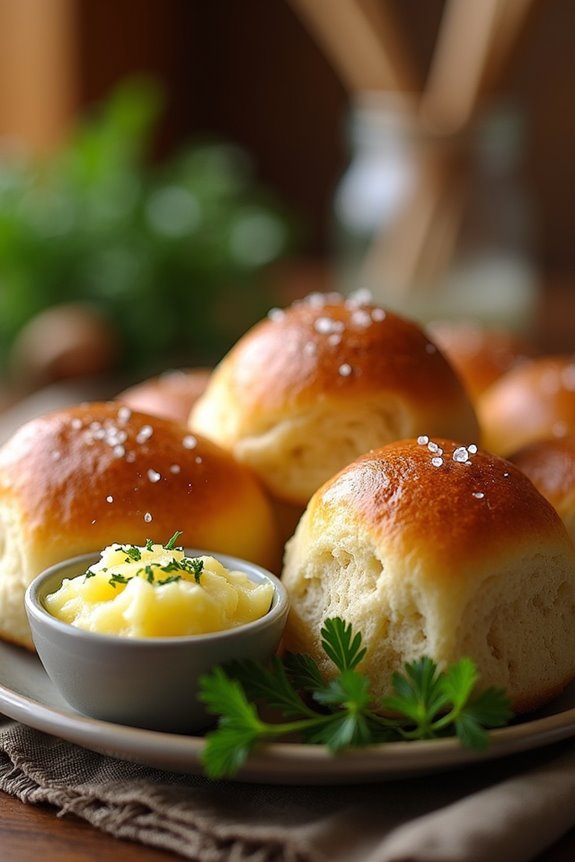
- Glaze and serve: Once your rolls come out of the oven, brush them generously with that gorgeous garlic butter. Don’t be shy with it; it’s the best part! Add a sprinkle of sea salt to finish. Allow them to cool slightly, just enough so you can resist burning your mouth, before serving them warm.
And there you have it! Fluffy, golden, and oh-so-garlicky dinner rolls that’ll have everyone coming back for seconds (or thirds). Enjoy the smiles on their faces as they plunge into these homemade delights. You’re not just a cook—you’re a roll-making superstar! Plus, having premium baking equipment can elevate your baking game even further, ensuring perfect results every time.
Tips & Variations
You don’t have to stick to the recipe strictly if you want to experiment a little and make these garlic butter dinner rolls your own.
Want a hint of spice? Toss in some red pepper flakes. If you prefer herbs, rosemary or thyme can really jazz things up.
Don’t have fresh garlic? Use garlic powder—is that cheating? Maybe, but it still tastes great!
I’ve even tried adding cheese to the dough, and wow, what a twist!
Just remember, let your dough rise fully for the fluffiest rolls, or you’ll end up with little rocks, and nobody wants that.
How to Serve?
Serving garlic butter dinner rolls is where the fun really begins, and trust me, they’re best served warm. Imagine this: the aroma fills your kitchen, and your guests can’t resist digging in.
I like to arrange the rolls in a cozy breadbasket, perhaps lined with a cute cloth napkin for that extra touch. You can even drizzle a bit more garlic butter on top right before serving.
When they’re pulling apart, the steam rises, and those buttery, garlicky scents envelop everyone—pure bliss. And hey, don’t forget to offer some fresh parsley on the side for a pop of color.
Just remember, these rolls disappear faster than you can say “baking disaster”—even if you burn the first batch.
Storage & Reheating Guide
How do you keep those delicious garlic butter dinner rolls fresh, even after the initial feast? I’ve got a couple of tricks up my sleeve.
First, if you have leftovers, let them cool completely before tossing them in an airtight container or wrapping them in plastic. Trust me, you don’t want stale rolls, right?
When you’re ready to enjoy them again, just pop them in the microwave for about 10 seconds or use the oven at 350°F for 5-7 minutes. They’ll be like new again!
And if you’re feeling a bit lazy (who isn’t sometimes?), just slather on a bit more garlic butter before reheating. That’s like magic. You’ll thank yourself later, I promise.
Also, using a garlic press can make preparing the garlic butter easier and more efficient, enhancing the flavor of your dinner rolls.
Final Thoughts
After savoring those warm, fluffy garlic butter dinner rolls, the last thing I want is to face dry, crumbly leftovers.
So, here’s my advice: make just enough to devour in one sitting, or store them properly. Trust me; no one wants sad, stale rolls hanging around.
If you find yourself with leftovers, warm them up and slather extra garlic butter—seriously, it makes all the difference. I’ve learned the hard way that nothing beats a fresh roll right out of the oven.
And honestly, if you’re not sharing, who’s going to judge? It’s okay to polish off half the batch yourself.