Let me tell you, there’s something magical about baking crusty Italian bread at home. It’s not just about the smell wafting through the kitchen or that satisfying crunch when you slice into it—it’s about the moments you share with loved ones, savoring each warm bite. Did I mention I’ve burned my fair share of loaves trying to achieve that perfect crust? But hey, we’ve all got to start somewhere. So, are you ready to let your kitchen be filled with the kind of warmth that only fresh bread can bring?
Why You’ll Love This Recipe
If you’ve ever walked into a bakery and been swept off your feet by the smell of fresh bread, you’ll totally understand why this Crusty Italian Bread Recipe is a must-try.
Imagine this: the warm, golden crust crackling as you slice into it, revealing a soft, airy interior. That first bite? Heaven.
Trust me, you’ll feel like a kitchen rockstar. And the best part? You don’t need to be a pro to nail it. The magic lies in simple ingredients and a little patience.
This bread works wonders for dinner or just as a snack with some olive oil. Plus, who doesn’t love the aroma of baking filling the house? You’ll definitely want to show off your creation.
Equipment List
Baking this Crusty Italian Bread can be such a rewarding experience, but let’s talk about what you’ll need to get started.
First, you’ll want a sturdy mixing bowl; trust me, this dough gets a little wild. A wooden spoon is handy for mixing, but I often just plunge in with my hands—much more fun, right?
A kitchen scale makes measuring flour a breeze, plus a coupla baking sheets for the loaves to rest on. Don’t forget a sharp knife for scoring; this bread deserves some flair!
Finally, a wire rack’s essential for cooling. You’ll feel like a bread superstar when you see it emerge from the oven, perfectly crusty and golden.
Investing in a high end kitchenware set can elevate your baking experience significantly; it’s all worth it, believe me.
Our Ingredients
When it comes to making that perfect loaf of crusty Italian bread, the right ingredients are vital. You want to guarantee you have everything ready before you begin, so your bread-making journey is smooth and enjoyable.
Let’s take stock of what you’ll need. Don’t worry; it’s not a long list, but it’s full of goodness that will make your kitchen smell heavenly. Imagine the aroma wafting through the house as you knead the dough—trust me, you’ll be in heaven.
Here’s what you’ll need to gather:
- 650 g bread flour (about 5 1/4 cups)
- 1 3/4 cups warm water (100–110°F)
- 1 tbsp granulated sugar
- 1 tbsp active dry yeast
- 2 tsp salt
- 1 tbsp butter, room temperature
- 1 tbsp extra virgin olive oil
- 1 egg white
- 1 tbsp chilled water
Now, let’s chat about some considerations regarding those ingredients. The bread flour is vital because it has a higher protein content, which helps your bread rise beautifully and develop that lovely crust.
And oh, that warm water? It’s like giving your yeast a cozy little spa day, helping it to froth and bubble nicely so your bread can rise like it means it.
As for the butter and olive oil, they add flavor and make the texture luxurious. So when you get ready to bake, don’t skimp on the quality—that extra virgin olive oil? It makes all the difference.
Keep your ingredients organized, and you’ll be well on your way to making a loaf that’ll have everyone asking for the recipe. And trust me, they won’t believe how simple it really is.
Step-by-Step Instructions

Making your own crusty Italian bread isn’t only rewarding, but it’s also surprisingly simple. With just a handful of ingredients and a bit of your time, you can create a loaf that will have your kitchen smelling like a quaint Italian bakery. Ready? Let’s get right into the deliciousness of it all!
1. Activate the Yeast: Start by mixing 1 3/4 cups of warm water (100–110°F), 1 tablespoon of granulated sugar, and 1 tablespoon of active dry yeast in a bowl. Give it a gentle stir and let it froth for about 5-10 minutes. You’re looking for that bubbly, frothy top—like little clouds of yeast heaven.
If it doesn’t froth, your yeast might be a bit old. Don’t worry; it happens to the best of us. Just grab a new packet.
2. Combine Dry Ingredients: In a large bowl, combine 650 grams of bread flour (about 5 1/4 cups) and 2 teaspoons of salt. Whisk them together until they’re nicely blended. This step is essential because it helps evenly distribute the salt, ensuring your bread won’t become a salty surprise.
3. Bring it All Together: Now, pour the yeast mixture into your flour bowl. Add 1 tablespoon of room temperature butter and 1 tablespoon of extra virgin olive oil, too. Stir with a wooden spoon until the dough starts coming together.
Don’t be shy—get in there and show it some love.
4. Knead the Dough: Flour your countertop and turn out the dough. Knead it for about 10 minutes until it’s smooth and elastic. You should feel it transforming under your hands; if it feels too sticky, sprinkle a touch more flour, but don’t overdo it (we want that fluffy bread, not a brick).
Trust me, your arms will give you a workout.
5. Let it Rise: Place the kneaded dough into a greased bowl, cover it with a clean kitchen towel, and Let it Rise in a warm place until it doubles in size, about 1 to 1.5 hours. Patience is key here.
Maybe savor a cup of coffee while you wait and imagine how amazing your bread will smell.
6. Shape the Loaf: Once your dough has risen beautifully, punch it down to release some of that built-up air. Turn it out onto your floured work surface, shape it into a loaf, and then place it on a baking sheet lined with parchment paper.
Cover it again and let it rise for 30 more minutes. You’ll start to feel the anticipation build—this is when it gets real.
7. Preheat Your Oven: Preheat Your Oven to a sizzling 450°F. This hot environment is perfect for creating that crispy crust we all crave.
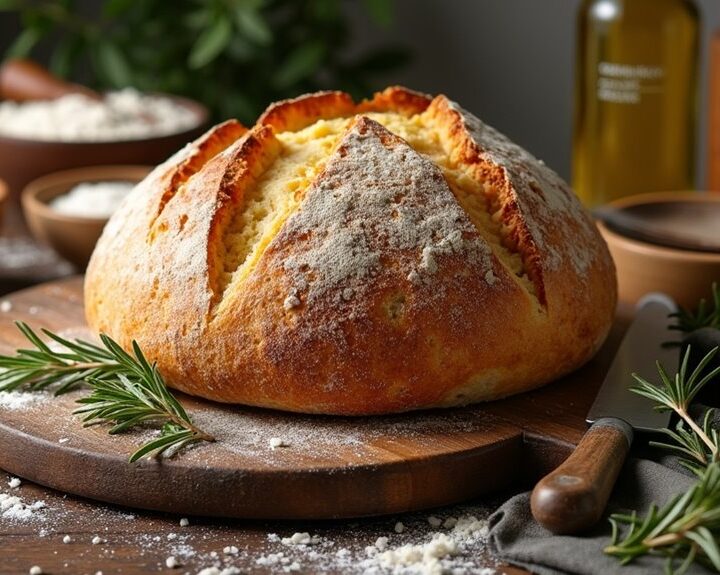
8. Score and Brush: Before it goes in the oven, use a sharp knife to make a few diagonal slashes on top of your loaf. This helps control the rise while baking.
Combine 1 egg white with 1 tablespoon of chilled water, and brush this mixture over your loaf. This step is what gives your bread that gorgeous, shiny finish.
9. Bake with Steam: Here’s where the magic happens. Bake your bread for 25 minutes with steam (you can create steam by placing a pan of hot water on a lower rack in the oven or misting the oven walls with water).
After that, uncover it and bake for another 15-20 minutes, or until it turns golden brown and sounds hollow when you tap it.
10. Cool and Slice: Once your loaf is perfectly baked, remove it from the oven and let it cool completely on a wire rack. I know; the wait is tough, but slicing into hot bread is a rookie mistake.
It’ll be worth it when your friends and family get the first taste of that crusty exterior and fluffy interior.
And just like that, you’ve made crusty Italian bread that will leave everyone wanting more, possibly begging you for the recipe. What’s not to love about that? Enjoy your baking adventure!
To elevate your bread-making experience, consider investing in premium cooking appliances that can help simplify the process.
Tips & Variations
Although it might seem intimidating, there are plenty of ways to tweak this Italian bread recipe to suit your tastes or impress your guests.
For instance, adding herbs like rosemary or garlic gives it a lovely twist. If you’re feeling adventurous, toss in some olives or sun-dried tomatoes for extra flavor.
I once accidentally dropped a handful of grated cheese into the dough, and let me tell you, it turned out heavenly.
Don’t forget about the crust; misting the oven with water creates that crunchy exterior we all love.
And let’s be real, letting the bread cool completely can be a test in patience, but trust me—it’s worth it for that perfect slice.
Happy baking!
How to Serve?
To truly enjoy that warm, crusty Italian bread you just baked, you’ve got to think about how you’re serving it.
I love presenting it as a centerpiece at dinner. Just slice it up and place it on a rustic wooden board, maybe next to some fresh garlic-infused olive oil for dipping. You could even add a sprinkle of herbs, if you’re feeling fancy. Imagine your friends reaching for that first piece, the crust crackling—it’s delightful.
If you’re feeling adventurous, pair it with a hearty soup or a vibrant salad. Oh, and don’t forget a little charcuterie; it’s like a match made in heaven. Trust me, it’ll make your meal unforgettable, and you might just impress yourself.
Storage & Reheating Guide
When you find yourself with leftover crusty Italian bread (which, let’s be honest, isn’t an everyday occurrence), you’ve got to think about how to keep it fresh and delicious.
First, I wrap it tightly in plastic wrap to keep moisture in; that way, I’m not left with a loaf that feels like a rock. If I really want to go the extra mile, I toss it in a paper bag, too.
For reheating, I preheat my oven to about 350°F and pop the bread in for 10 to 15 minutes. Nothing beats that warm, crispy crust. To enhance your experience, consider using a Lazy Susan Organizer to keep your kitchen essentials easily accessible while preparing meals.
If I’m feeling wild, I might even toast slices for a crunchy twist. Just don’t forget to enjoy every bite!
Final Thoughts
Making crusty Italian bread from scratch is truly a rewarding experience, not just because of the delightful aroma that fills your kitchen, but also because it’s a labor of love.
There’s something magical about transforming simple ingredients into a beautiful loaf. I’ll admit, my first attempt looked more like a rock than a bread, but I didn’t let that stop me.
Every bake teaches you something new, right? Whether it’s creating that crispy crust or achieving the perfect chewiness, there’s always room for improvement.
So, don’t stress if things don’t turn out perfect; those rustic, slightly imperfect loaves are often the most memorable.
Grab some butter, gather your loved ones, and enjoy those heartwarming moments over slices of your homemade treasure.