I’ve got to share my latest obsession with you – crispy carnitas made in a slow cooker. Seriously, it’s like the perfect blend of ease and flavor. Imagine this: tender, juicy pork shoulder, spiced just right, and then that glorious broiling step for crispy perfection. I can’t help but wonder why I didn’t try this sooner. If you think that sounds good, just wait until I walk you through the process.
Why You’ll Love This Recipe
When it comes to comfort food, crispy carnitas might just take the crown. I can’t help but grin every time I sink my teeth into those tender bites with perfectly crispy edges.
You see, these crispy slow cooker carnitas aren’t just delicious; they’re super easy to make. I love preparing them on busy days since you literally set it and forget it, letting that slow cooker do all the work.
The aromas fill my kitchen, making me feel like a culinary genius, even on my laziest days. Plus, they’re so versatile—I use them in tacos, burritos, or just on their own.
Who wouldn’t want to dig into that? Trust me, once you try them, you’ll wonder how you ever lived without crispy carnitas in your life.
Equipment List
Crispy carnitas might steal the spotlight, but let’s not forget that even the tastiest recipes need the right tools in the kitchen.
To whip up this mouthwatering dish, you’ll want a slow cooker, of course—it’s my trusty sidekick. A large cutting board makes prep easy, especially when you’re hacking away at that pork shoulder.
Don’t forget a sharp knife; dull knives are the enemy. A pair of sturdy tongs helps when flipping those crispy bits, and a meat thermometer guarantees perfectly cooked meat. A premium slow cooker offers even heat distribution, ensuring that your dish comes out perfectly tender and juicy every time.
Oh, and don’t skimp on a food processor for those zesty toppings. Trust me, the right equipment makes all the difference, turning kitchen chaos into smooth sailing. Investing in a premium slow cooker can elevate your cooking experience significantly.
Who says cooking can’t be a breeze?
Our Ingredients
When it comes to cooking up a storm, the ingredients you choose can make or break your dish. For crispy carnitas, you’ll want a mix of flavors and textures that perfectly complement that succulent pork. It’s about bringing out those rich, savory notes while having just the right amount of zest.
Think tender meat, aromatic spices, and vibrant toppings that make every bite a delight. Plus, there’s something pretty magical about the way these ingredients come together – it’s like they were meant to be best friends in a tasty taco. So, let’s gather what we need, shall we?
Ingredients:
- 3-4 pounds pork shoulder (or pork butt)
- 1 tablespoon salt
- 1 teaspoon black pepper
- 1 tablespoon oregano (Mexican oregano if you can find it)
- 1 tablespoon ground cumin
- 1 onion, roughly chopped
- 4 cloves garlic, minced
- 1 orange (juice and zest)
- 1 lime (juice)
- 2 bay leaves
- 1 cup chicken broth
- Optional toppings: chopped cilantro, diced onions, avocado, lime wedges, salsa
Now, think about your ingredients for a second. The pork shoulder is the star of the show, of course, because it’s rich in fats that melt away during cooking and lend that coveted tenderness.
The spices? They’re like the supportive friends who come to the party and make everything better. And don’t forget about that zingy orange and lime juice – they totally elevate the dish with a kick of freshness.
If you’re not a fan of spicy stuff, that’s cool; feel free to adjust the seasonings to your liking. Cooking is all about making it personal, after all. Just make sure your ingredients are fresh and good quality. Trust me, a little splash of love (and maybe some extra garlic) goes a long way!
Step-by-Step Instructions
Making crispy carnitas isn’t just a cooking process; it’s an adventure that fills your kitchen with tempting aromas and leaves everyone drooling. So, let’s roll up our sleeves and embark on this delicious journey. Trust me, it’s worth every minute! Additionally, having the right luxury seafood cooking equipment can elevate your kitchen experience as you create mouthwatering dishes.
Step-by-Step Instructions
- Prep That Pork: Start with 3-4 pounds of pork shoulder (or pork butt). Cut it into large chunks. Not only does this help with cooking, but it also makes it easier to shred later. Plus, who doesn’t love a little meat-butting around?
- Seasoning Time: In a large bowl, mix together 1 tablespoon of salt, 1 teaspoon of black pepper, 1 tablespoon of oregano, and 1 tablespoon of ground cumin. Sprinkle this spice mix generously over the pork chunks, making sure to rub it in like you’re giving them a little spa treatment.
- Get Saucy: In your slow cooker, toss in the roughly chopped onion, 4 minced cloves of garlic, the juice and zest of 1 orange, juice of 1 lime, and 2 bay leaves. Then, plop those well-seasoned chunks of pork right on top. Pour in 1 cup of chicken broth, covering the pork as much as possible. Think of this as the flavorful swimming pool for our pork party.
- Cook Low and Slow: Cover your slow cooker and set it to low for about 8 hours (or high for 4-5 hours, if you’re in a hurry). This is where the magic happens. Wait until the pork is tender enough to shred with a fork. You’ll know it’s ready when the meat pulls apart easily, and you’re tempted to sneak a piece every five minutes.
- Crisp It Up: Once the pork is tender, carefully remove it from the slow cooker. Place it in a large bowl and shred it with two forks. Get your crispy game face on because it’s time to crank up that heat. Either in a hot skillet or a 400°F oven, spread the shredded pork out on a baking sheet.
- Broil for Perfection: If using the oven, broil the pork for 5-10 minutes, flipping it halfway through, until crunchy and golden brown on the edges. You want it to look like a piece of art—beautifully crispy, just calling out for some taco shells.
- Taste Test: Before serving, give it a taste. Just like a good chef does, right? Adjust the seasonings if needed; maybe a little squeeze of lime or a sprinkle of extra salt. Your taste buds are the judges here, so keep them happy!
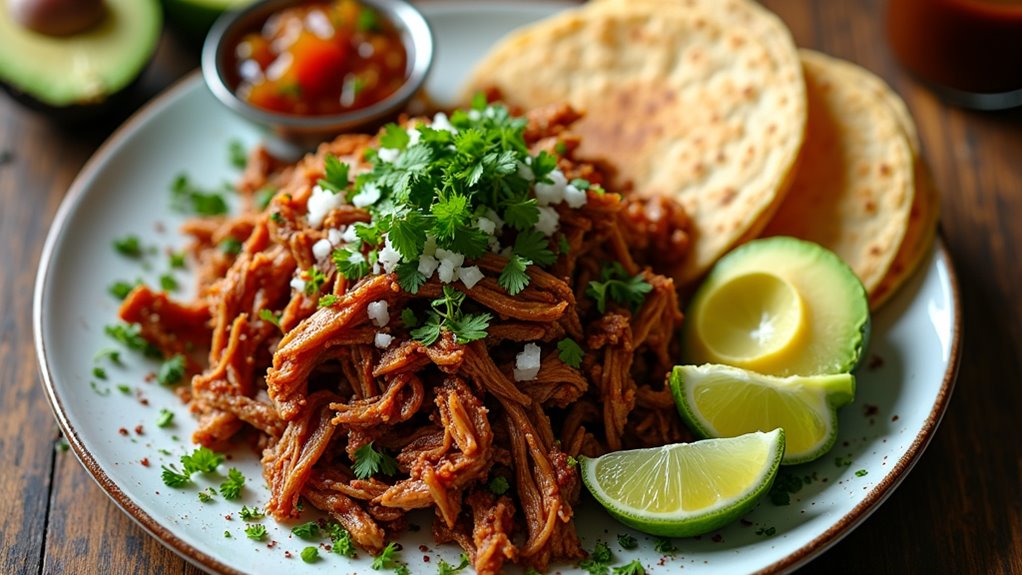
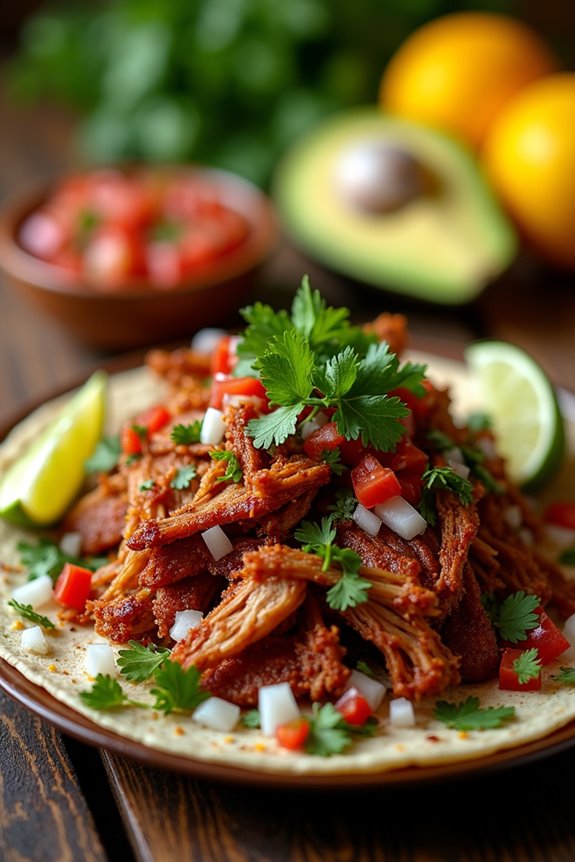
- Serve & Enjoy: Now for the fun part! Serve your crispy carnitas with toppings like chopped cilantro, diced onions, avocado, lime wedges, and salsa. Load them into tortillas, or brown them in a taco shell. Remember, this isn’t just dinner; this is a fiesta for your mouth.
And voila! You’ve mastered crispy carnitas that’ll make everyone sing your praises (or at least ask for seconds). Just keep in mind, there’s no such thing as too much salsa, so pour it on. Happy cooking!
Tips & Variations
While you might think that crispy carnitas are perfect just as they are, there’s a whole world of tips and variations waiting for you to explore.
Ever tried adding orange juice or zesty lime to the mix? It’s a game-changer. And if you’re feeling adventurous, throw in some chipotles for a smoky kick. Trust me, your taste buds will thank you.
When it comes to the meat, I like to mix pork shoulder with a bit of fatty pork belly. That extra richness really boosts the flavor.
Oh, and don’t forget to save the cooking liquid; it’s liquid gold.
How to Serve?
Serving crispy carnitas can feel like a mini celebration, with endless delicious options at your fingertips. I love piling the tender meat onto warm tortillas, letting the satisfying crunch do the talking.
Then, I add fresh toppings—like diced onions, cilantro, and a squeeze of lime. You wouldn’t believe how those flavors pop together. Sometimes, I even whip up a quick avocado crema for that extra zing.
If I’m being honest, I can’t resist serving them with a side of black beans for a comforting meal.
The best part? These carnitas are great for gatherings. People can build their own tacos. It’s like hosting a taco bar, minus any of the fuss.
Trust me, you’re gonna want to dig in.
Storage & Reheating Guide
Even the best carnitas deserve a good home after the feast, don’t you think?
I usually store my leftovers in an airtight container and toss them in the fridge. They’ll last about three to four days—just perfect for your next taco night.
If you’re a planner like me, freeze them, and they can hang out for up to three months without losing their flavor. Using soup freezer containers can help maintain their quality during freezing.
When it’s time to reheat, I prefer the oven for that crispy exterior: just pop them in at 375°F for about 10-15 minutes. You’ll thank me later.
Microwaving works too, but let’s be honest; soggy carnitas aren’t what we want.
Final Thoughts
When it comes to making crispy carnitas, I can’t help but feel a bit smug. Seriously, who doesn’t love that savory, melt-in-your-mouth goodness?
I remember the first time I attempted this recipe; my kitchen smelled like heaven, and I was a bit terrified I’d burn it all. But lo and behold, my slow cooker worked its magic.
Here’s the thing—once you nail down the recipe, it’s all about experimenting. Want to toss in some extra spices? Go for it. Planning a taco night? These carnitas will steal the show.
Trust me, your friends will think you’re a cooking wizard. So, roll up your sleeves, channel your inner chef, and enjoy every crispy, savory bite. You’ve got this.