I recently decided to whip up a Basque cheesecake in a loaf pan, and let me tell you, it’s a game-changer. Who knew making cheesecake could be this easy? I mean, just melt, mix, and pour – no fancy water baths required. Plus, the beautifully burnt top adds an impressive touch, even if I nearly miscalculated and turned my kitchen into a mini smokehouse. Curious how to achieve that creamy perfection? Stick around; I’ve got all the details coming up.
Why You’ll Love This Recipe
If you’re anything like me, the thought of a creamy, dreamy pasta sauce can make your taste buds tingle with excitement.
Seriously, there’s something magical about creamy pesto pasta sauce that just wraps around your pasta like a warm hug. It’s rich, flavorful, and oh-so-satisfying.
Picture yourself slurping those noodles, savoring every bite. I love how quick it’s to whip up, too. Just a handful of ingredients you probably have lying around.
Plus, it’s versatile—great for a date night or a weeknight gathering with friends.
I’ve even caught myself making extra just to have it as a midnight snack. Who says we can’t indulge?
Trust me—once you try it, you’ll be hooked.
Equipment List
When it comes to whipping up a delightful creamy pesto pasta sauce, having the right tools can make all the difference. I’ve found that a sturdy chopping board and a sharp knife are essential for mincing garlic; no one wants oversized chunks in their sauce.
You’ll need a medium pan for simmering, preferably non-stick—because let’s face it, burnt cheese isn’t exactly gourmet. Don’t forget a whisk; it’s vital for getting that creamy texture just right! A wooden spoon is great for stirring, too.
Finally, a measuring cup helps keep the ingredients balanced. Why struggle with eyeballing measurements? I’m not a psychic, after all. Additionally, using a silicone muffin pan can help you easily serve individual portions for a delightful presentation.
Our Ingredients
Alright, let’s talk about those vital ingredients for our Basque cheesecake! This creamy delight is all about balance and simplicity. You want to create something that feels rich yet wonderfully light.
As we gather our ingredients, think about the magic that happens when they come together. Each one plays a fundamental role in achieving that signature creamy texture and sweet, tangy flavor.
So, let’s plunge into the must-haves for this delicious dessert.
- 1 cup cream cheese, softened
- 1 cup heavy cream
- 3/4 cup sugar
- 1/4 cup all-purpose flour
- 2 large eggs
- 1 tsp vanilla extract
- 1/4 tsp salt
- Optional: Zest from 1 lemon or lime for added zing!
Now, onto some broader thoughts about our ingredient choices. It’s vital to use the freshest cream cheese you can find; it makes a world of difference in taste.
And don’t skimp on the heavy cream—it’s key for that luscious, velvety finish we’re aiming for.
Remember, the sugar isn’t just for sweetness; it actually helps create that beautifully caramelized top layer that we all adore.
If you want to make the taste pop even more, consider adding a zest of citrus; it creates a delightful contrast against the sweetness.
After all, who doesn’t love a bit of zing in their cheesecake?
Step-by-Step Instructions
Making Basque cheesecake is an exciting adventure in the kitchen, transforming simple ingredients into a rich, creamy dessert with a mesmerizingly charred top. If you’re ready to indulge your senses, just follow these easy steps to create a once-in-a-lifetime cheesecake that will have your friends begging for the recipe!
- Preheat the Oven: Start by preheating your oven to 400°F (200°C). This high heat is the secret to achieving that signature burnt crust, which is honestly what makes this cheesecake so distinctive and delightful.
- Prep Your Baking Pan: Grab a 9-inch springform pan (this is essential so you can easily release your cheesecake later). Line the bottom with parchment paper and grease the sides lightly with butter or cooking spray. Nobody wants sticky cheese, right?
- Mix Cream Cheese: In a large mixing bowl, take 1 cup of softened cream cheese and beat it with an electric mixer on medium speed. You want it creamy and smooth—think fluffy clouds. (No one likes lumps, and trust me, I’ve made that mistake before!)
- Add Sugar and Eggs: Gradually beat in 3/4 cup of sugar, followed by the 2 large eggs, one at a time. Make sure each egg is fully incorporated before adding the next. You want to achieve a light and airy mixture here. Try to resist the urge to lick the beaters…though who could blame you?
- Incorporate Heavy Cream: Next, pour in 1 cup of heavy cream and mix it gently. Keep it at a lower speed; we want it to blend without splashing cream everywhere. (Don’t forget to wear your favorite apron for this part—it can get messy!)
- Whisk in Flour and Flavorings: Now it’s time to add 1/4 cup of all-purpose flour, 1 tsp of vanilla extract, and 1/4 tsp of salt. Mix until just combined. (Remember: Don’t overmix! A few streaks of flour are absolutely okay.)
- Optional Zest: If you’re feeling adventurous and want to add some zest, now’s the time! A teaspoon of lemon or lime zest can add that zing that makes your cheesecake shine even brighter. Give it a gentle fold with a spatula.
- Pour and Bake: Pour this beautiful batter into your prepared springform pan and smooth the top with a spatula. Bake in your preheated oven for about 25-30 minutes. You want the top to be a rich golden brown, and the center should still have a slight jiggle—it’s like a warm hug from your oven!
- Cool Down: Once baked, turn off the oven and leave the cheesecake inside for another hour. This helps it cool gradually and prevents cracking, which is something we definitely want to avoid.
- Chill: After the hour is up, let it cool at room temperature for about 30 minutes. Then, cover it and pop it in the fridge for at least a few hours—or ideally overnight. (Patience is key here, folks.)
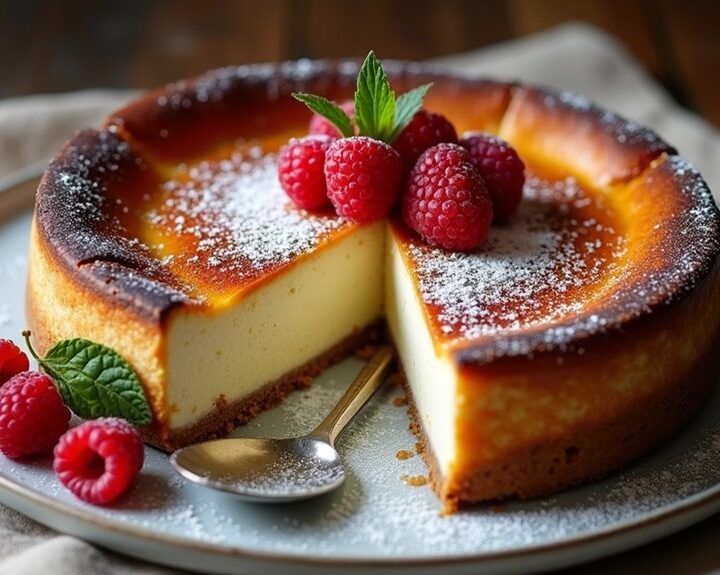
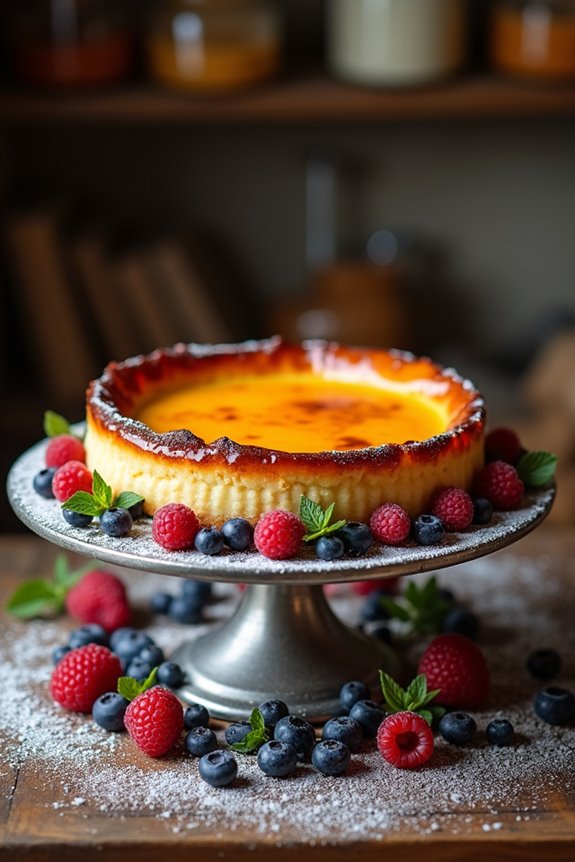
- Serve & Enjoy: When you’re ready to serve, carefully run a knife around the edge of the cheesecake before removing the springform pan. Slice it up and get ready for compliments. You may wish to serve with a light dusting of powdered sugar or fresh berries, but it’s also fantastic just as it is.
This cheesecake isn’t just a dessert; it’s an experience that combines the warmth of home baking with a touch of culinary artistry. Make sure to have the right Japanese cheesecake baking equipment for optimal results. Happy baking, and may your cheesecake turn out gloriously delicious!
Tips & Variations
After your cheesecake has cooled in the oven, it’s time to think about how to make this dessert truly your own. Honestly, there’s so much you can do!
For a richer taste, try swapping out some cream for sour cream or a dollop of Greek yogurt. Feeling adventurous? Add a swirl of berry coulis or chocolate sauce on top.
If you want to make mini versions, pour the batter into muffin tins—adorable and just the right size. And hey, you don’t have to stick with traditional flavors; try infusions like coffee or lemon zest. I once added vanilla for an extra luscious kick.
Experiment, have fun, and don’t be shy about mixing things up. Your cheesecake, your rules!
How to Serve?
When serving your Basque cheesecake, think about presenting it in a way that makes it as delightful to the eyes as it’s to the taste buds.
I like to dust the top with a sprinkle of powdered sugar, which just adds that touch of elegance. You can slice it into generous wedges, but trust me, a little goes a long way—this cheesecake is rich!
Pair it with fresh berries for a burst of color and flavor. I sometimes drizzle honey or a fruit coulis over the top; it’s a game-changer.
Don’t forget to serve it chilled—just like me on a hot summer day.
And if it wobbles a bit on the plate? That’s just part of its charming personality.
Storage & Reheating Guide
Storing your Basque cheesecake properly can make all the difference in keeping that creamy goodness intact. First, let it cool completely at room temperature.
Once it’s cool, wrap it tightly in plastic wrap or pop it in an airtight container. Simple, right? It’ll stay fresh in your fridge for up to five days. Trust me, though—if you’re anything like me, it’ll disappear much faster than that.
For optimal freshness, consider using an Onion & Garlic Keeper, which helps maintain the right environment for storing perishables.
When it comes to reheating, I recommend slicing off a piece and gently warming it in the microwave for about 15-20 seconds. Just enough to revive that melt-in-your-mouth texture without turning it into a weird, gooey disaster.
Final Thoughts
Even though making a Basque cheesecake can sound a bit intimidating, I promise you, it’s one of those desserts that just fills your heart with joy.
Honestly, it’s so forgiving; even if your crust isn’t perfect, who cares? The charred top makes it all look rustic and cozy. Plus, every bite of that creamy, custardy center is pure bliss. You’ll impress your friends—not that I’m trying to steal your thunder, of course.
Just remember, it’s all about the love you mix in while whisking. So, if you mess up a bit, just laugh it off. It’s cake, not rocket science, right? Just enjoy the journey and dig into that delicious slice.
Happy baking, and don’t forget to share!