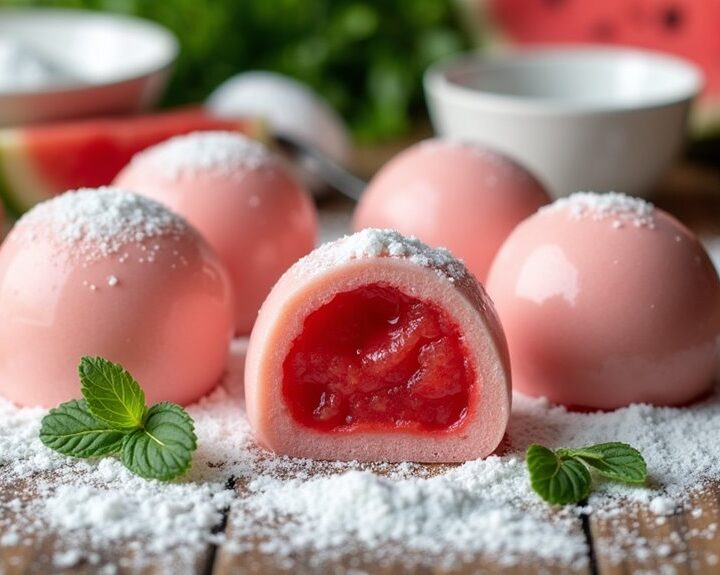
Have you ever sunk your teeth into a piece of mochi and thought, “This could use a little summer flair”? Well, I did, and that’s how I came up with my Delightful Watermelon Mochi Recipe. Picture that soft, chewy texture with a burst of juicy watermelon flavor. Sounds tempting, right? Between the fussing and the flour dust, I’ve had my share of kitchen mishaps, but when it comes together, it’s like magic. Ready for the fun journey ahead?
Why You’ll Love This Recipe
You’re in for a treat with this Watermelon Mochi recipe. Imagine biting into a sweet, chewy treat that’s as invigorating as a summer day.
What I love about this recipe is how it captures that playful vibe of classic Japanese melon pan, but with a fun twist! The combination of the soft mochi and the fruity watermelon flavor is pure magic.
Plus, it’s a great way to impress friends – who doesn’t want to show off a little Japanese culinary flair? I remember the first time I made these; I was convinced I’d mess it up. But they turned out beautifully and were gone in minutes.
Trust me, you’ll love these delightful little bites as much as I do.
Equipment List
When it comes to making Watermelon Mochi, having the right tools makes all the difference.
First up, you’ll need a microwave-safe bowl—it’s where the magic begins. A spatula will help mix things up, but don’t forget a measuring cup for precision, or else you might end up with a tropical disaster instead of a delight.
A silicone mat or cornstarch for dusting is essential, too; trust me, I learned that the hard way when my first batch stuck like glue. You’ll also want a rolling pin—just a simple one is fine—to flatten the mochi dough.
Oh, and some small cups for shaping those cute, little watermelons. With these tools, you’ll be on your way to an Instagram-worthy dessert in no time. Additionally, utilizing a pasta drying rack can also help streamline your dessert preparation by keeping the mochi from sticking together.
Our Ingredients
When it comes to making Watermelon Mochi, choosing the right ingredients can elevate your final product from simple to sensational. Imagine biting into a chewy, sweet, and invigorating treat that encapsulates the essence of summer. Sounds dreamy, right? Well, with the right mix of ingredients, you’ll be on your way to creating your very own bite-sized masterpieces, reminding you of warm, sunny days even in the dead of winter.
But before we plunge into the fun of mixing and molding, let’s gather our ingredients to guarantee you have everything you need for this tasty endeavor.
Here’s what you’ll need for your Watermelon Mochi:
- Glutinous rice flour (this is the star of the show—no substitutes here)
- Sugar (to sweeten the deal, because who doesn’t love a little sweetness)
- Water (let’s not forget the moisture; it’s as essential as your favorite playlist)
- Cornstarch or potato starch (to prevent sticking, trust me on this one)
- Red food coloring (for that classic watermelon hue, or green if you’re feeling daring)
- Optional: Watermelon flavoring (if you want to amp up the watermelon vibes even more)
Now, a quick side note about the ingredients: glutinous rice flour is key—don’t grab regular flour, or you’ll end up with a totally different texture, like, say, a brick (hello, kitchen disaster).
And if you can find it, the watermelon flavoring can really add that punch, making it taste just like summer in a bite.
If you’re feeling adventurous, you could even experiment with natural fruit purees for flavor, but be aware that may affect the consistency.
Step-by-Step Instructions

Creating Watermelon Mochi isn’t just a culinary task; it’s an opportunity to bring a little slice of summer into your kitchen, no matter the season. The moment you take that first chewy bite, the way the sweet watermelon flavor dances on your tongue, is absolutely worth the effort. Don’t worry, though—making mochi might sound intimidating, but with these easy-to-follow steps, you’ll be molding and shaping delightful treats in no time. Additionally, using the right cooking equipment gourmet kitchen can enhance your mochi-making experience.
Step-by-Step Instructions
1. Prepare the Dough: In a large mixing bowl, combine 200 g of glutinous rice flour and 100 g of sugar. Stir them together until evenly mixed.
Then, gradually add 250 ml of water, whisking gently to confirm there are no lumps. You want a smooth, slightly thick batter. (Pro tip: If you notice any stubborn lumps, worry not—just give it a good whisk!)
2. Cook the Dough: Transfer the mixture to a microwave-safe bowl, cover it loosely with plastic wrap (that way, it doesn’t get a weird crust), and microwave on high for 1 minute.
Stir, then microwave for another minute, and repeat this process one more time for a total of 3 minutes. You want the dough to become translucent and a little sticky. (It’s like magic, right? Just keep watching as it transforms!)
3. Cool Down: Once you’ve cooked the dough, carefully remove it from the microwave (it’s going to be hot, so watch those fingers!) and let it cool for a few minutes.
You want it to be warm but not so hot that it burns your hands when you start shaping it.
4. Shape the Mochi: Dust your work surface generously with cornstarch or potato starch to prevent sticking.
Scoop a portion of the dough (about the size of a golf ball) and flatten it into a disc using your hands. It doesn’t have to be perfect—each piece will have its unique, charming shape. (No judgment here! We embrace all imperfect mochi.)
5. Add the Filling: If you’re using watermelon flavoring or some diced fresh watermelon (which adds a nice touch), place a small amount in the center of your flattened disc.
Then, gently stretch the edges of the dough over the filling and pinch them together to seal it. Roll it into a ball and give it a light dusting of cornstarch so it doesn’t stick to everything like a toddler on a sugar high.
6. Repeat the Process: Continue forming the rest of your mochi, using the remaining dough and filling options.
Make sure to keep everything well-dusted with starch to avoid a sticky situation. (Trust me, sticky fingers aren’t nearly as cute as they sound.)
7. Final Touches: Once all your mochi are shaped, you can give them a final dusting with cornstarch or potato starch to keep them from sticking together.
Placing them in the fridge for about 30 minutes can help them firm up a bit more—plus, cold mochi is really invigorating.
And that’s it! Now you’re the proud creator of some amazing Watermelon Mochi.
Just a few steps, some patience, and you’ve crafted a treat that tastes like summer. So, share them with friends or keep them all to yourself—it’s totally your call. Enjoy them straight away or pack them into some cute containers for later. Happy mochi-making!
Tips & Variations
Now that you’ve shaped those adorable mochi balls, there’s always room to sprinkle in some fun and creativity with tips and variations.
For instance, if watermelon isn’t your jam, try using strawberry or mango puree instead. Trust me, your taste buds will thank you.
Also, don’t skimp on the cornstarch dusting—it prevents sticking and adds a nice touch to the presentation. If you want a little crunch, toss in some roasted sesame seeds. I once forgot them, and my mochi was sadder than a puppy in the rain.
Ultimately, feel free to experiment with the sweetness. If you’re feeling adventurous, add a pinch of salt to enhance flavors. Your mochi, your rules—just enjoy the process.
How to Serve?
Serving watermelon mochi can feel like an exciting event in your kitchen, especially when you finally get to share these little gems with friends or family.
I love arranging them on a pretty platter, maybe garnishing with mint leaves for that wow factor. When I serve them, I often cut some into halves or quarters—perfect for those who want just a taste.
Don’t forget the dipping sauces; a touch of sweet soy or melted chocolate makes everything more fun. Sometimes, I even make a little game out of it—who can eat the most before dessert’s gone?
Just imagine everyone giggling over sticky fingers and sweet smiles. It’s all about the joy of sharing, right?
Storage & Reheating Guide
While it might seem like a challenge to store leftover watermelon mochi, it’s actually pretty simple.
First, make sure your mochi is completely cool before storing. I usually grab an airtight container and layer parchment paper between pieces to prevent sticking.
You’ll want to keep them in the fridge for about three to five days, but let’s be real—if you’ve got leftovers, that’s a small miracle.
When you’re ready to enjoy them again, I find that letting them come to room temperature does wonders.
You can pop them in the microwave for about 10-15 seconds if you’re craving that fresh, chewy texture, which is similar to the freshness you can achieve with high end kitchen gadgets.
Trust me, it’s way better than risking a soggy bite. Enjoy!
Final Thoughts
Before diving into the sweet world of watermelon mochi, I can’t help but think about how fun—yet a bit tricky—it can be to make these little treats.
Seriously, who knew mochi could be so stubborn? There were times I felt like I was wrestling with a gummy monster.
But when those soft, chewy bites finally came together, let me tell you, they were worth the effort. Imagine biting into that invigorating watermelon flavor; it’s like summertime in your mouth.
And while I may have had a few mishaps—sticky hands and mochi that didn’t quite cooperate—I wouldn’t change a thing. It’s all part of the experience.