Let me tell you about my absolute favorite go-to dish: sweet sticky chili chicken thighs. Honestly, these juicy, marinated chicken thighs are like a flavor explosion in your mouth, and who doesn’t love a bit of sweetness mixed with just the right amount of spice? I can practically hear my taste buds cheering. And guess what? They pair perfectly with crispy fries, but don’t let me spoil the rest for you. You might just find this recipe irresistible.
Why You’ll Love This Recipe
You know how some recipes can just make you feel all warm and fuzzy inside? That’s how I feel about cheesy Italian arancini balls.
Imagine those crispy, golden bites, bursting with gooey cheese and a hint of parsley. They’re like comfort food wrapped in a crunchy coat. When I make them, I can’t help but smile as the aroma fills the kitchen.
It’s a total crowd-pleaser, perfect for parties or cozy nights in. Plus, they’re surprisingly fun to make. Rolling those little balls can feel like a mini workout, or maybe that’s just me.
Whether you’re dunking them in marinara or just snacking straight from the frying pot, trust me, they’ll make your taste buds dance with joy.
Equipment List
When diving into the delightful world of cheesy Italian arancini balls, having the right equipment can make all the difference. Trust me, I’ve been there—attempting to make these tasty bites with mismatched tools and being left with a messy kitchen and sad, sticky rice.
You’ll want a sturdy pot for cooking the risotto, an ice cream scoop to form perfect balls, and a shallow dish for your flour, egg, and panko. A thermometer also helps keep the oil at 350°F—no one wants burnt arancini, right?
Using a frying basket can help them cook evenly, too. Additionally, elevating your dining experience with a luxury salad bowl set can impress your guests while serving these delicious bites. So grab your gear, and let’s get cooking! I promise, you’re going to love how these turn out.
Our Ingredients
So, if you’re looking to whip up some delicious cheesy Italian arancini balls, you’ll first need to gather your ingredients. It’s a pretty straightforward list, but trust me, each one plays a vital role in creating those tasty, crispy bites of risotto goodness.
Now, don’t let the list intimidate you; once you have everything ready, it’s all about mixing, forming, and frying your way to a delightful snack. Here’s what you’ll need:
- 1 1/2 cups arborio rice
- 3 1/2 cups broth (vegetable or chicken works)
- 1/2 cup wine (any dry white will do)
- 1 cup milk
- Cheeses (cheddar, mozzarella, parmesan – mix it up)
- 2 eggs
- Fresh parsley (chopped, because why not add a little green)
- Flour (for breading)
- Panko (it gives that lovely crunch)
- Oil (for deep-frying, of course)
Now, let’s dive a little deeper into these ingredients. Arborio rice is the star of our show, providing that creamy, dreamy texture you want in risotto. The mix of cheeses really takes it over the top, adding that gooey, melty goodness when you bite into the arancini.
And don’t skimp on the parsley; it brightens everything up! As for the oil, think of it as the playground for your arancini. Too hot? They burn; too cold? They’ll be a soggy mess.
Step-by-Step Instructions

Making cheesy Italian arancini balls might sound fancy, but it’s actually a fun, satisfying project that will fill your kitchen with beautiful aromas. Elevate your kitchen with premium cooking appliances as you embark on this delicious venture.
So, roll up your sleeves and get ready to plunge into this deliciously cheesy adventure. You’ll be mixing, forming, frying, and before you know it, you’ll have a plate full of golden-brown risotto balls that are simply irresistible.
Let’s get started!
1. Cook the Risotto: In a large pot, melt 2 tablespoons of butter over medium heat. Toss in a finely chopped onion and 2 cloves of minced garlic, sautéing until they become translucent.
Next, add 1 1/2 cups of arborio rice, stirring until it’s well coated and toasty, before pouring in 1/2 cup of dry white wine. Let it simmer for just a minute or two before gradually adding 3 1/2 cups of broth (vegetable or chicken works great), along with 1 cup of milk.
Stir often, allowing the mixture to absorb the liquid. This process usually takes about 20 minutes, and when it’s ready, you want it creamy with a bit of bite—perfect risotto!
2. Cool and Mix: Once your risotto is cooked, transfer it to a large bowl, and let it cool completely. The cooling is a must—nobody wants sticky hands when shaping balls.
Once cooled, mix in 2 beaten eggs, 1 cup of mixed cheeses (think cheddar, mozzarella, and parmesan for that cheesy goodness), and a handful of chopped fresh parsley.
It’s all about that lovely blend of flavors. Don’t be shy—get your hands right in there and mix until everything is well incorporated.
3. Shape the Balls: Now comes the fun part. Take a scoop of your rice mixture and flatten it slightly in the palm of your hand.
Place a small cube of mozzarella (about 1/2 inch) in the center and mold the rice around it, forming a ball. This can get a little messy, but trust me, it’s totally worth it.
You want each ball to be about the size of a golf ball—just right for popping into your mouth.
4. Bread the Balls: Set up a breading station with three shallow bowls: one with flour, another with a beaten egg, and a third filled with panko.
Roll each arancini ball first in flour, shaking off the excess, then dip it into the egg, and finally coat it with panko for that crispiness we all love.
Make sure each ball is nicely covered—this is what creates that golden-brown exterior when we fry them.
5. Fry the Arancini: Heat up oil in a large, deep skillet or pot to 350°F (take your time with this to get it just right).
Fry the arancini in batches—don’t overcrowd the pan—until they’re golden brown, which usually takes about 4-5 minutes.
Use a slotted spoon to carefully remove them and let them drain on paper towels. The sound of them sizzling is music to your ears, isn’t it?
6. Serve and Enjoy: Ideally, you want to serve your arancini fresh and hot, alongside a warm marinara sauce for dipping.
The gooey mozzarella inside will melt in your mouth, creating a delightful combination of flavors and textures. You just can’t compete with that crispy outside and creamy inside.
And that’s it! You’ve now conquered the art of making arancini.
Gather your friends, plate them up, and watch as these little balls of joy disappear. Enjoy every cheesy, crispy bite, and remember… next time, maybe you should make a double batch. They won’t last long.
Tips & Variations
Even if you think you’ve nailed the basics of arancini, there’s always room to play around and make this dish your own.
Want a spicy kick? Add some crushed red pepper to the risotto, and trust me, your taste buds will party. I love sneaking in some finely chopped veggies like spinach for a color boost, too. If you’re feeling fancy, try different cheeses—gorgonzola or goat cheese can add a rich twist.
And leftovers? Form them into patties, pan-fry them the next day for lunch, and you’re in business. Just remember to cool the rice completely; that’s the secret to making perfectly crispy balls.
Who knew cooking could be so fun and creative?
How to Serve?
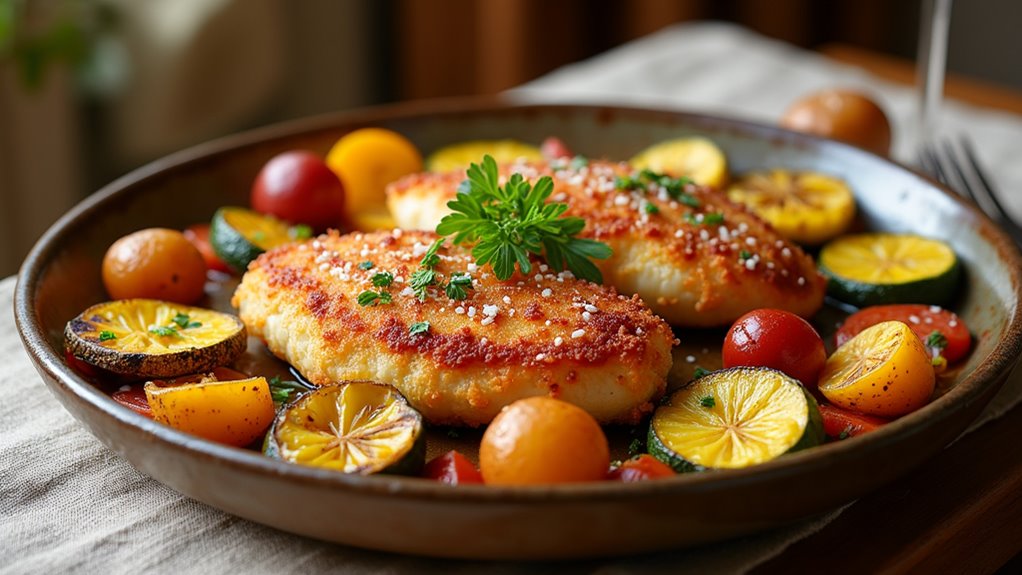
When it comes to serving my sweet sticky chili chicken thighs, I like to keep it simple yet satisfying. First off, I plate the thighs, glistening with their spicy glaze—talk about eye candy.
I often pair them with fluffy rice or a crunchy salad; the contrast between flavors just hits the spot. Don’t forget the sauce! I like to drizzle some over the top for extra flair.
Sometimes, I’ll sprinkle fresh herbs for that pop of color and freshness, too. If I’m feeling adventurous, I add a few lime wedges on the side—who doesn’t love a zesty kick?
And let’s be honest, you can’t go wrong with a side of crispy fries to mop up that sauce.
Storage & Reheating Guide
After enjoying those sweet sticky chili chicken thighs, you might find yourself with leftovers that are just too delicious to leave behind. Honestly, I can’t resist saving some for later.
To store, simply let the chicken cool, then pop it into an airtight container. It’ll stay fresh in the fridge for about 3 to 4 days, but good luck trying to make it last that long.
When you’re ready to enjoy them again, just pull out your trusty skillet. Heat them over medium heat, adding a splash of water or broth to keep them moist.
Cover for a few minutes, and voilà, dinner’s back on the table. Trust me, it’ll taste just as good, maybe even better the next day. Plus, you can feel good about your choice to use sustainable style when opting for reusable glass containers for storage.
Final Thoughts
Cooking can sometimes feel challenging, right? But believe me, once you nail this Sweet Sticky Chili Chicken Thighs recipe, you’ll feel like a kitchen rockstar.
Seriously, it’s got that perfect balance of sweet and spicy, and your taste buds will thank you. Whether you’re cooking for family or just treating yourself, this dish is simple yet impressive.
I still remember my first attempt—I practically doused everything in sauce and created a kitchen mess that looked like a crime scene. But hey, that’s part of the fun, isn’t it? Plus, you get to lick the spoon.