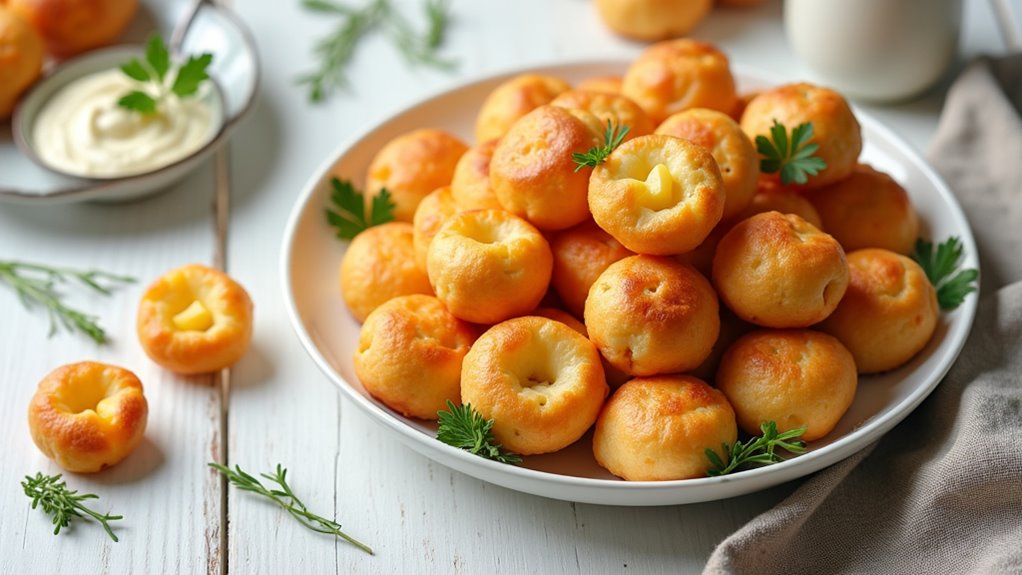
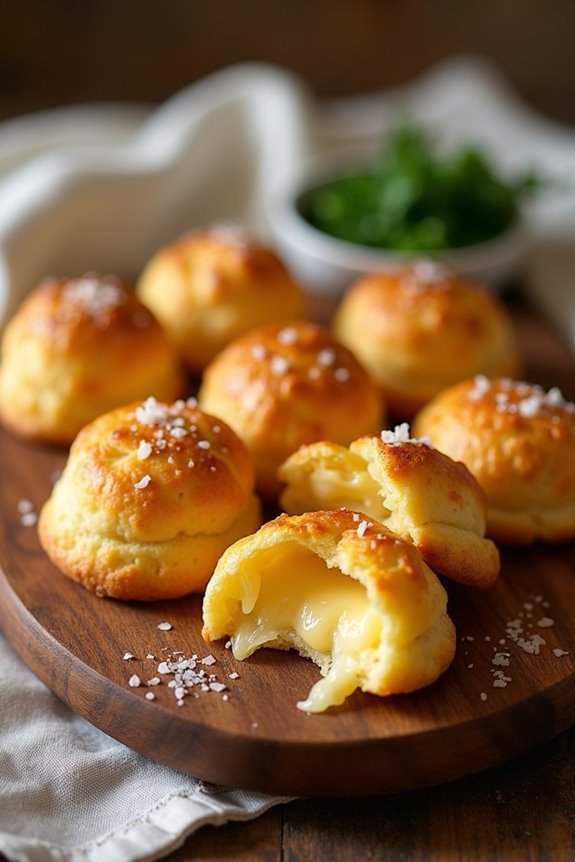
When I think of cheese puffs, I can’t help but smile. There’s something about that crispy outside and gooey, cheesy inside that just screams comfort food, don’t you agree? I remember the first time I made them—let’s just say it was a hilarious mess, but worth every bite. With a handful of simple ingredients and a bit of creativity, you can whip up a batch that’ll impress everyone. Curious about how to make these delightful snacks?
Why You’ll Love This Recipe
If you’ve ever craved a snack that’s cheesy, light, and downright irresistible, let me introduce you to cheese puffs. You’re gonna love how simple and fun they’re to whip up. Imagine this: you’re wrestling with a late-night snack itch, and instead of diving into a bag of chips, you can create these little nuggets of cheesy happiness right at home. They’re crispy on the outside and soft inside—just perfect for popping in your mouth. Plus, they’re super customizable; sprinkle in your favorite spices if you’re feeling adventurous. And trust me, your friends will think you’re some gourmet chef when you serve them piping hot. These cheese puffs are the kind of treat that brings people together, laughter included.
Equipment List
Making cheese puffs is a breeze, but having the right equipment makes it even smoother.
First up, you’ll need a mixing bowl—preferably a sturdy one, because trust me, nothing’s worse than a bowl that tips over mid-mix. A wooden spoon or a hand mixer will help blend that cheese and butter like a dream.
Don’t forget a small cookie scoop; it makes sizing those puff balls a cinch—trust me, my first batch looked like a strange cheese blob festival.
You’ll also need a parchment-lined baking tray because who wants sticky clean-up?
And, if you’ve got an oven thermometer lying around, now’s the time to use it. It keeps my baking on point. In fact, investing in premium baking equipment can elevate your entire baking experience.
Happy snacking!
Our Ingredients
When it comes to making cheese puffs, the ingredients are surprisingly simple but packed with flavor. You probably already have most of them hanging around in your kitchen, so let’s explore what you’ll need to whip up these tasty bites that are sure to impress your family and friends.
Seriously, who can resist warm, cheesy puff goodness? Not me. Okay, let’s get to the list.
Ingredients:
- 1 cup grated cheddar cheese
- 1/4 cup unsalted butter, softened
- 1/2 cup all-purpose flour
- 1/2 teaspoon paprika
Now, here’s a more detailed look at your ingredients. First off, that grated cheddar cheese? Go for the good stuff. A nice sharp cheddar will give your puffs that extra kick of flavor that makes you go “Wow!” rather than “meh.”
And about that unsalted butter—I know, I know, some of us just grab whatever butter is in the fridge, but unsalted gives you more control over the taste.
Think about the flour, too; all-purpose is perfect, but if you’re feeling adventurous, a little whole wheat flour might add a nice nutty twist.
And don’t skimp on the paprika. Just a smidge enhances the flavor and gives those cheese puffs a beautiful touch of color.
Step-by-Step Instructions
Making homemade cheese puffs is a delightful and rewarding experience, and trust me, it’s much easier than it sounds. Just a few simple steps, and you’ll have delicious, cheesy bites that are perfect for snacking or entertaining. Let’s dive right into the process, shall we?
- Cream the Cheese and Butter: Start with 1/4 cup of softened unsalted butter and 1 cup of grated cheddar cheese. In a mixing bowl, cream them together until the mixture is smooth and well combined. The texture should be creamy, and everything should feel like it’s having a little dance party.
- Mix in the Dry Ingredients: Next up, grab 1/2 cup of all-purpose flour and 1/2 teaspoon of paprika. Sprinkle the flour and paprika over the cheesy mixture, and mix it all together until you form a smooth dough. If you find yourself getting a little workout swirling your spoon, that just means you’re doing it right!
- Shape the Dough: Now it’s time to get hands-on. Using your fingers or a small cookie scoop, shape the dough into marble-sized balls. Aim for a roundness that would make a perfect little cheese puff—don’t stress if they’re not all identical. Each puff is unique, just like us.
- Prepare for Baking: Line a baking tray with parchment paper. This is your cheese puff runway. Place the formed dough balls on the tray, keeping a bit of space between them. They’ll spread out a tad while baking, so don’t cram them together like they’re rushing for the last piece of pizza.
- Bake to Perfection: Preheat your oven to 350°F (175°C). Pop the tray into the oven and bake for about 15 minutes. The cheese puffs should be puffed up and lightly golden around the edges. Keep an eye on them, because nobody likes overbaked cheese puffs—you want them just right.
- Cool and Serve: Once they’re out of the oven, let the puffs cool slightly on the tray. This waiting period is essential; hot cheese puffs might scorch your tongue. After a few minutes, they’re ready to be enjoyed.
And there you have it, folks! Cheese puffs that are sure to be a hit with family and friends—or, sorry not sorry, a tasty treat just for you. Now, who needs a warm, cheesy snack? Don’t forget that using premium kitchen appliances can enhance your cooking experience and make the process even smoother!
Tips & Variations
Even though cheese puffs are delicious on their own, there’s a whole world of tips and variations that can elevate your snacking experience.
For a fun twist, why not swap in different cheeses? Goat cheese or pepper jack can add a nice kick. I’ve also tried adding spices like garlic powder—so good. If you want them a bit healthier, you can mix in some finely chopped veggies. Trust me, I was skeptical at first, but it worked wonders.
And don’t stress about shaping them perfectly! I often embrace the “rustic” look—more character, right?
Just make sure you’re not overbaking them; a light golden hue is the goal. They’ll disappear fast, so be ready for compliments.
How to Serve?
While there’s no wrong way to enjoy cheese puffs, I find that serving them up with a few extra touches can really impress your guests, or even just yourself. Imagine this: a lovely platter, adorned with basil leaves and maybe a small bowl of spicy salsa or creamy ranch dip.
It’s like a fancy restaurant experience at home. Sometimes, I sprinkle a bit of extra paprika on top for that pop of color.
And don’t forget the whimsical serving utensils—vintage cocktail picks or colorful toothpicks makes it feel special. I mean, who doesn’t love an appetizer that’s fun to eat?
Storage & Reheating Guide
When it comes to cheese puffs, I always find myself with a few left over—because let’s be honest, they vanish faster than I can bake them.
To store them, I toss the cooled puffs into an airtight container and pop them in the fridge. They’ll last about three days, but let’s face it, that’s a stretch for my snacking habits.
Freezing’s an option too. Just lay them out on a tray, freeze until solid, then transfer to a bag—this way, they won’t stick together like old friends.
Also, if you want to elevate your cheese puffs experience, consider making your own cheese with a gourmet cheese making kit to achieve that fresh, artisanal flavor.
When I want to reheat, I simply pop them in the oven at 350°F for about 10 minutes. It’s amazing how they regain that fresh, cheesy magic.
Final Thoughts
As I reflect on this whole cheese puff experience, I can’t help but chuckle at how something so simple can bring such joy to snack time (or any time, really).
Seriously, whipping these up is like a mini celebration. You mix some cheese, butter, and flour, and voilà—little bites of happiness. Have you ever seen anyone frown while eating a cheese puff? I doubt it.
They’re crunchy, cheesy, and perfect for sharing, or not. Sometimes, I find myself hiding them away; they just disappear too quickly.
And let’s not even talk about the aroma that fills your kitchen. It’s a heartwarming reminder that cooking can be both simple and joyous.