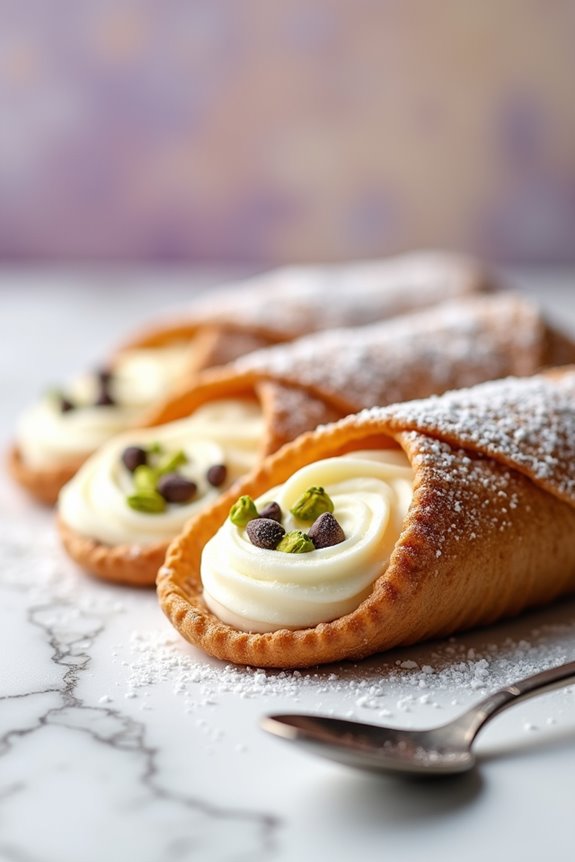
I’ve always found cannoli to be a little slice of heaven. Who can resist those crispy shells filled with creamy goodness? I certainly can’t, especially when I can customize them with chocolate chips or crushed pistachios. It’s like a flavor party in your mouth. I remember my first attempt—let’s just say the shells didn’t exactly win any beauty contests. But hey, they tasted fantastic. Ready to whip up your own batch? Let’s get rolling.
Why You’ll Love This Recipe
When you bite into a perfectly crispy, flaky cannoli, it’s like a little taste of heaven. Trust me, I’ve tried a bunch of recipes, and this one takes the cake—or should I say, the pastry?
You’ll love how easy it’s to make the dough and fill it with creamy ricotta. Picture that smooth filling melting in your mouth, while the crunchy shell provides the ideal contrast.
And here’s a tip: don’t skimp on the powdered sugar dusting. It elevates the whole experience.
Have you ever had cannoli that were too sweet? This recipe strikes that perfect balance. Plus, you can customize with chocolate chips or pistachios.
How can you resist indulging in something this delightful? You can’t!
Equipment List
Before diving into the delicious world of homemade cannoli, let’s talk about the equipment you’ll need.
First up, grab a mixing bowl—where all the magic begins. You’ll also need a rolling pin for stretching that dough, and trust me, a good one makes all the difference.
Cannoli tubes are essential for shaping those delightful shells; if you don’t have any, you can improvise with some sturdy, clean metal objects.
Don’t forget a deep pot for frying—something that can hold enough oil to immerse those shells.
Finally, a piping bag (or a zip-top bag with a corner cut off) is perfect for filling your cannoli.
Additionally, having the right kitchen appliances can greatly enhance your breakfast cooking experience.
It’s the little things that make the biggest difference in this process, right?
Our Ingredients
Making authentic cannoli is a wonderful adventure into the world of Italian desserts, and it all starts with the ingredients. Trust me, you want to make sure you’re stocked up on all the right stuff before you begin.
That way, when it’s time to whip up those crispy shells and luscious filling, you’ll be ready to roll—literally. So, let’s break it down and make sure you know exactly what you’ll need to create these scrumptious treats.
Ingredients:
- 2 cups all-purpose flour
- 1 tbsp sugar
- 1 large egg
- 1 tbsp vegetable oil
- ¼ cup Marsala wine
- 3 tbsp milk
- 1 egg white (for sealing)
- Vegetable oil (for frying)
- 4 cups ricotta cheese
- ¾ cup powdered sugar
- ½ tsp cinnamon
- Chocolate chips and/or pistachios (optional)
Now, let’s chat about these ingredients a bit. Using high-quality ricotta is key to achieving that creamy filling that everyone loves.
Nobody enjoys a grainy filling, right? And Marsala wine? Don’t skip it. It may sound fancy, but it gives the dough that lovely depth of flavor, while keeping the shells light and crispy.
As for the optional chocolate chips and pistachios, well, let’s just say they’re like cherry on top of an already amazing dessert—totally worth it if you want that extra crunch or a sweet surprise.
Just remember, creating cannoli is all about that unique balance of flavors and textures, so feel free to play around a bit.
Step-by-Step Instructions
Making authentic cannoli is a delightful project that can impress anyone with a sweet tooth. This step-by-step guide will have you whipping up a batch of these crunchy, creamy treats in no time. It’s time to don your apron, because we’re about to begin a delicious journey!
Step-by-Step Instructions
1. Make the Dough: In a large mixing bowl, combine 2 cups of all-purpose flour and 1 tablespoon of sugar. Toss in 1 large egg, 1 tablespoon of vegetable oil, ¼ cup of Marsala wine, and 3 tablespoons of milk. Mix everything together until a dough begins to form (it should be a bit shaggy but come together nicely).
2. Knead the Dough: Turn the dough out onto a lightly floured surface and knead it for about 5-7 minutes until it’s smooth and elastic. Remember, the more you work it, the better the texture—think of it like giving a little love tap.
Cover the dough with plastic wrap or a clean kitchen towel and let it rest for about 30 minutes. This helps the gluten relax, making it easier to roll out later.
3. Roll Out the Dough: After resting, divide the dough into smaller portions for easier rolling. Roll each portion out thin—about 1/8 inch thick—using a rolling pin. If it hasn’t reached that level of thinness, don’t be shy about rolling it again.
4. Cut the Dough Circles: Use a round cookie cutter or a glass to cut out circles, about 3-4 inches in diameter. Gather the scraps, re-roll them, and cut more circles until you’ve used up most of your dough.
5. Wrap the Tubes: Take a cannoli tube and wrap each circle of dough around it, overlapping the edges slightly. Make sure to seal the edge thoroughly using a bit of egg white (you’ll need 1 egg white for this).
This is like the glue that holds the whole thing together, and nobody wants a loose shell at the end.
6. Fry the Cannoli Shells: Heat up some vegetable oil in a deep frying pan or heavy pot until it reaches about 350°F (175°C). Carefully slip in the wrapped tubes, frying the shells until they turn golden brown, which should take about 2-3 minutes.
Remember to turn them so they cook evenly. Once done, carefully remove the tubes from the oil and set them on paper towels to drain. Allow them to cool completely before attempting to remove the shells from the tubes.
7. Prepare the Filling: While the shells are cooling, it’s time for the filling. In a mixing bowl, combine 4 cups of ricotta cheese, ¾ cup of powdered sugar, and ½ teaspoon of cinnamon. If you’re feeling fancy, toss in some chocolate chips or pistachios for that extra crunch.
Mix until it’s all well combined and creamy—oh, the smell is heavenly.
8. Pipe the Filling: Once the cannoli shells are completely cool (this is important; nobody likes soggy cannoli), it’s time to fill them. Use a piping bag to fill the shells with the ricotta mixture. Don’t be shy—pack it in there generously.
You want that first bite to be a flavor explosion.
9. Finish with a Dusting: After you’ve filled the shells, dust them lightly with powdered sugar for that classic touch. If you opted for pistachios or chocolate chips, sprinkle them on the ends for added flair and crunch.
10. Serve and Enjoy: Your delightful cannoli are now ready to be savored. Take a moment to admire your masterpiece before you jump in—there’s something truly satisfying about seeing your hard work come to life.
Creating these Italian treats may seem intimidating at first, but trust me, once you immerse yourself in the process, you’ll find each step is quite straightforward. Enjoy making these cannoli; they’re a wonderful treat for any occasion (or just a casual dessert). Also, don’t forget to have the right cheese making equipment on hand to ensure the freshest, creamiest ricotta possible for your filling.
And hey, if they don’t turn out perfect the first time, no worries—just keep practicing, and soon enough, you’ll be a cannoli expert.
Tips & Variations
When it comes to perfecting your cannoli game, a few tips and variations can really take your creation from “meh” to “magnifico.”
You know, every baker has their secret tricks up their sleeve—I mean, I always wish I could channel my inner Italian nonna, but let’s be real, I sometimes need a little help, too.
If you want crispy shells, roll the dough really thin and keep an eye on the frying time—don’t let them get too dark.
As for the filling, I love adding mini chocolate chips or crushed pistachios for a fun twist.
And hey, if you’ve got some orange zest lying around, toss that in for a burst of flavor.
Who wouldn’t love that?
How to Serve?
After you’ve crafted those perfectly crispy cannoli shells and whipped up that delightful ricotta filling, it’s time to think about how to serve them.
First, grab a platter and arrange those beauties in a single layer, keeping them upright if possible. Trust me, they look way more charming that way.
Now, dust them with powdered sugar like you’re an artsy chef, making sure each one gets a little love. If you’re feeling fancy, sprinkle some crushed pistachios or chocolate chips on top for that extra flair. Honestly, I can’t resist doing that—it adds a pop of color!
Finally, serve them immediately. Nothing beats the joy of seeing your guests’ faces light up when they plunge into those creamy, dreamy treats.
Storage & Reheating Guide
Even though you might want to devour those cannoli right away, they do need a little TLC when it comes to storage.
To keep ’em crispy, I’d recommend storing the shells and filling separately. Trust me, nobody wants soggy cannoli.
Place the shells in an airtight container and store them at room temperature. For the filling, stick it in the fridge. It’ll last about two days, but let’s be honest, they’re way too good to linger around that long.
When you’re ready to enjoy, just pipe the filling into the shells right before serving. If you do have leftovers, I suggest reheating the shells gently in an oven at low heat.
I’ve definitely burnt a few—don’t be like me. Making artisan cheese at home can also open the door to new culinary experiences.
Final Thoughts
While it might be tempting to gobble up every single cannoli right after making them, I’ve learned the hard way that patience is key.
Trust me, letting those crispy shells cool completely before you fill them makes a world of difference. Otherwise, you’ll end up with a soggy mess—and nobody wants that, right?
The filling? Oh, it’s a masterpiece, especially with a hint of cinnamon and a sprinkle of chocolate chips. It’ll make your taste buds dance.
I encourage you to get creative; try adding your favorite ingredients. Sharing them with friends makes it even sweeter, but who am I kidding—I’ve been known to hoard a few for myself.
Enjoy the process, and let your love for cannoli shine through.