I’ve got to tell you about my adventures in making herb-infused buttermilk fried chicken. Imagine this: juicy chicken bathed in a tangy buttermilk bath, then cloaked in a mix of fresh herbs and spices. It’s a bit like a flavor party, and everyone’s invited. I mean, who doesn’t love a crispy exterior that gives way to tender meat? But hold on, I can’t give away all my secrets just yet—let’s get into the nitty-gritty of making this dish shine.
Why You’ll Love This Recipe
When you sink your teeth into a piece of this herb-infused fried chicken, it’s hard not to smile—especially since it’s so easy to make.
Seriously, buttermilk fried chicken with fresh herbs and garlic simply transforms an ordinary meal into a soul-satisfying experience. I mean, who doesn’t love crispy, golden-brown chicken that’s bursting with flavor?
The addition of fresh herbs changes everything. You’ll be wondering why you ever settled for plain fried chicken. Plus, the buttermilk tenderizes the meat, so each bite is juicy and delicious.
Trust me, if you’ve been searching for a showstopper for your next gathering—or just a Friday night dinner with yourself—you’ve just found it. You can thank me later, right after you devour every last piece.
Equipment List
Got a few essential pieces of equipment in your kitchen? You’ll definitely want to gather them before diving into this herb-infused buttermilk fried chicken adventure.
First up, a cutting board and a good chef’s knife make quick work of prepping chicken. Next, don’t forget a large mixing bowl for your buttermilk and flour mixture—trust me, spills happen.
A skillet is essential for frying, and I swear by a cast-iron one for that perfect crisp. Cast iron skillets are known for their excellent heat retention and even cooking properties. You’ll also need a meat thermometer; no one wants undercooked chicken, right?
Finally, some tongs will help you flip those golden pieces without turning your kitchen into a battlefield. Seriously, I’ve learned the hard way that flying hot oil isn’t fun at all.
Have fun cooking!
Our Ingredients
When it comes to making herb-infused fried chicken, the right ingredients can make or break your dish. The good news? You likely have most of what you need already lurking around in your pantry. This recipe not only incorporates the savory punch of fresh herbs but also the tangy goodness of buttermilk. Who knew chicken could be so versatile and delicious?
Plus, it’s a fantastic way to impress your friends or family—trust me, they’ll be begging for the recipe.
Here’s what you’ll need to whip up this scrumptious dish:
- 1 package boneless skinless chicken breasts
- ½ cup all-purpose flour
- 1 tablespoon chopped fresh parsley
- 1 tablespoon fresh thyme leaves
- ½ teaspoon garlic powder
- ¼ teaspoon salt
- ¼ teaspoon pepper
- ¼ cup butter with olive oil
- 1 cup buttermilk
Now, while the ingredients list isn’t overly complicated, there are a few things to take into account. Fresh herbs—like parsley and thyme—really elevate the flavor of the chicken, so it’s worth seeking those out if you don’t have them in your fridge.
If you find yourself frantically searching the grocery aisle for buttermilk, don’t worry; you can actually substitute milk mixed with a splash of vinegar or lemon juice if you’re in a pinch. Just let it sit for a few minutes to mimic that creamy tanginess.
And if you’re like me, always forgetting to check pantry supplies, maybe jot down the ingredients on a post-it before you head to the store. It saves time and helps avoid a last-minute sprint for flour.
Happy cooking!
Step-by-Step Instructions
Making herb-infused fried chicken is a delightful and satisfying experience—especially when you realize just how easy it can be! By combining boneless skinless chicken breasts with a tangy buttermilk marinade and a herby flour coating, you create a dish that will have everyone raving. Ready to jump in? Just follow these straightforward steps to create your masterpiece.
1. Prep the Chicken: Start with 1 package of boneless skinless chicken breasts. Place each piece between two sheets of plastic wrap or parchment paper. Using a meat mallet (or a heavy rolling pin if you’re feeling creative), pound the chicken to about ½-inch thickness. This helps the chicken cook evenly and stay juicy—because nobody wants a dry piece of chicken, right?
2. Marinate in Buttermilk: Next, take 1 cup of buttermilk and dip each piece of the pounded chicken into it, ensuring it’s fully coated. This tangy marinade won’t only add flavor but also keep the chicken moist during cooking. Once coated, let the chicken sit for a few minutes (maybe while you clean up a little).
3. Mix the Flour Coating: In another bowl, mix together ½ cup of all-purpose flour, 1 tablespoon chopped fresh parsley, 1 tablespoon fresh thyme leaves, ½ teaspoon garlic powder, ¼ teaspoon salt, and ¼ teaspoon pepper. Give everything a good stir to combine; those herbs should be distributed evenly throughout.
4. Coat the Chicken: After letting the buttermilk soak in, now it’s time for the fun part. Take each piece of chicken and let any excess buttermilk drip off before dredging it in the herbed flour mixture. Make sure each piece is well-coated; you want that glorious crunch when it cooks. (And try not to lick your fingers—it’s hard, I know.)
5. Heat the Skillet: In a skillet, melt ¼ cup of butter with olive oil over medium-high heat. You want to get that oil nice and hot so the chicken can sizzle when you add it. (Pro tip: If you see some bubbles forming, it’s ready!)
6. Cook the Chicken: Carefully add the coated chicken to the skillet. Listen for that satisfying sizzle. Cook for about 5 minutes without messing with it—this allows a nice golden crust to form.
After the first side is crisp, turn the chicken over and reduce the heat to medium. Let it cook for another 5–7 minutes. (You’re looking for an internal temperature of 165°F—so if you’ve got a meat thermometer, now’s the time to whip it out.)
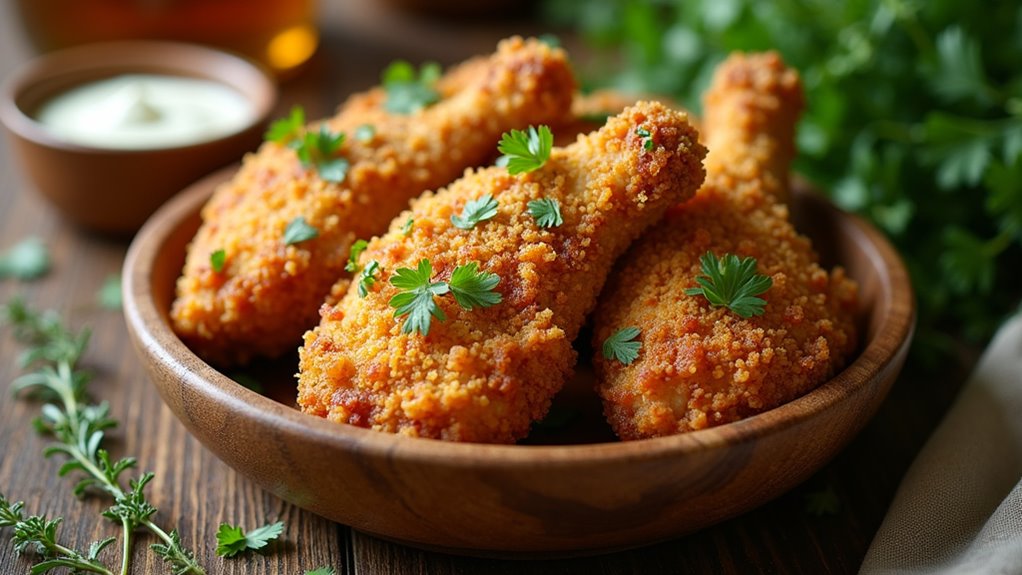
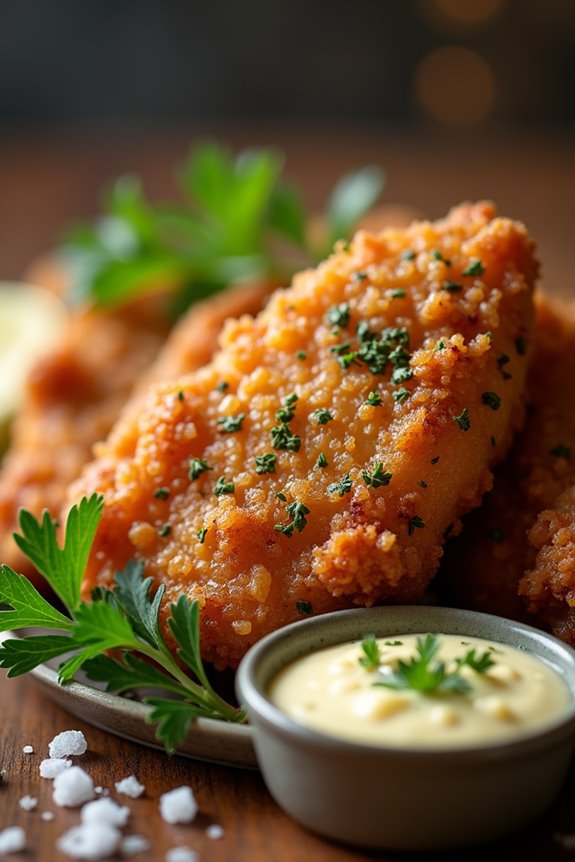
7. Serve and Garnish: Once the chicken is golden brown and cooked through, take it out of the skillet and let it rest for a minute. This helps keep all those juices locked in. Serve it hot, garnished with a sprinkle of fresh herbs for that final touch—because we eat with our eyes first, right?
Enjoy the incredible flavors of your homemade buttermilk fried chicken. If you’re feeling adventurous, you can always try serving it with your favorite dipping sauce or even on a sandwich. Additionally, to achieve the best frying results, consider investing in a commercial deep fryer, which ensures consistent heat and perfect cooking. Happy cooking!
Tips & Variations
While you might think that frying chicken is an art best left to professionals, let me assure you, it’s simpler than it seems—and you can easily make it your own.
Want a twist? Try using different herbs like dill or oregano—they bring their own magic. If I’m feeling adventurous, I toss in some cayenne for heat.
Don’t forget the buttermilk; it’s not just for soaking, it’s the secret to delicious flavor and tenderness.
And if you’re short on time, skip pounding the chicken—just use thinner cuts. You’ll still get great results.
Oh, and I learned the hard way: always let the chicken rest before biting in—trust me; it’s worth the wait.
Happy cooking!
How to Serve?
Serving up this herb-infused fried chicken is like sharing a little piece of joy with everyone at the table, and trust me, it tastes even better when folks gather around to enjoy it together.
I usually plate the chicken right from the skillet, still crackling, and I toss a sprinkle of fresh herbs on top for that extra pop of color. It’s such a treat!
You could serve it with fluffy biscuits or a crisp green salad—both add a nice crunch. Sometimes, I’ll make a side of spicy honey for dipping, ’cause why not add a little zing?
Just imagine everyone digging in, laughing, and savoring each delicious bite. Honestly, sharing this meal feels like giving a warm hug.
Storage & Reheating Guide
Once you’ve savored every last crunchy bite of your herb-infused fried chicken, you’ll probably wonder what to do with any leftovers—trust me, you’re not alone.
First, let that chicken cool down a bit, then pop it in an airtight container. It’ll hang out safely in the fridge for about 3 to 4 days.
If you’re feeling ambitious, you can freeze it for up to 3 months—just make sure to wrap it well. Using airtight food storage solutions can help maintain the quality of your leftovers.
Now, when it’s time to reheat, forget the microwave; that’ll ruin the crispy goodness.
Instead, use an oven set to 375°F and warm it up for about 15-20 minutes. You’ll thank me when that crispy coating is still just as divine as before.
Final Thoughts
Enjoying a delicious meal of herb-infused fried chicken is a joy, but let’s be real—what about those lingering thoughts after your last bite?
You might be thinking, “Did I really just eat that whole piece?” or “How can I recreate this magic?” Trust me, I’ve been there, often licking my fingers and pretending I haven’t made a mess.
The secret’s in those fresh herbs and garlic soaked into buttery perfection. And now? You’ve got a go-to recipe to impress, whether it’s for a cozy dinner or a small gathering.
Don’t stress if it’s not picture-perfect; I promise, flavor wins every time. So, let’s keep frying, experimenting, and enjoying every crunchy, juicy morsel together.