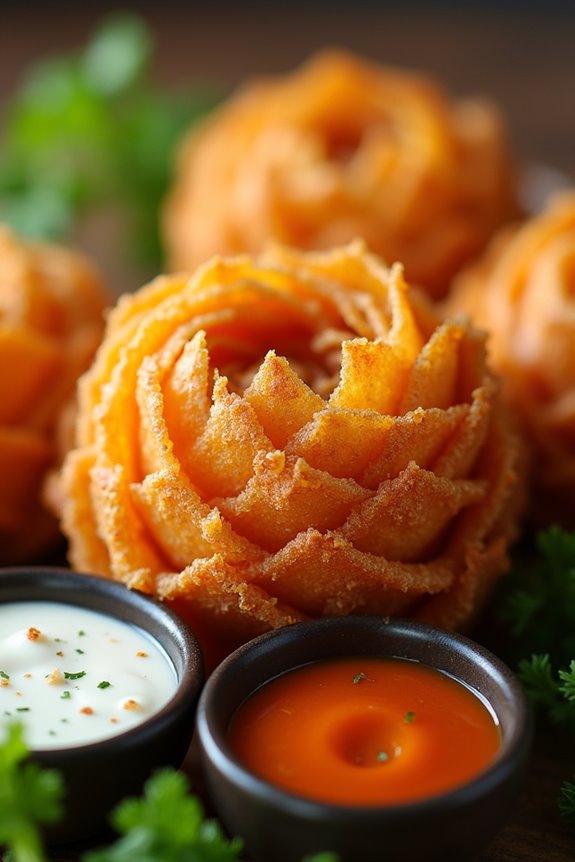
I’ve got a knack for turning ordinary ingredients into mouthwatering treats, and this bite-sized blooming onion is no exception. Seriously, who doesn’t love crispy, flavorful onion petals that practically beg to be dipped? It’s always a hit at parties, though I can’t always guarantee it’ll make it to the table. Have you ever found yourself sneaking a petal or two before serving? Let’s jump into how to whip up this crunchy delight, shall we?
Why You’ll Love This Recipe
When you take your first bite of a blooming onion, it’s like a flavor explosion that makes your taste buds do a happy dance, don’t you think?
These bite-sized blooming onions aren’t just fun to eat; they’re a total game-changer for your snack line-up. I mean, who wouldn’t want crispy, golden goodness served with zesty dipping sauce?
You can’t help but smile when you pull apart those crunchy petals, right? Plus, they’re perfect for sharing—if you’re feeling generous.
I’ve made them for parties, and trust me, they disappear faster than I can say “blooming onion.” It’s a recipe that guarantees smiles, laughs, and maybe one or two “Can I’ve another?” queries.
You’ll love it, I promise.
Equipment List
To whip up a blooming onion that steals the show, you’ll need to gather some essential equipment.
First off, a sharp knife is a must—I can’t tell you how many times I’ve struggled with a dull one. You’ll also want a sturdy cutting board to keep everything steady while you slice and dice.
A large pot or deep fryer will work wonders for frying; trust me, nobody wants a soggy onion. A slotted spoon—and I mean this—will save you from burning your hands while fishing out that masterpiece. Investing in premium kitchen appliances can make this process even more efficient and enjoyable.
Don’t forget a mixing bowl, measuring cups, and spoons—it’s like a cooking starter pack. Investing in professional kitchen equipment will elevate your cooking game and ensure great results.
And an apron, unless you want your favorite shirt to become a casualty. We all have those stories, right?
Our Ingredients
Making a blooming onion is one of those culinary adventures that feels fancy without requiring you to have a Michelin star hanging on your wall. Seriously, there’s something magical about that crispy, crunchy exterior revealing tender onion petals inside, just waiting to be dipped in delicious sauce.
As we explore the ingredient list, I can almost smell that savory aroma filling the kitchen. Ready to become the culinary hero at your next gathering? Let’s gather our ingredients first.
Ingredients:
- 1 large sweet onion (like Vidalia or Walla Walla)
- 1 cup all-purpose flour
- 1 teaspoon paprika
- 1 teaspoon garlic powder
- 1 teaspoon onion powder
- 1 teaspoon cayenne pepper (adjust to your spice preference)
- 1/2 teaspoon salt
- 1/4 teaspoon black pepper
- 1 cup buttermilk (or milk with a splash of vinegar if you’re in a pinch)
- 1 large egg
- Oil for frying (canola or vegetable oil works great)
- Optional: Dipping sauce of your choice (like ranch or zesty dipping sauce)
When it comes to ingredients, quality matters, but again, don’t sweat if you can’t get the fanciest stuff. Sweet onions are a must because they bring that perfect balance of sweetness and flavor, but if you can only find the standard kind, it’ll still taste fabulous.
Flour can be all-purpose, but I’ve tried it with a bit of cornstarch mixed in for extra crunch. Oh, and for the spices—feel free to play around. If you’re in the mood for a smoky flavor or a kick of heat, add more paprika or cayenne.
Honestly, the kitchen is your playground, so let those flavor ideas bounce around in your head and make them come alive!
Step-by-Step Instructions
Making a blooming onion at home isn’t only fun, but it’s also an experience that’ll make you feel like a culinary rock star. Once you get the hang of it, you’ll be cruising through each step with confidence, ready to impress your family and friends. So, grab your ingredients and let’s get this show on the road.
Step-by-Step Instructions
1. Prepare the Onion: Start by taking your large sweet onion (1) and peeling away the outer layers. Carefully slice off about 1/2 inch from the top of the onion, and then trim off the root end. This will help your onion bloom beautifully. The goal is to keep it intact, so take it slow.
2. Cut the Petals: Place the onion cut-side down on a cutting board. Using a sharp knife, slice the onion into 12-16 wedges without cutting all the way through to the bottom. You want the wedges to stay attached at the base for the ultimate bloom effect. You might want to get your inner artist out here—it is a thing of beauty.
3. Prep the Batter: In a mixing bowl, combine 1 cup of all-purpose flour, 1 teaspoon paprika, 1 teaspoon garlic powder, 1 teaspoon onion powder, 1 teaspoon cayenne pepper, 1/2 teaspoon salt, and 1/4 teaspoon black pepper. Whisk it all together until well blended. This will be the crispy coating that everyone loves.
4. Make the Dipping Mixture**: In a separate bowl, mix together 1 cup of buttermilk** (or your homemade version with milk and vinegar) and 1 large egg. Whisk this until smooth. This mixture will help the flour coating stick to the onion like magic.
5. Coat the Onion: Take the prepared onion and dunk it slowly into the buttermilk mixture, making sure it gets into all the crevices of those petal-like layers. Once it’s nice and coated, carefully lift it out and let the excess drip off.
Next, sprinkle the flour mixture over the onion, covering it completely. You can tap and shake a little to ascertain it gets into the gaps.
6. Heat the Oil: In a heavy pot or deep skillet, heat oil for frying—enough to cover at least half of the onion. Aim for a temperature of around 375°F (190°C). You can test if the oil is hot enough by dropping in a small pinch of the flour mixture; if it sizzles, you’re ready to go. Using premium baking equipment can enhance your frying experience.
7. Fry the Onion: Gently lower the coated onion into the hot oil, cut side down. Fry it for about 5-8 minutes until it’s beautifully golden brown and crispy. Be careful—hot oil can be a bit, well, reckless.
So if you feel like you’re missing a superhero cape, don’t be afraid to use a slotted spoon to help you.
8. Flip and Finish: Carefully flip the onion halfway through with the help of tongs or a slotted spoon, allowing it to brown evenly on both sides. Once it’s done, pull it out and place it on a paper towel-lined plate to drain any excess oil.
9. Serve With Dipping Sauce**: Now that you’ve got your beautiful blooming onion, don’t forget to serve it with your choice of dipping sauce (like ranch or a zesty sauce**) for extra flavor. Go ahead and dig in—your taste buds will be thanking you.
There you have it—the art of making a blooming onion at home! With these steps, you’re well on your way to creating a delightful appetizer that will have everyone talking. Just remember: practice makes perfect, so if your first try isn’t Instagram-worthy, don’t panic. Enjoy the process and have some fun with it.
Cooking with premium kitchen cookware can elevate your culinary creations to a whole new level!
Tips & Variations
While you might think there’s a single way to whip up a blooming onion, there’s actually a treasure trove of tips and variations that can elevate your culinary masterpiece.
For starters, try different seasonings—garlic powder, smoked paprika, or even a pinch of cayenne bring a burst of flavor.
Also, don’t skimp on the dipping sauce; a zesty ranch or tangy chili mayo can make a big difference.
If you’re feeling adventurous, how about adding cheese? Just sprinkle some grated cheese before baking for a melty twist.
And let me tell you, cutting that onion can be tricky. I’ve had my fair share of onion tears.
Just take a deep breath and maybe keep the tissues handy. Your taste buds will thank you!
How to Serve?
Serving a blooming onion isn’t just about putting it on the table; it’s all about creating an experience. Imagine this: as I set down that glorious pile of crispy, golden petals, I can almost hear the oohs and aahs.
I love to place a small bowl of tangy dipping sauce in the center, inviting people to dig in. Oh, and don’t forget the napkins—things can get a little messy.
I often encourage guests to pull apart the petals for that perfect crunch with every bite. It’s like a little culinary adventure. And watching everyone enjoy it? Priceless.
Just be prepared; you might end up cooking a second batch, because one never seems to be enough. Trust me on that!
Storage & Reheating Guide
Even the most delicious blooming onion can’t escape the reality of leftovers, and trust me, you’ll want to treat them right.
First off, let ’em cool down before wrapping them in plastic wrap or popping them in an airtight container. I usually stash mine in the fridge, where they’ll be happy for about 3 days.
When it’s time to indulge again, don’t even think about the microwave; they’ll turn soggy. No, no, my friend. Instead, heat your oven to 400°F (200°C) and give them about 10 minutes—then enjoy that crispy goodness again.
Also, using high-quality artisan baking equipment can help create the perfect texture for your blooming onion.
Trust me, there’s nothing like a second round of these bite-sized delights. Just remember, dolling out leftovers is like a warm hug for your taste buds.
Final Thoughts
After properly storing and reheating those leftover blooming onions, it seems fitting to reflect on the joy these little masterpieces bring to the table.
Seriously, who doesn’t love a crispy, flavorful bite? They’re perfect for gatherings or just a cozy night in.
I still remember the first time I attempted making them—let’s just say the kitchen looked like a war zone. But it was worth it! Every perfectly fried onion made my heart sing.
Whether you dip them in ranch or go bold with a spicy sauce, it’s all about personal taste. So, don’t be shy. Give them a try, and when you do, be ready to savor every delicious moment.
Trust me, your taste buds will thank you.