Have you ever craved something that’s crunchy, creamy, and packed with flavor? That’s exactly what these Bang Bang Chicken Sliders deliver. I can’t tell you how many times I’ve perfected the crispy chicken and zesty sauce combo, only to find myself fighting off my family for the last one. I mean, who knew sliders could be so addictively good? Want to whip up your own batch? Let’s talk about how to make these little beauties shine.
Why You’ll Love This Recipe
Have you ever craved something that’s both quick to make and surprisingly delicious? Trust me, bang bang chicken sliders are the answer.
Imagine this: crispy chicken, zesty sauce, and soft buns all coming together in one bite. Honestly, I can whip these up in no time, and they always impress.
I love how I can customize them—add more sriracha if I’m feeling spicy or pile on the pickles for that crunch. Plus, they’re perfect for parties or a casual dinner.
You won’t believe how easy it’s to wow friends with a dish that feels gourmet. Every time I make these sliders, I wonder why I don’t do it more often.
Seriously, they’re as fun to make as they’re to eat.
Equipment List
When it comes to making bang bang chicken sliders, having the right tools at your side is half the battle. You’ll need a good baking sheet for toasting those buns. Trust me, soggy buns are a no-go.
A knife to slice the chicken and a bowl for mixing that delectable sauce are essential too. Don’t forget a spatula for flipping the chicken and layering everything together. A whisk can be handy for that sauce, but a spoon works just as well.
I always keep my trusty cutting board close—it makes everything easier. You might even want an apron if you’re prone to splatters, like me. Kitchen chaos is part of the fun, right? Investing in premium kitchen cookware can elevate your cooking experience and make these tasks more enjoyable. Grab these essentials, and we’re ready to roll!
Our Ingredients
When it comes to making Bang Bang Chicken Sliders, the ingredients you choose can make all the difference between a good meal and a great one. We’re talking about layers of flavor, satisfying crunch, and just the right amount of sauce to bring it all together.
Even though the ingredient list may seem simple, each component plays an essential role in creating something that’s not just tasty, but downright addictive. So, let’s break down what you’ll need to whip up these scrumptious sliders.
Ingredients:
- 4-6 frozen chicken tenderloins
- 2 tablespoons butter
- 1 tablespoon sesame seeds
- 6-12 pickle slices
- 1/4 cup mayonnaise
- 2 tablespoons sweet chili sauce
- 1-2 tablespoons sriracha (adjust for heat preference)
- 1 tablespoon rice vinegar
- 6-12 slider buns
Now, a couple of things to keep in mind while you gather these ingredients. First off, the chicken – frozen tenderloins are super convenient. You just pop them in the oven according to the package instructions. If you prefer, you could also use fresh or grilled chicken; the beauty is in the flexibility.
Make sure your buns are fresh and soft. Nobody wants a tough bite; it’s all about that perfect slider experience. As for the sauce, feel free to tweak it—add more sriracha if you’re feeling bold or dial it back a notch if you’re feeding the kiddos.
And pickles? They bring a crunch that cuts through the richness, so don’t skip them unless you’re really not a fan. Each ingredient works together like a team, bringing you closer to that slider heaven.
Step-by-Step Instructions
Making Bang Bang Chicken Sliders isn’t only a fun culinary adventure but also a guaranteed crowd-pleaser. With just a few simple steps, you’ll create a mouthwatering treat that’s perfect for parties or a cozy night in. Ready to jump in? Let’s get cooking!
Step-by-Step Instructions
1. Cook the Chicken: Start by grabbing 4-6 frozen chicken tenderloins. Cook them according to the package instructions—usually, this means baking them in the oven until they’re nice and crispy.
Once cooked, slice them into tasty bite-sized pieces. (Pro tip: Using frozen tenderloins is a major time-saver. Trust me, your future self will thank you).
2. Prep the Buns: Preheat your oven to 350°F. While it’s warming up, take 6-12 slider buns. Slice the buns in half, then butter the tops with about 2 tablespoons of butter.
Sprinkle 1 tablespoon of sesame seeds on top of the buns for that perfect crunch and flavor boost. Pop them in the oven for 5-10 minutes until they turn golden brown and just a touch crispy. (There’s nothing worse than a soggy slider, right?)
3. Make the Sauce: In a small mixing bowl, combine 1/4 cup of mayonnaise, 2 tablespoons of sweet chili sauce, and 1-2 tablespoons of sriracha (this is your chance to customize the heat level).
Add in 1 tablespoon of rice vinegar for a tangy kick. Mix everything together until it’s creamy and well combined. (Taste as you go—the sauce is where the magic happens. Just don’t lick the spoon until we’re done, okay?)
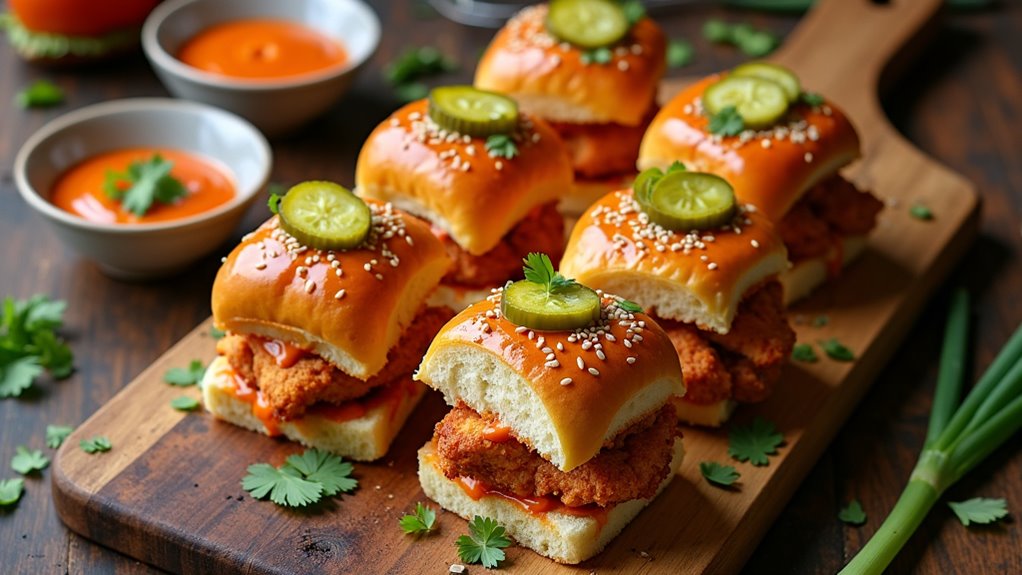
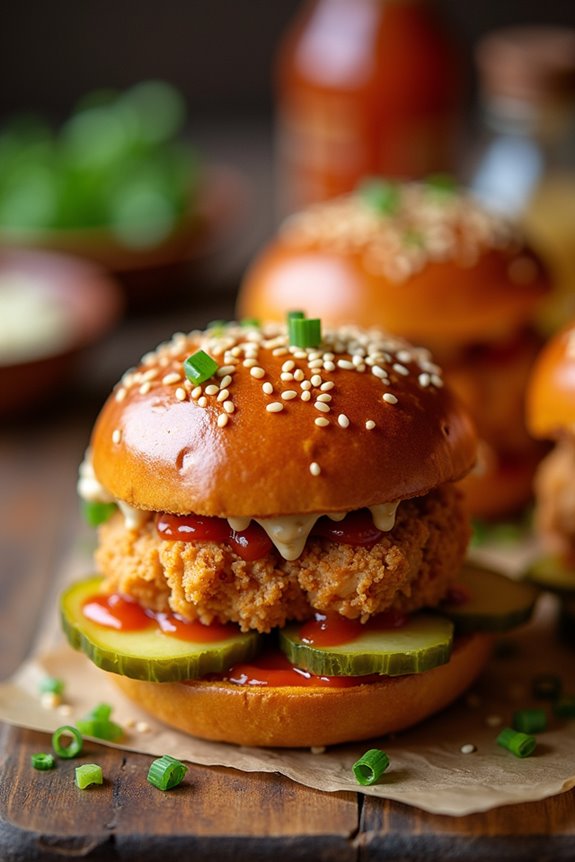
4. Assemble Your Sliders: Once the buns are out of the oven, spread a generous amount of that delicious sauce on the bun bottoms.
Place a few pieces of chicken on top, then drizzle with a little more sauce. Add a couple of pickle slices—about 6-12, depending on your love for pickles.
Finally, place the top half of the bun on and give it a gentle press down.
5. Serve Warm: This is where the fun begins! Arrange your sliders on a platter and serve them warm.
They’re great as is, but you might want to have some extra sauce on the side for dipping. (Because let’s face it, more sauce is never a bad idea).
To elevate your cooking experience, consider using high-end baking tools to improve the quality of your culinary creations.
And there you have it—a delicious set of Bang Bang Chicken Sliders ready to impress your family and friends. Jump in and enjoy every last bite!
Tips & Variations
After you’ve whipped up those delightful Bang Bang Chicken Sliders, you might be wondering how to make them even more special.
One of my favorite tips is to experiment with the sauce; add a hint of lime juice for a citrusy twist or some chopped cilantro for freshness.
Feeling adventurous? Swap out the chicken for crispy tofu or grilled shrimp—both are fantastic alternatives.
And if you want to impress, try mixing in some chopped green onions or adding a sprinkle of toasted coconut on top.
As for the buns, don’t be afraid to use whole-grain or gluten-free ones.
If you’ve got leftovers, stick them in a wrap with some greens.
Trust me; they’ll still be a hit.
How to Serve?
Serving Bang Bang Chicken Sliders can be an absolute blast, especially when you invite friends over or host a casual game night. Imagine this: everyone gathered around, sliders in hand, laughing, and sharing stories.
You can set up a cute little slider station with the buns and toppings laid out. I usually make a big batch because, let’s be honest, who doesn’t love seconds?
Trust me, drizzle that extra sauce on top before they dig in; it’s a game-changer. And don’t forget the pickles—those tangy slices bring everything together.
Need a tip? Keep napkins handy; it can get messy, but hey, that’s part of the fun. Who knew sliders could be such a fun-filled experience?
Storage & Reheating Guide
When it comes to storing leftover Bang Bang Chicken Sliders, I’ve got a little system that keeps things simple and tasty.
First, I wrap each slider in plastic wrap or foil to avoid that sad, soggy fate. I store them in an airtight container in the fridge. They usually last about three days, but let’s be honest—I often devour them in less.
When I’m ready for round two, I preheat my oven to 350°F to keep the buns nice and toasted. I pop them in for about 10 minutes.
Sometimes, I use the microwave too—just remember to unwrap them, or it’ll be a slippery mess. Always have a little more sauce ready. It’s a game changer! Additionally, using a professional kitchen mixer can make preparing the sliders even more efficient.
Final Thoughts
Leftover Bang Bang Chicken Sliders? Don’t worry; you’re in for a treat.
These sliders are so delicious that you might find yourself craving them more than once a week. Seriously, after my first batch, I was dreaming about them.
When I reheated mine, I added a bit more sauce—because why not? They turned out just as tasty as the first day, maybe even better. It’s all about those flavors mingling.
I recommend keeping some extra pickles on hand; they really kick things up a notch.
Let’s be real, it’s hard to mess these up, and they’re perfect for game day or a quick dinner.
Trust me, you’ll be the hero of your kitchen with these sliders. Enjoy every bite!