Let me tell you, the Creamy Pepperoncini Chicken Skillet is a lifesaver when I’m in a rush. It’s quick, easy, and oh-so-delicious—just perfect for those hectic weeknights. Seriously, who doesn’t love one-pan meals? The chicken gets so tender, simmering in that creamy, tangy sauce that makes your taste buds dance. And the best part? Minimal cleanup. Curious about what goes into this flavorful dish? Stick around, because I’m about to spill all the details.
Why You’ll Love This Recipe
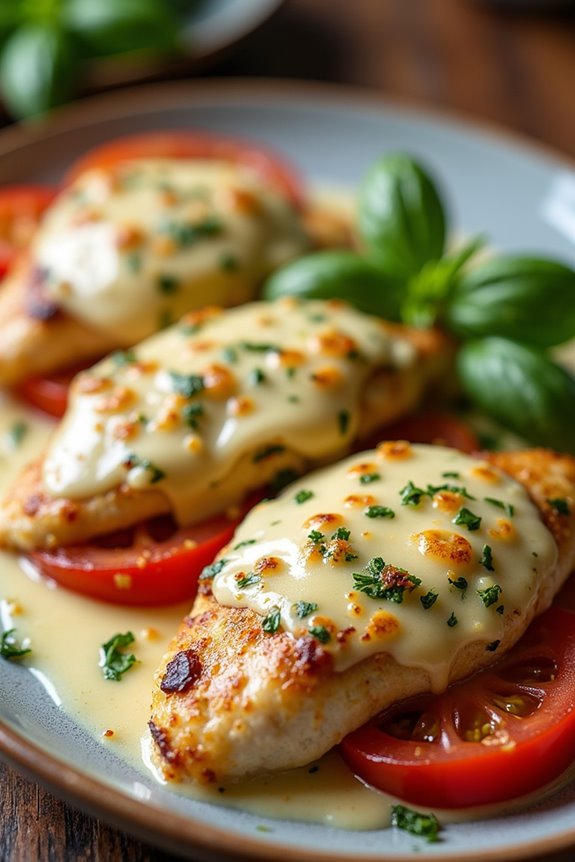
You’re gonna love this recipe for Baked Pesto Chicken; it’s a game changer. Seriously, if you’ve ever been in a dinner rut, this is the answer.
I mean, who doesn’t want juicy chicken slathered in vibrant basil pesto? The flavors sing, and it’s so easy that even I can’t mess it up—I once burned water, remember?
You’ll toss chicken with pesto, sprinkle a little salt and pepper, and pop it in the oven. It practically cooks itself.
And oh, when that gooey mozzarella melts on top? It’s pure magic. Plus, you can throw some tomatoes on for that extra flair.
Dinner’s ready in no time, and your taste buds will thank you for this baked pesto chicken delight.
Equipment List
Alright, now that you’re all pumped about that delicious baked pesto chicken, let’s chat about what you’ll need to whip it up.
First off, grab a large skillet—make sure it’s got a good non-stick surface because no one wants their chicken doing the tango with the pan. A well-seasoned cast iron skillet set is a fantastic choice for even cooking.
You’ll also need a sharp knife for slicing, although mine often looks like it’s been through a battle—I promise to sharpen it one day.
Don’t forget a cutting board, too, unless you enjoy cleaning up chicken juice off your countertops.
Finally, a spatula will come in handy for flipping those chicken breasts like a pro.
Easy peasy, right? With these tools, you’re all set for some kitchen magic.
Our Ingredients
When it comes to whipping up a delightful creamy pepperoncini chicken, having the right ingredients on hand is super important. Trust me, I’ve been there when I thought I could wing it, only to end up in a bit of a pickle—like sloshing soy sauce instead of olive oil.
So let’s get it right this time, shall we? Here’s a list of what you’ll need to create this tasty dish, so you’re all prepped and ready to rock your kitchen.
- 4 boneless, skinless chicken breasts
- ½ cup basil pesto
- Salt and pepper
- 1 cup shredded mozzarella cheese
- 2-3 sliced plum tomatoes (optional)
Now that we’ve got our ingredients all lined up, let’s chat a bit about them. First off, fresh ingredients can really elevate the dish. If you’ve got homemade basil pesto lurking in your fridge, definitely use it; otherwise, store-bought is a fine substitute.
And speaking of those tomatoes, they really can add a splash of color and a bit of freshness, but if you’re more of a ‘no tomato’ kinda person, feel free to leave them out.
Now envision this: a crispy, cheesy chicken breast straight from the oven—can you smell the deliciousness? Just make sure everything is fresh, and you’ll be treating your taste buds to something special.
Happy cooking!
Step-by-Step Instructions
Making a Creamy Pepperoncini Chicken is a breeze when you follow these simple steps. Just imagine it: juicy chicken, creamy goodness, and a delightful kick from the pepperoncini. Trust me, your taste buds will thank you for this one. Now grab your ingredients, and let’s dive right in!
- Preheat your oven to 400°F. This step is essential for getting that ideal cook on your chicken. I mean, no one likes undercooked chicken, right? While the oven heats up, line a baking sheet with foil for easy cleanup later.
- Toss the 4 boneless, skinless chicken breasts in ½ cup of basil pesto. Sprinkle a little salt and pepper over them too. Just envision this: tangy pesto coating the chicken like a warm hug. Make certain each piece is well-coated so every bite bursts with flavor.
- Arrange your chicken on the lined baking sheet, giving each piece a little space to breathe. This will help them cook evenly, so no rubbery bits here. Now, pop them in the oven and bake for 20-25 minutes. You’re looking for an internal temperature of 165°F to confirm they’re cooked through. As they bake, you’ll start to smell the deliciousness wafting through your kitchen—trust me, you may need to fight the urge to sneak a taste.
- While the chicken is baking, grab your 1 cup of shredded mozzarella cheese and the 2-3 sliced plum tomatoes (if you’re using them). Here’s a pro tip: shredded cheese melts better than blocks, so use the shredded kind for a gooey finish.
- Once the chicken hits the 20-25 minute mark, remove it from the oven. The chicken should look golden and inviting by now. Carefully top each piece with the cheese and, if you’re feeling it, the tomato slices. Then, pop it back in the oven for an additional 5 minutes, allowing the mozzarella to melt and bubble. Just keep an eye on it so that the cheese doesn’t burn—unless you enjoy that crispy, crunchy texture, then go for it!
- After that, take the skillet out of the oven and let it sit for a couple of minutes. I know it’s tempting to dive right in, but letting it rest will help all those delicious flavors settle. Remember, having the right professional pastry tools can elevate your cooking experience to new heights.
And there you have it: a mouthwatering Creamy Pepperoncini Chicken that’s ready to serve! Whether paired with rice or your favorite side dish, you’re in for a treat. Enjoy the cooking experience, and don’t forget: everyone makes mistakes in the kitchen—just roll with it and laugh it off, even if you accidentally grab the soy sauce. Happy cooking!
Tips & Variations
Even though this Creamy Pepperoncini Chicken is already a showstopper on its own, there are plenty of tips and variations to make it your own.
For starters, you can spice things up by adding a splash of hot sauce for a little kick. Or, why not swap out the chicken for turkey or even tofu? Trust me, it works wonders.
If you’re feeling adventurous, throw in some sautéed mushrooms or spinach for an extra veggie boost. I once forgot to add the cream and ended up with a delightful chicken stir-fry instead. Who knew?
Finally, don’t hesitate to serve it over pasta or rice—it’s like a flavor hug!
Have fun experimenting; it’ll become your signature dish.
How to Serve?
Serving up Creamy Pepperoncini Chicken is all about creating the perfect meal experience, and I can tell you, it’s as easy as pie. I like to serve this dish right in the skillet, family-style, letting everyone dig in.
Pair it with buttery mashed potatoes or a bed of fluffy rice to soak up that creamy sauce. Trust me, you’ll want to mop up every last drop.
A fresh salad on the side balances the richness nicely, and if you’re feeling fancy, toss some garlic bread on the table for good measure.
Oh, and don’t skip the wine – it elevates the dinner vibe. Seriously, who doesn’t love a little wine with dinner? Enjoy, and don’t forget to graze as you serve up!
Storage & Reheating Guide
After you’ve enjoyed that creamy, dreamy plate of Pepperoncini Chicken, you might find yourself staring at leftovers, wondering what to do next. No worries; I’ve got you covered!
First off, let those leftovers cool completely before tossing them into an airtight container. They’ll last in the fridge for about three to four days.
Planning to eat them later? You can also freeze the chicken for up to three months. Just make sure to portion it out, or else you could end up with a freezer avalanche.
When you’re ready to dive back in, reheating is easy—just warm it in a skillet on low heat or pop it in the microwave with a splash of broth. In addition, using premium kitchen appliances can enhance your cooking experience even further. Trust me, it’s delicious all over again!
Final Thoughts
As you wrap up your culinary adventure with the creamy Pepperoncini Chicken, I can’t help but think about just how satisfying this dish really is. It’s creamy, tangy, and downright comforting. Honestly, who doesn’t want a one-pan meal that tastes like a hug?
You’ve got layers of flavor that just dance together—like my attempts at dancing at weddings, not pretty but entertaining. And let’s not forget how easy this is to whip up! Whether it’s a busy weeknight or a lazy Sunday, this dish fits right in.