I can’t help but smile when I think about a fresh strawberry pie, can you? It’s one of those desserts that just screams summer, right? There’s something magical about biting into bright, juicy strawberries tucked in a flaky crust. Honestly, I used to think making pie was a challenging task, but this recipe… well, it’s surprisingly easy. I can’t wait to share my step-by-step journey with you, because trust me, you won’t want to miss this.
Why You’ll Love This Recipe
You might find it hard to resist a slice of this Fresh Strawberry Pie, especially when you’re looking for a vibrant dessert that practically screams summer.
I mean, who wouldn’t want to plunge into a pie bursting with juicy strawberries? Each bite is a little party in your mouth, with that perfect balance of sweetness and tang.
Plus, making it’s surprisingly easy, which is great because I’m not always the best in the kitchen. I once mistook salt for sugar – let’s not speak of that disaster.
With fresh strawberries as the star, you’ll impress everyone without breaking a sweat. This fresh strawberry pie isn’t just dessert; it’s a summer memory waiting to happen.
Equipment List
Equipment List
After you’ve gotten yourself all excited about that fresh strawberry pie, let’s chat about the equipment you’ll need to pull this fruity delight together.
First up, you’ll need a good mixing bowl—nothing fancy. A saucepan is a must for that luscious filling, and don’t forget a sturdy spoon for mashing.
For the pie crust, a 9-inch pie dish will work perfectly. Got a rolling pin? Great! You’ll need it if you’re making your crust from scratch.
Measuring cups and spoons are essential, as too much sugar can lead to a disaster—trust me. Finally, if you’re craving that gorgeous shine on top, grab a brush for the egg wash.
Additionally, a nonstick loaf pan can be incredibly helpful if you decide to make a loaf-style pie or cake to accompany your strawberry delight.
It’s all about presentation, right? Just have fun; it’ll be delightful, I promise!
Our Ingredients
When it comes to making a fresh strawberry pie, the ingredients are just as important as the technique. Each component plays a key role in creating that perfect balance of sweetness and freshness that makes strawberry pie so special.
So, let’s quickly run through what you’ll need. Grab a shopping list, and don’t blame me if you suddenly find yourself with more strawberries than you could ever eat—once you start thinking about fresh, juicy strawberries, it’s hard to stop.
Ingredients:
- 2½ pounds fresh strawberries, hulled
- ¾ cup granulated sugar
- 5 tablespoons cornstarch
- 1 tablespoon lemon juice
- ½ cup water
- 1 baked pie crust
- 1 large egg (for an egg wash)
- Demerara sugar (for sprinkling)
Now, let’s think about our ingredients for a second. Fresh strawberries are key—seriously, frozen just won’t deliver that burst of flavor we all crave in a summer pie. If you’ve got a local farmer’s market, that’s the place to go.
And the sugar? Well, it’s like the cherry on top; it enhances the strawberries’ natural sweetness. If you want a little zing, a dash of lemon juice brightens everything up. Just imagine biting into each slice; the sweet and tangy flavors dancing on your palate.
Oh, and let’s not forget about that pie crust. Whether you’re a store-bought kind of person or a crust-making wizard, it’s essential to hold all that juicy goodness together. Have fun picking your ingredients—they’re the stars of this show after all.
Step-by-Step Instructions
Making a fresh strawberry pie is a delightful endeavor that celebrates the vibrant flavors of juicy strawberries. Not only is it a treat for your tastebuds, but the process is quite simple. Just follow these easy steps to create a pie that’ll impress your family and friends.
1. Preheat your oven to 425°F (220°C) to get things warmed up for that crispy crust. While it’s heating up, grab your baked pie crust and let it cool if it’s not already. That golden crust is going to be the perfect cradle for all those delicious strawberries.
2. In a saucepan, combine 1¼ pounds of hulled strawberries** (which is half of your 2½ pounds total) with ¾ cup granulated sugar, 1 tablespoon lemon juice, and ½ cup water**. Give it a gentle mash with a fork or potato masher to break them down a bit.
Heat over medium-high until it reaches a boil, and watch as the fragrant juices start to ooze out. Ah, the smell of summer!
3. Once boiling, dissolve 5 tablespoons of cornstarch in the remaining ¼ cup water. Stir it in, and let it simmer until the mixture thickens, which should take about 2-3 minutes.
You want it thick enough to hold the strawberries without turning into a soup. After thickening, let it cool for about 10 minutes—give it some time to chill out!
4. Now, add the remaining 1¼ pounds of hulled strawberries to your thickened mixture. This step is essential. You want to keep those fresh strawberries whole to get that luscious texture in every bite.
Gently toss everything together, being careful not to crush your strawberries too much.
5. Pour the strawberry filling into your cooled pie crust. Make sure it’s evenly distributed; you don’t want a lopsided pie.
At this point, you might want to take a moment to appreciate just how beautiful it looks—it smells even better!
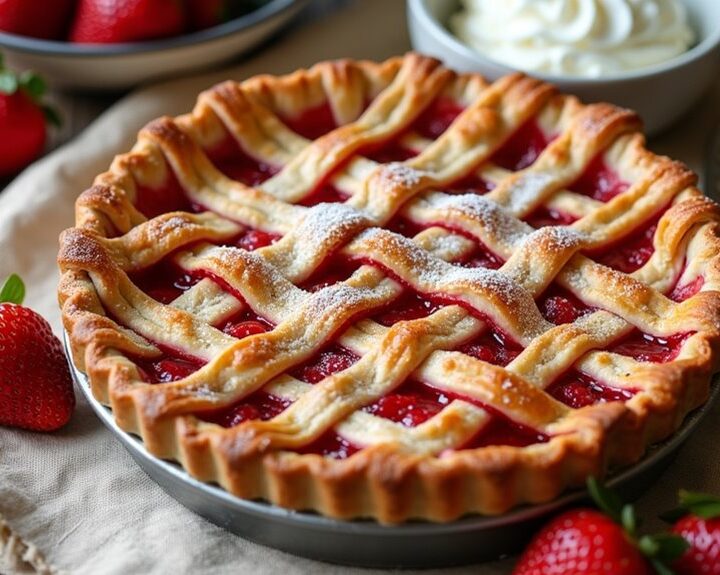
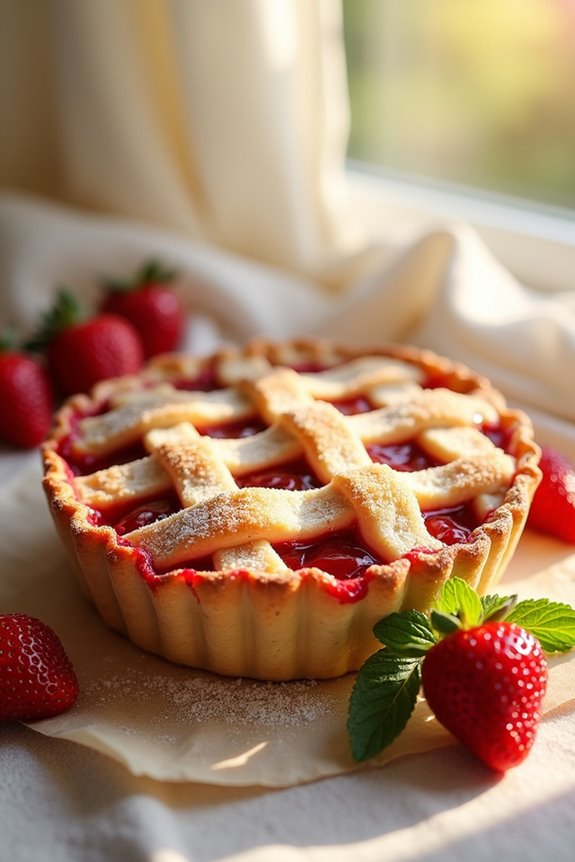
6. To make a lattice top, cut a second pie crust into strips. Weave them over the filling to create that charming, crisscross design.
It’s like braiding hair, but a lot less complicated. Trim the edges to fit over the crust and tuck them under for a neat finish.
7. Brush the top with a large egg mixed with a splash of water (this is your egg wash) to give it that golden-brown shine as it bakes.
To add a little crunch and sparkle, sprinkle some demerara sugar over the top.
8. Bake for 35-45 minutes until the crust is beautifully browned and the filling is bubbling. You’ll know it’s done when the crust looks crispy and the filling has started to pop through the lattice.
Keep an eye on it toward the end so it doesn’t over-bake—nobody likes a burnt pie!
9. Once baked, remove your pie from the oven and let it cool for at least an hour before slicing into it. This cooling time is important; it allows the filling to set, making it easier to serve.
Plus, it gives you a chance to enjoy the delicious aroma wafting through your kitchen.
And there you have it! Your fresh strawberry pie, a true summer classic. I hope you’re as excited to dig in as I’m to sit back and admire your handiwork. Just remember to take a snapshot before serving—these beauties are Instagram-ready! Moreover, for those who love to cook, investing in a high-end waffle maker can elevate your breakfast game and create delicious treats!
Tips & Variations
Tips for making a fresh strawberry pie can transform your good dessert into something truly sensational.
First off, using fresh strawberries is a game-changer; frozen ones might turn your pie into a soggy mess. If you’re feeling adventurous, try grating a Granny Smith apple into the filling. Trust me, it helps soak up excess juice and adds a nice tang.
If you want a no-bake version, let that beauty chill for at least three hours. And oh, don’t forget that egg wash! It makes your crust look golden and irresistible. I learned this the hard way; mine once looked like it had seen better days.
How to Serve?
Serving a fresh strawberry pie is almost as delightful as making it. Once that pie cools, I can’t wait to dig in. I love slicing generous pieces—don’t be shy here, right?
Plating it up with a scoop of vanilla ice cream takes it to another level. Trust me, it melts in your mouth. I always serve it slightly chilled; it enhances the flavor, making those strawberries pop like fireworks.
If I’m feeling extra fancy, I drizzle some chocolate or caramel sauce on top. And don’t forget the whipped cream—because why not? Just be prepared for compliments.
I usually pretend I slaved over it all day, but let’s be real—I did get lost in a few strawberry daydreams while making it.
Storage & Reheating Guide
How do you keep that gorgeous fresh strawberry pie tasting its best after you’ve whipped it up?
First off, I cover it tightly with plastic wrap. You don’t want your delightful pie to snag any strange fridge odors or dry out.
If you’ve got leftovers, a slice can easily fit in an airtight container too. Just remember, it’ll be tastiest in the first few days—fresh strawberries don’t last forever.
When you’re ready for a treat, I suggest enjoying it chilled, but if you prefer something warm, pop it in the oven at 350°F for about 10 minutes.
To preserve that wonderful flavor even longer, consider using a vacuum sealer machine to keep your pie fresh. Just watch it doesn’t get too toasty. Trust me, you’ll want to savor every bite, not crunch through a burned edge.
Final Thoughts
While I could ramble on about the beauty of a fresh strawberry pie, let’s face it—there’s nothing quite like that first slice to make all the effort worthwhile.
Seriously, the moment that sweet, juicy filling meets your taste buds is like a mini celebration. It’s hard to believe something so delightful comes from just a pile of fresh strawberries.
And yes, I may have eaten half the pie before serving it once—who can resist?
So, whether you’re sharing it with friends or keeping it all to yourself, this pie is bound to impress.
Remember, perfection isn’t always the goal—just the joy of baking and indulging.