I’ve always been a bit of a kitchen adventurer, but there’s something about making milk mochi that feels extra special, wouldn’t you agree? Imagine this: soft, chewy bites of happiness, warm from the pot. It’s a treat that sparks joy, whether you’re savoring it solo or sharing with friends. I’ve had my fair share of sticky situations, believe me, but the end result always keeps me coming back. Curious about how to make your own delightful batch?
Why You’ll Love This Recipe
If you’ve ever tasted a warm, chewy piece of mochi, you’ll know just how delightful it can be, especially when it’s made with milk.
I mean, who doesn’t love that stretchy, sweet comfort? This milk mochi recipe is a game-changer. It’s creamy, it’s dreamy, and trust me, it’s not too hard to whip up.
You’ll find the ingredients right in your pantry, so there’s no need for a treasure hunt at the store.
Picture biting into a perfectly dusted piece, smooth and sweet, and think about how perfect it’ll be for sharing or, let’s be honest, keeping to yourself after a long day.
It’s a little piece of joy, and I think you’ll love it, just like I do.
Equipment List
When you’re diving into making milk mochi, it helps to have some trusty equipment by your side. First off, you’ll need a large mixing bowl—gotta have a good space to combine those ingredients.
A non-stick pan is a must, too, or you’ll find your mochi sticking like it’s in a bad relationship. I’ve learned the hard way to have a spatula handy for stirring; you don’t want to be wrestling with the dough.
Don’t forget those cooking gloves; trust me, your hands will thank you later. A cutting board will come in handy for shaping the mochi.
Oh, and a dusting tool—cooked glutinous rice flour is a sticky friend, so you’ll need that to keep things manageable. For a successful baking experience, consider investing in artisan bread maker machine to complement your sweet treats.
Our Ingredients
Making milk mochi is a fun adventure, and it all starts with gathering the right ingredients. Trust me, there’s something magical about mixing up those fluffy, stretchy, delightful bits, and using the right components makes all the difference.
You’ll want to pay attention, because with the right ingredients in hand, you’ll be on your way to impressing anyone lucky enough to have a bite of your homemade mochi.
Here’s what you’ll need:
- 150 g glutinous rice flour
- 30 g cornstarch
- 25 g sugar
- 20 g corn oil
- 290 g whole milk
Now, let’s chat about those ingredients for a moment.
Glutinous rice flour is the superstar here; it gives the mochi that delightful chewy texture we all love. Cornstarch helps to keep things light and prevent it from getting too dense—nobody wants a rock-hard mochi, right?
And sugar? Oh, it adds that touch of sweetness that makes your taste buds dance. Don’t skip out on the corn oil, as it’ll keep your mochi nice and moist while you’re working your magic.
Finally, whole milk ties everything together and gives the mochi a lovely creamy flavor. When you’re picking out your ingredients, consider going for the best quality you can find; it’ll make your mochi that much more delicious.
Happy cooking!
Step-by-Step Instructions
Milk mochi is a delightful treat that’s surprisingly easy to make. Mixing the batter is quick and simple—just follow these easy steps, and you’ll be on your way to enjoying soft, chewy mochi in no time. Let’s get started on creating this fun, tasty snack!
- Mix the Ingredients: In a large bowl, combine 150 g of glutinous rice flour, 30 g of cornstarch, 25 g of sugar, and 20 g of corn oil. Then, pour in 290 g of whole milk. Using a whisk, blend everything together until the mixture is smooth and free of lumps. You really want to mix it well; this is where the magic begins.
- Strain (Optional): If you want to guarantee an ultra-smooth texture for your mochi, consider straining the mixture. This is totally optional, but hey, it can make a difference if you’re going for that picture-perfect mochi.
- Cook on Low Heat: Next, pour the mixture into a non-stick pan and turn your heat to low. Stir slowly and continuously—the goal here is to avoid scorching. Keep this up until the mixture thickens and forms a cohesive dough. You’ll know it’s ready when it pulls away from the edges of the pan. It usually takes about 5-10 minutes, but keep an eye on it so you don’t have a sticky disaster.
- Knead the Dough: Once you get that glorious dough, take it off the heat and let it cool for a bit. Seriously, don’t burn your hands. When it’s cool enough to handle, put on some kitchen gloves (trust me, you’ll thank me later) and knead the dough for about 5 minutes. It should become elastic and slightly less sticky. Get your workout in while you’re at it!
- Shape the Mochi: Now, roll the dough into a long strip, kind of like you’re making a giant rope. Lightly dust your work surface with some cooked glutinous rice flour to prevent sticking. From there, cut the strip into small triangles (or your desired shape). It’s fun to experiment a little—maybe even make some fun shapes for added flair.
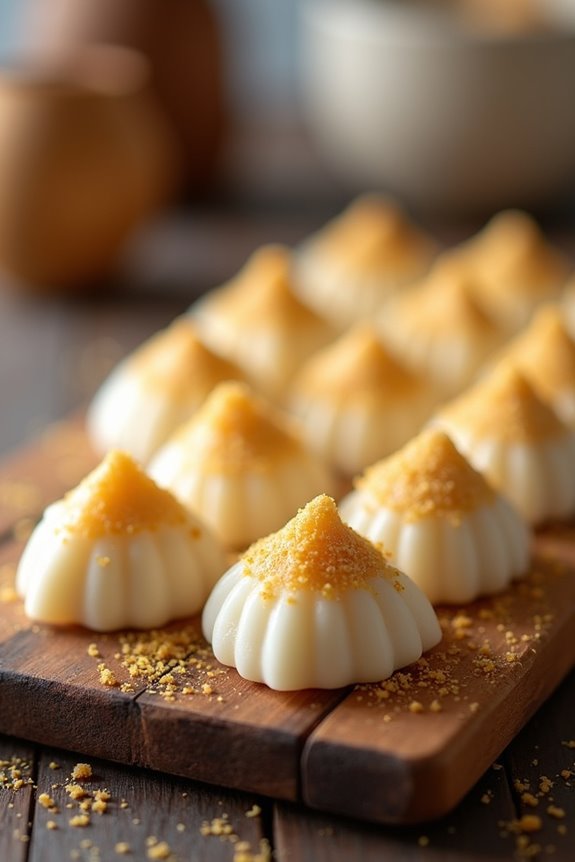
- Coat with Kinako: The final touch to elevate your milk mochi is coating each piece with roasted soybean flour, or kinako. This adds a nutty flavor that contrasts beautifully with the sweetness of the mochi. Just roll each piece in the kinako until they’re well-coated. It’s like giving your little mochi friends a cozy outfit. Additionally, using a commercial deep fryer can be a great way to experiment with frying different fillings for your mochi.
And there you have it! Your homemade milk mochi is ready to be enjoyed. Just remember, whether you’re snacking on it yourself or sharing it with friends and family, be prepared for compliments. They might just think you’ve become a mochi-making pro overnight. Happy cooking!
Tips & Variations
There are endless ways to customize your milk mochi to make it even more delightful. For starters, try swapping out some milk for coconut or almond milk. Trust me—your taste buds will thank you.
Experimenting with flavors can be a blast, like adding matcha powder or vanilla extract for extra zing. If you’re feeling adventurous, throw in a few chocolate chips or fruit bits.
And when it comes to coating, kinako is fantastic, but crushed nuts or coconut flakes can really elevate the experience. Remember to keep gloves handy for kneading—it’s a sticky situation otherwise.
Oh, and if you find yourself questioning your cooking skills, just know, I’ve had more kitchen disasters than I care to admit, and yet here we are, making mochi.
How to Serve?
While you’re probably itching to dig into that delightful milk mochi, how you serve it can make all the difference.
I like to arrange the mochi pieces on a beautiful plate, dusted lightly with kinako, to give it that Instagram-worthy touch. You know, the kind that makes your friends drool just by looking at it?
Sometimes, I even add a little drizzle of honey on top for an extra sweet surprise. If you’re feeling extra fancy, a couple of fresh berries can add a pop of color.
Trust me, presentation matters. It turns a simple treat into a feast! So, grab your favorite serving platter and let the mochi shine; you won’t regret it.
Storage & Reheating Guide
Once you’ve indulged in that delightful batch of milk mochi, you’ll want to make sure it stays fresh and tasty for as long as possible.
I usually pop them into an airtight container and store them in the fridge. They’ll last about 3-5 days that way.
Do you need a sweet snack? Just take one out, but don’t forget to dust off any excess kinako first.
When I’m ready to enjoy them again, I simply let them sit at room temperature for 15 minutes.
If I’m feeling a bit fancy, I steam them for a couple of minutes until soft and warm.
Don’t microwave them unless you want a chewy brick—trust me on that one. Remember, a quality mochi making machine can significantly enhance your homemade mochi experience.
Final Thoughts
As I wrap up this milk mochi adventure, I can’t help but think about how these little bites of heaven really do hit the spot.
I mean, who doesn’t love a chewy, sweet treat? They’re fun to make, too. Yes, I may have dropped a few pieces on the floor during cutting, but hey, that’s part of the journey.
Plus, the kinako coating—such a game changer! I still can’t believe how well it complements that creamy texture.
So, whether you’re enjoying these mochi by yourself or sharing with friends, remember: they’re meant for savoring.
Give it a try, and trust me, you’ll end up wanting to make a second batch before the first one’s gone.
Happy cooking!