I’ve got to admit, the creamy mango mousse has quickly become one of my go-to desserts. It’s light but indulgent, and every bite takes me straight to a sun-soaked beach, even if I’m just lounging at home. Have you ever tried working with ripe mangoes? They can be a slippery little challenge, but they’re oh-so-rewarding. Let me walk you through how to whip up this delightful treat, and trust me, you won’t want to miss the best part at the end.
Why You’ll Love This Recipe
When it comes to desserts, there’s something magical about a light, airy mousse that just makes my heart flutter.
And oh, this mango mousse is no exception. The way it melts in your mouth, balancing sweetness with a hint of tropical goodness, just takes me straight to the beach.
Plus, it’s surprisingly easy to whip up. You just blend ripe mangoes, fold them into whipped cream, and voilà—dessert is ready.
And the best part? You can customize it with toppings like nuts or chocolate, making it feel fancy without the fuss.
Seriously, can you think of a better way to impress guests? Or, you know, just treat yourself. I can’t resist sneaking a spoonful while no one’s looking.
Equipment List
To whip up a dreamy mango mousse, you don’t need a whole kitchen full of gadgets. Honestly, you just need a blender and a mixing bowl. The blender does the heavy lifting, turning those luscious mangoes into a silky puree.
A good mixing bowl isn’t just practical; it’s perfect for folding in that airy whipped cream. You’ll also want a whisk—handheld or electric, your choice. If you’re fancy, grab some serving glasses for a beautiful presentation. I sometimes use mason jars because, let’s face it, they’re adorable.
Finally, don’t forget a spatula to scrape every last bit of that mango goodness. Who wants leftovers stuck to the bowl? Not me. An alternative to blending could also be using a mortar and pestle to create a unique texture in your dessert, which allows you to explore the art of using one. Now, let’s get cooking!
Our Ingredients
To make that delightful mango mousse from our recipe, let’s gather some simple ingredients. You’ll be amazed at how just a few fresh items can transform into such a creamy and satisfying dessert.
This isn’t just about throwing things together; it’s about creating a little magic in your kitchen. So, gear up to start this tropical journey, and let’s jump into what you need to get started.
- 2 ripe mangoes (or 1.5 cups chopped)
- ½ cup light or whipping cream (25–35% fat)
- 1–2 tablespoons raw sugar or honey (optional)
- Optional garnishes: chopped mangoes, nuts, mint, or chocolate
Now, let’s talk about the stars of the show: those mangoes. Picking ripe ones is essential. I mean, you don’t want to end up with a mousse that tastes like a sour memory, do you?
Sweet, juicy mangoes will be your best friends here. And as for the cream, a good quality light whipping cream will help create that airy, fluffy texture we all love in a mousse.
But, if you’re feeling adventurous or want to cut back on the sweetness, go ahead and skip the sugar or honey. Remember, cooking is all about balancing flavors.
Step-by-Step Instructions

Making your own delicious mango mousse isn’t only easy but also super rewarding. Ready to impress your taste buds? Let’s explore these simple steps that will lead you to a light, creamy, and absolutely delightful dessert.
- Blend the Mangoes: Start with 2 ripe mangoes, or if you’re short on time, about 1.5 cups of chopped mango flesh. Peel and chop the mangoes into pieces, then toss them into your blender. Blend until you have a smooth, vibrant mango puree. If you’re craving a bit of extra sweetness, now’s the time to add 1–2 tablespoons of raw sugar or honey. Just a little hint of sugar can make a big difference, but trust your palate.
- Whip the Cream: Grab ½ cup of light or whipping cream, and pour it into a mixing bowl. Using an electric mixer or a whisk (if you’re feeling like a workout), whip the cream until soft peaks form. That means it should hold its shape but still be super light and fluffy. Watch it carefully—over-whipping can turn your cream into butter, and we definitely don’t want that.
- Fold It Together: Take the lovely mango puree you blended earlier and gently fold it into the whipped cream. Use a spatula or a wooden spoon, and fold carefully to mix them without deflating all that airy goodness. This part is essential, as you want the mousse to be airy and light, so go easy on the mixing.
- Spoon into Glasses: Once your mango and cream mixture is beautifully combined, it’s time to spoon this dreamy concoction into serving glasses. You can use small jars, wine glasses, or whatever you have handy. Make it pretty—after all, we eat with our eyes first!
- Chill Your Mousse: Now, pop those glasses into the fridge and let them chill for 1–2 hours. This waiting game is tough, but every minute spent chilling makes your mousse even silkier and more invigorating.
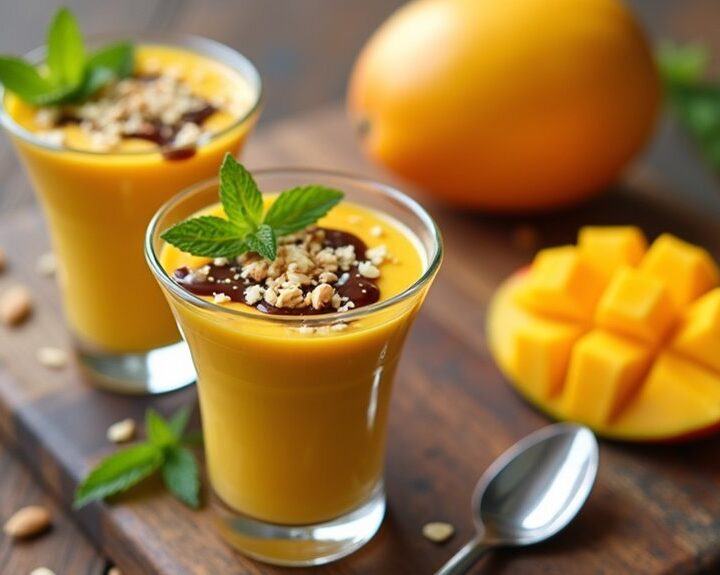
- Garnish and Serve: When you’re ready to enjoy, take your mango mousse out of the fridge. It’s time for the fun part! Garnish with whatever tickles your fancy—more chopped mango, a sprinkle of nuts for crunch, fresh mint leaves for a pop of color, or even a drizzle of chocolate if you’re in the mood for extravagance. Serve it cold, and watch the smiles materialize.
And there you have it! Your mango mousse is ready to delight. Just remember, if it doesn’t look Instagram-worthy at first, it’s just practice for your next culinary masterpiece. Who knew making a dessert could be this fun? Enjoy every spoonful.
Tips & Variations
While you might think this mousse recipe is perfect just as it is, there’s a whole world of tips and variations waiting to be explored.
For starters, if you’re like me and have a soft spot for sweetness, try adding a hint of vanilla extract for that extra kick. Not a mango fan? Substitute with ripe peaches or strawberries. I’ve even thrown in a splash of coconut milk for a tropical twist, and wow, it’s heavenly.
Don’t forget, ensuring your mangoes are ripe is essential; trust me, no one wants a stomach ache.
And if you accidentally over-whip the cream, embrace your inner “mousse monster” and stir it back in carefully. The texture still matters, right?
How to Serve?
Serving this creamy mango mousse is where the fun really begins. I love using cute little glasses; they make everything feel special. Just imagine a layer of bright orange mousse topped with a sprinkle of chopped mangoes or maybe some crushed nuts for a little crunch.
Oh, and a sprig of mint? You’d think I’m a fancy chef.
When I serve this dessert, I always remind my friends to dig in right away — it’s best cold. Sometimes, I even joke that letting it sit too long might cause it to “feel neglected.”
And trust me, no one wants sad mousse. So, whether it’s a dinner party or a quiet night, this mousse always saves the day and quickly becomes the star.
Storage & Reheating Guide
Even though it’s hard to resist diving into that creamy mango mousse right away, knowing how to store it properly makes all the difference when it comes to enjoying leftovers.
I usually pop mine in the fridge as soon as I can, making sure it’s covered tightly with plastic wrap or in a sealed container. It’ll last about 3 to 4 days, but honestly, it never lasts that long at my house.
If you find yourself with extra mousse, don’t fret about reheating—just serve it cold right from the fridge. Trust me, the flavor stays just as delightful. In fact, using premium kitchen appliances can enhance your cooking experience and help you make delicious desserts like this one.
I’ve tried it once warmed by accident, and … let’s just say, it wasn’t my finest culinary moment. Enjoying it chilled is the way to go.
Final Thoughts
Storing your mango mousse might seem like a minor detail, but trust me, it sets the stage for the grand finale of your dessert experience.
After all, who wants a flat, sad mousse? Not me. So, here’s my advice: keep it covered in the fridge, and it’ll stay luscious for 3 to 4 days.
I’ve been there, forgetting about my treats, only to find a sad little bowl lurking in the back. Don’t let that happen to you.
When you’re ready to indulge, just scoop it out, garnish with some fresh mango or nuts, and voilà! You’ve got a dish that feels fancy without the fuss.
Enjoy every creamy, dreamy bite, and remember: you totally deserve this delicious treat!