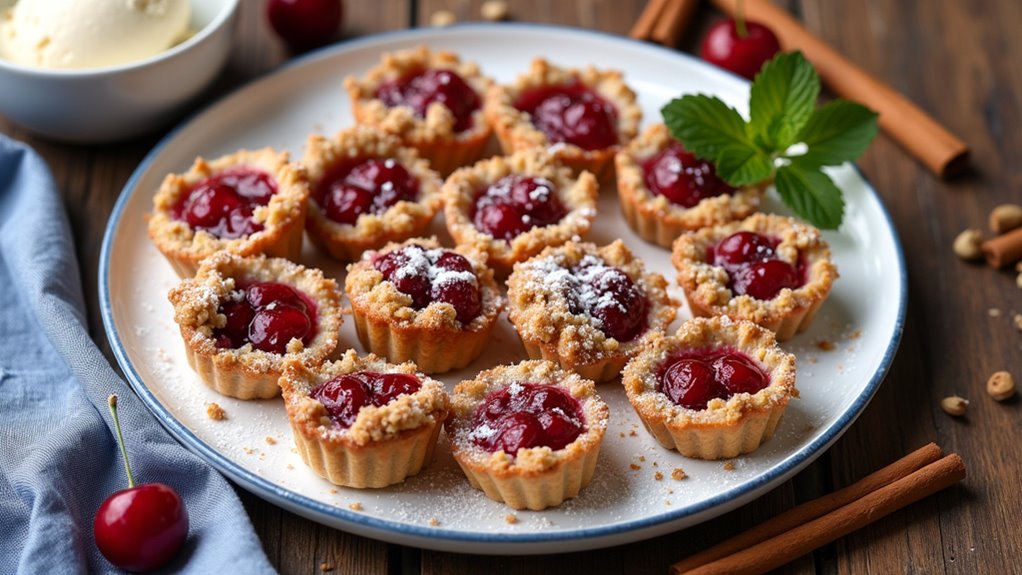
I can’t tell you how much I love making Cherry Pie Bites. Seriously, they’re like little pockets of happiness that bring everyone around me together. Imagine this: a buttery streusel topping, sweet cherry filling—what’s not to love? I still remember the first time I made them, flour everywhere, half the cherries on the floor—classic me. But the joy on my friends’ faces made it all worthwhile. Curious about how to whip these up?
Why You’ll Love This Recipe
If you’ve ever dreamed of having cherry pie but find yourself too busy (or too afraid of making a full pie from scratch), then these Cherry Pie Bites are about to change your life.
Seriously, these little gems deliver all the cherry deliciousness without the fuss. They’re perfect for when you want something sweet but don’t want to spend hours in the kitchen—thank you, refrigerated pie crusts.
You’ll love how the buttery streusel topping contrasts with the juicy cherry filling. Plus, they’re bite-sized, so you can indulge guilt-free, right?
They’re great for parties, or just for treating yourself on a cozy night in. Trust me, one bite, and you’ll be hooked. Just don’t blame me if you can’t stop at one.
Equipment List
When it comes to making Cherry Pie Bites, having the right tools can make all the difference in your kitchen adventure. You’ll need a mini muffin tin—you know, the one that’s usually hidden in the back of your cabinet? Trust me, it’s worth pulling out.
A rolling pin will be handy for flattening that pie crust, and a circle cutter guarantees uniformity, which I totally need because my circles never turn out perfect. A saucepan for cooking the cherry filling is essential, and don’t forget mixing bowls for all those ingredients.
Finally, grab a spatula for filling those tiny tarts. Additionally, a measuring spoon set is vital for accurately measuring out your ingredients, ensuring your cherry filling is perfectly sweetened. With the right tools, you’ll feel like a pro, even if it’s just you and your pajamas baking away on a Sunday afternoon.
Our Ingredients
When it comes to whipping up a batch of Cherry Pie Bites, the ingredients aren’t just your standard pantry staples; they play a big role in creating that delightful bite-sized dessert. You might be surprised at how few ingredients you actually need for such deliciousness.
And yes, while it feels a bit indulgent to be sinking into the warm goodness of cherry pie, it’s totally okay because, hey, everything in moderation, right? Plus, who can resist those little bites of joy?
Here’s what you’ll need to gather:
- 3 Tbsp light brown sugar
- 3 Tbsp all-purpose flour
- 1/4 tsp cinnamon
- 1/8 tsp salt
- 3 Tbsp pecans, finely chopped
- 2 Tbsp unsalted butter, melted
- 1 package Pillsbury refrigerated pie crusts (14.1 oz)
- 3 cups pitted cherries
- 1/2 cup granulated sugar
- 2 Tbsp cornstarch
- 2 tsp lemon juice
- 1/2 tsp vanilla extract
Now, let’s chat a bit about these ingredients. First off, the choice of cherries is essential. You can opt for fresh or frozen cherries, but I’ll tell you from experience—the flavor of fresh cherries is hard to beat.
When you’re picking the cherries, make sure they’re sweet and plump to really pack that punch of flavor into your cherry pie bites.
Also, a little sprinkle of cinnamon in that streusel topping adds a comforting warmth, which is just perfect for those cozy nights on the couch.
And remember, the pecans in the topping might make you feel a bit fancy; it elevates the texture and gives a delightful crunch. Just be careful not to eat all the nuts before they make it to the pie—trust me, been there, done that!
Step-by-Step Instructions
Making Cherry Pie Bites is a delightful adventure that combines the sweet-tart flavor of cherries with the comforting crunch of a streusel topping. It’s surprisingly simple to whip up these mini treats, perfect for impressing friends or just indulging yourself after a long day. Just follow these easy steps, and you’ll have a batch of mouth-watering cherry pie bites in no time.
1. Preheat the Oven: Begin by preheating your oven to 325°F. While that heats up, get your mini muffin tin and spray it lightly with non-stick cooking spray. Because let’s be honest, no one likes a stuck pie bite!
2. Prepare the Pie Crusts****: Unroll the package of Pillsbury refrigerated pie crusts (14.1 oz), and using a 2.5-inch cookie cutter or a cup, cut out some circles. Press each circle gently into the muffin tin, making little cups.
Pop these into the fridge to chill while you work on the filling—this prevents the crust from shrinking during baking.
3. Cook the Cherry Filling**: In a medium saucepan over medium heat, toss in the 3 cups of pitted cherries along with 1/2 cup of granulated sugar, 2 tablespoons of cornstarch, and 2 teaspoons of lemon juice**. Stir everything together and let it cook until it thickens.
This should take about 5–7 minutes. Don’t forget to stir occasionally—no one likes burnt cherries. Once thickened, remove from heat and add 1/2 teaspoon of vanilla extract for that beautiful aroma.
4. Fill the Crusts: Take your chilled pie crust cups out of the refrigerator and fill them with the cherry mixture, leaving a little room at the top because they might bubble over while baking.
This is the moment you realize just how good these will taste.
5. Make the Streusel Topping: In a small bowl, mix together 3 tablespoons of light brown sugar, 3 tablespoons of all-purpose flour, 1/4 teaspoon of cinnamon, 1/8 teaspoon of salt, and 3 tablespoons of finely chopped pecans for some nutty goodness.
Drizzle in 2 tablespoons of melted unsalted butter and mix it until crumbly. The mixture should look a bit like sand—yum.
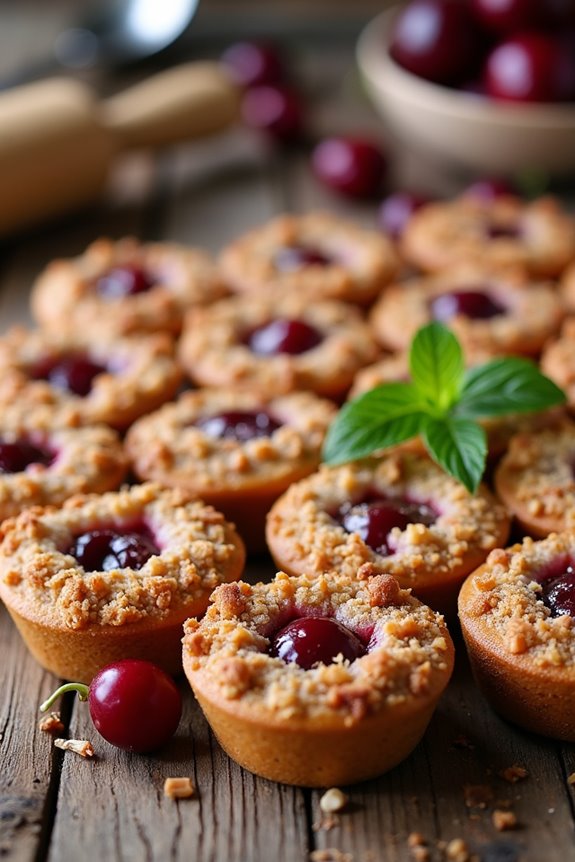
6. Top and Bake****: Sprinkle the streusel topping generously over each filled crust. Slide the muffin tin into your preheated oven and bake for about 20–25 minutes.
You want them to be golden brown—think of how gorgeous they’ll look when you pull them out!
7. Cool and Enjoy: Once baked, let your cherry pie bites cool for a few minutes in the tin before transferring them to a wire rack.
Trust me, the temptation to snack on them right away will be real, but a little cooling does wonders.
Additionally, using essential seafood cooking gear can enhance your culinary adventures, ensuring that your efforts in the kitchen are equally successful, whether you’re baking desserts or cooking seafood.
And there you have it—bite-sized pieces of cherry bliss that you can feel good about indulging in! These Cherry Pie Bites aren’t just desserts; they’re proof that you can create something truly special without spending all day in the kitchen.
Tips & Variations
You’ve whipped up those delicious cherry pie bites, and now you’ve got a lot of room to play around with flavors and textures. If you want to switch things up, consider adding a splash of almond extract for a nutty twist.
And hey, if cherries aren’t your jam, feel free to swap them for blueberries or peaches; I promise, it’ll be just as heavenly.
Don’t forget to chill those pie crusts before filling them; it really helps with shrinkage—trust me, I learned that the hard way.
Want a crunch? Top your bites with a sprinkle of coconut or even crumbled cookies for extra flair.
There’s no right or wrong here; it’s all about what makes your sweet tooth sing. Enjoy experimenting!
How to Serve?
Serving these cherry pie bites is where the fun really begins. Envision this: I take them out of the oven, golden and bubbly, and I can’t help but feel giddy.
Placing them on a colorful platter adds a pop of joy. Got friends over? I like to let everyone grab their own—it’s like a mini dessert buffet. A dollop of whipped cream on top makes them even better.
And if I’m feeling indulgent, a sprinkle of powdered sugar is a game changer, seriously. Watching my friends’ faces light up as they take that first bite? Priceless.
Don’t forget, one bite mightn’t be enough—so set out a few extras. Trust me, no one’s going to mind a little cherry pie overload.
Storage & Reheating Guide
Even though I’d love to say these cherry pie bites last forever, the truth is they won’t. If you’ve managed to have leftovers—what a feat!—stick them in an airtight container. They’ll be good in the fridge for about 3-5 days.
For longer storage, toss them in the freezer; they’ll hang out there for up to three months. Just make sure to wrap ‘em tightly, or they might end up with freezer burn.
When you’re ready to enjoy, heat the bites in the oven at 350°F for about 10-15 minutes until they’re warm.
Microwaving? Try 30 seconds, but don’t blame me if they get a bit mushy. No one wants sad cherry bites, right? To maximize freshness, keep them in airtight food storage solutions that prevent air exposure.
Final Thoughts
Although making these cherry pie bites might seem a little fussy at first, I promise it’s worth every bit of effort. When you finally pull them out of the oven, golden brown and smelling like heaven, you’ll know what I mean. The first bite? Pure bliss. Plus, they’re perfect for sharing—or hiding from family, if you’re feeling selfish. Trust me, I’ve been there. Remember to chill the crust before filling to keep it from shrinking; it’ll save you from some baking drama. And don’t stress if your filling oozes out a bit. That just means more yummy goodness. So, gather those ingredients, roll up your sleeves, and let’s make some sweet memories together. You got this!