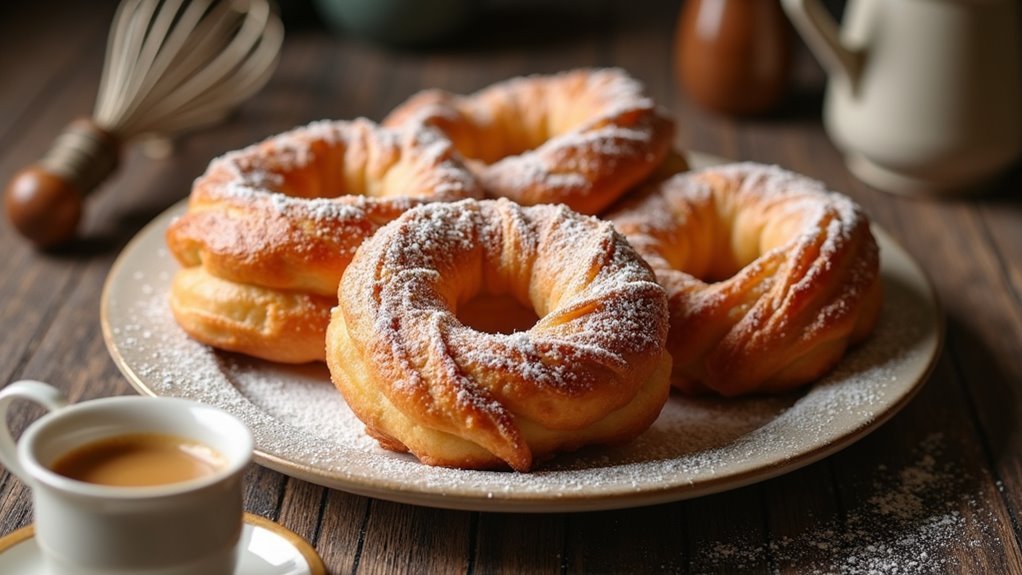
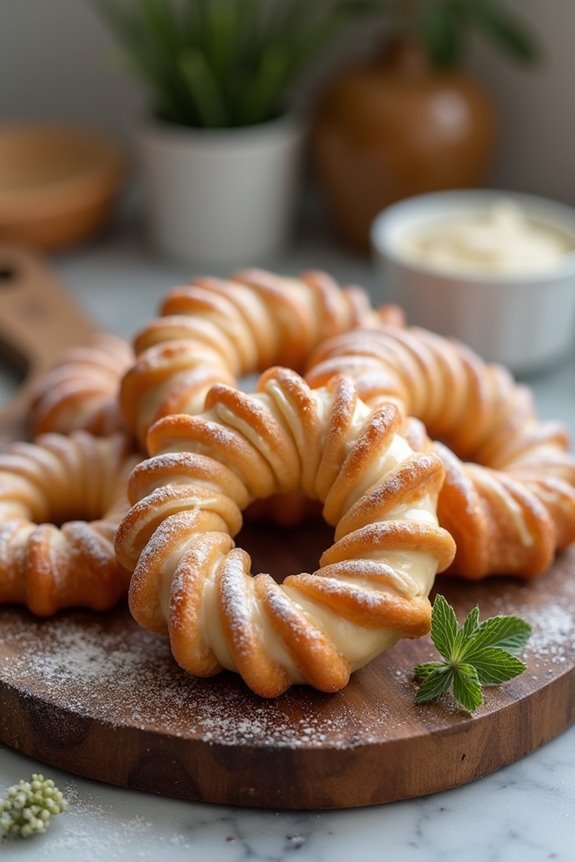
I’ve been craving something light and airy, and French crullers definitely fit the bill. These little doughnuts are so magical, with their fluffy texture and the sweet glaze that makes my taste buds sing. But let’s be real, the frying part can be a bit intimidating—burnt crullers could easily happen if you’re not careful. Ever had that? Yeah, me too. But trust me, once you get the hang of it, you’ll feel like a pastry pro. Curious about how to whip these up?
Why You’ll Love This Recipe
Have you ever wondered why some treats just hit the spot like nothing else? I definitely have, and I think it’s French crullers.
These little doughnuts are light, airy, and utterly divine. Honestly, once you bite into that perfectly glazed cruller, it’s like a little bite of heaven.
I love how the recipe is surprisingly simple, yet the result feels fancy. You boil milk and butter, mix in flour, then add eggs like you’re baking magic. It’s a bit of a juggling act, but totally worth it.
And let’s not forget the glorious glaze—a sweet finish that’s just so satisfying.
Equipment List
To whip up some delectable French crullers, you’ll need a few key pieces of equipment that make the process easier and a bit more fun.
First, grab a large saucepan for boiling those yummy ingredients. You can’t forget a mixing bowl for all that dough. A sturdy wooden spoon will really help when you’re stirring away, developing those gluten chains.
A star piping tip is a must for that classic cruller look, and you’ll definitely want a piping bag or a Ziplock with a corner snipped off.
Finally, a deep fryer or a heavy pot is essential for frying. Trust me, I’ve had my share of “oops” moments, so a thermometer for oil temperature is your best friend! Additionally, using a professional kitchen torch can elevate your crullers by adding a beautiful caramelized finish.
Our Ingredients
Making French crullers is like starting on a delightful culinary adventure! With just the right ingredients and a sprinkle of patience, you can create light, airy donuts that are perfectly glazed. Who doesn’t love the idea of biting into a crispy exterior that gives way to a fluffy center?
Trust me, these crullers will have you wondering why you ever thought about buying donuts from the store. Let’s gather everything we need to get started on this tasty journey.
Here’s what you’ll need:
- 1 cup milk
- ½ cup water
- ½ cup unsalted butter
- 2 teaspoons sugar
- 1 teaspoon salt
- 1 cup all-purpose flour
- 4 large eggs
- Vegetable oil (for frying)
- Powdered sugar and hot water (for glaze)
When it comes to ingredients, freshness is key! For example, make certain your eggs are fresh because they’ll lift your dough. The butter? Go for unsalted; that way, you can control the saltiness just right.
And speaking of control, keep an eye on your flour—too much can make your dough dense instead of light and airy. Remember, cooking is all about balance and a bit of experimentation. So, don’t be afraid to have fun with it!
If you go for a flavored glaze—maybe adding a hint of vanilla or some citrus zest—just make sure it complements the subtle flavor of the crullers. Happy cruller-making!
Step-by-Step Instructions
Making French crullers is an enchanting experience—every step brings you closer to fluffy, golden delights that can rival any bakery treat. Mixing the batter is quick and simple—just follow these easy steps, and you’ll have people raving about your crullers in no time.
- Boil the Mixture: Start by pouring 1 cup of milk, ½ cup of water, and ½ cup of unsalted butter into a saucepan. Toss in 2 teaspoons of sugar and 1 teaspoon of salt. Bring this mixture to a rolling boil over medium heat. Keep your eyes on it—no one likes a messy stovetop.
- Make the Dough: Once boiling, remove the saucepan from the heat and stir in 1 cup of all-purpose flour all at once. Mix it vigorously until a smooth dough forms. You want it to pull away from the sides of the pan easily and form a ball. It should look like it’s ready for a fabulous doughnut transformation.
- Cook the Dough: Place the saucepan back on the heat. Stir the dough continuously for about 2 minutes. This helps evaporate some moisture and gives your crullers that perfect fluffy texture. When the dough pulls away easily, it’s time to take it off the heat again.
- Add the Eggs: Let the dough cool slightly—no one wants scrambled eggs in their crullers. Once it’s cool enough, beat in 4 large eggs, one at a time. Make sure each egg is fully incorporated before adding the next. Your dough should be smooth and glossy by the end; think of it as a lovely, creamy pastry that’s enthusiastic to be fried.
- Prep to Fry: Line a baking sheet with parchment paper and grab your piping bag fitted with a star tip. Pipe the dough into rings on the parchment, making them about 2-3 inches in diameter. Don’t worry if they aren’t perfect—crullers are forgiving and delicious no matter their shape.
- Heat the Oil: In a large pot, add vegetable oil for frying—about 3-4 inches deep is perfect. Heat the oil to 340-345°F. Use a thermometer if you have one! This step is essential to avoid any soggy or burnt disasters (we’ve all been there, haven’t we?).
- Fry the Crullers: Carefully slip the piped rings into the hot oil in batches. Fry each side for about 2 minutes, flipping when they turn golden brown. Keep an eye on them; you want that irresistible golden color without overcooking.
- Glaze Time: Once they’re out of the oil, let them cool slightly on a wire rack. Meanwhile, prepare your glaze by mixing powdered sugar with hot water until you reach a nice dipping consistency. You can dip the tops of the crullers into this sweet concoction for a delightful finish.
And there you have it! Your French crullers, exquisite in flavor and texture. Just remember to dress them up with that glaze, and then sit back while people shower you with compliments. You deserve every one of them for these lovely little treats. Happy cruller-making!
For optimal results, consider using premium baking tools to enhance your cruller-making experience.
Tips & Variations
One of the best parts of baking crullers is the chance to get creative. Have you ever thought about adding flavors? A splash of vanilla or a hint of almond extract can do wonders. I’ve even tried tossing in a bit of orange zest for an unexpected kick.
Don’t forget to play with your toppings too—glazing with chocolate or a sprinkle of cinnamon sugar can make you feel like a pastry chef.
Oh, and if you’re aiming for that classic cruller look, use a star piping tip; it’s a game-changer for those beautiful ridges.
Just be careful with your oil temperature—it can make or break your crullers. Trust me, I’ve learned the hard way with a few rather tragic batches.
How to Serve?
When it comes to serving French crullers, you have to admit, the presentation matters. I love placing these golden-brown beauties on a pretty platter—who doesn’t appreciate a little eye candy?
Dusting them with powdered sugar feels like giving them a makeover. Then, I arrange some fresh berries around them for a pop of color. And let’s be honest, it makes me look fancy, even if I’m still in my pajamas.
I usually serve them warm, with a side of coffee or hot chocolate—because why not? Sometimes, I even drizzle extra glaze on top for that “wow” factor.
After all, life’s too short for dull crullers. Trust me, your guests will be impressed and reaching for more.
Storage & Reheating Guide
Ah, the dilemma of storing leftover French crullers—why do they always seem to vanish before you even get to think about it?
But if you do have some lingering around, wrap them tightly in plastic wrap or store them in an airtight container to keep them fresh. I’ll be honest, they’re best enjoyed the same day, but I’ve kept them in the fridge for up to two days.
When it’s time to indulge again, reheat them in a toaster oven at 350°F for about 5 minutes. It brings back that crispiness.
Just don’t microwave them; trust me, you’ll end up with a soggy mess. And that’s no fun when you’re craving a delightful cruller. Consider using soup freezer containers for any leftover batter or components to ensure proper storage.
Final Thoughts
While I could go on and on about how amazing French crullers are, let’s face it—there’s just something magical about biting into one.
These little clouds of sweetness are the perfect treat for any occasion. Honestly, once you’ve mastered the art of making them, you’ll find it hard to resist frying up a batch whenever you’re in the kitchen.
Sure, they can be a bit tricky at first, but don’t worry. I’ve burned my fair share in the name of cruller love. Just remember to keep that oil hot and have fun with it.
Before you know it, you’ll be enjoying crullers with a cup of coffee, feeling like a true pastry chef.